First of all, find the shipping rates for your products from your chosen shipping provider, so you know how much you want to charge. There are various free online tools offered by shipping companies to get shipping quotes based on the size and weight of your parcel. Some examples are listed below;
Each vendor will set their own shipping rates. If the customer has multiple products from different vendors in their cart, then the shipping options for each vendor will be presented separately to the customer at checkout.
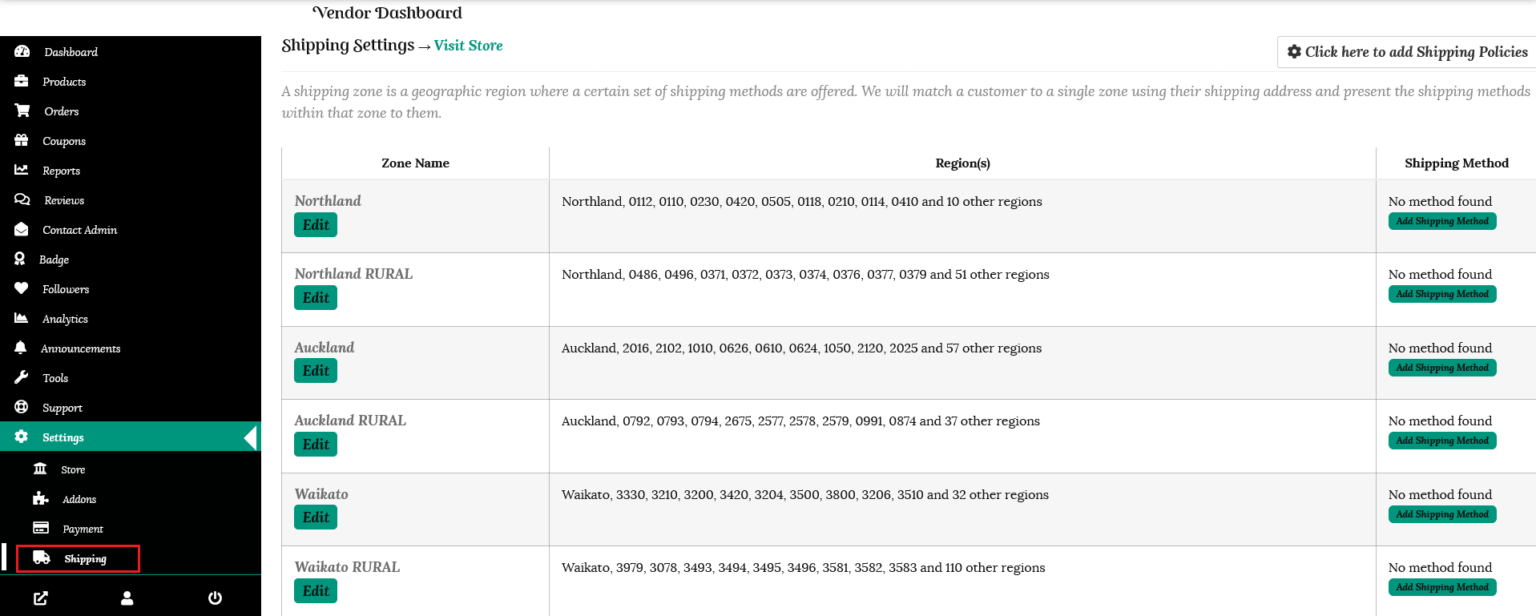
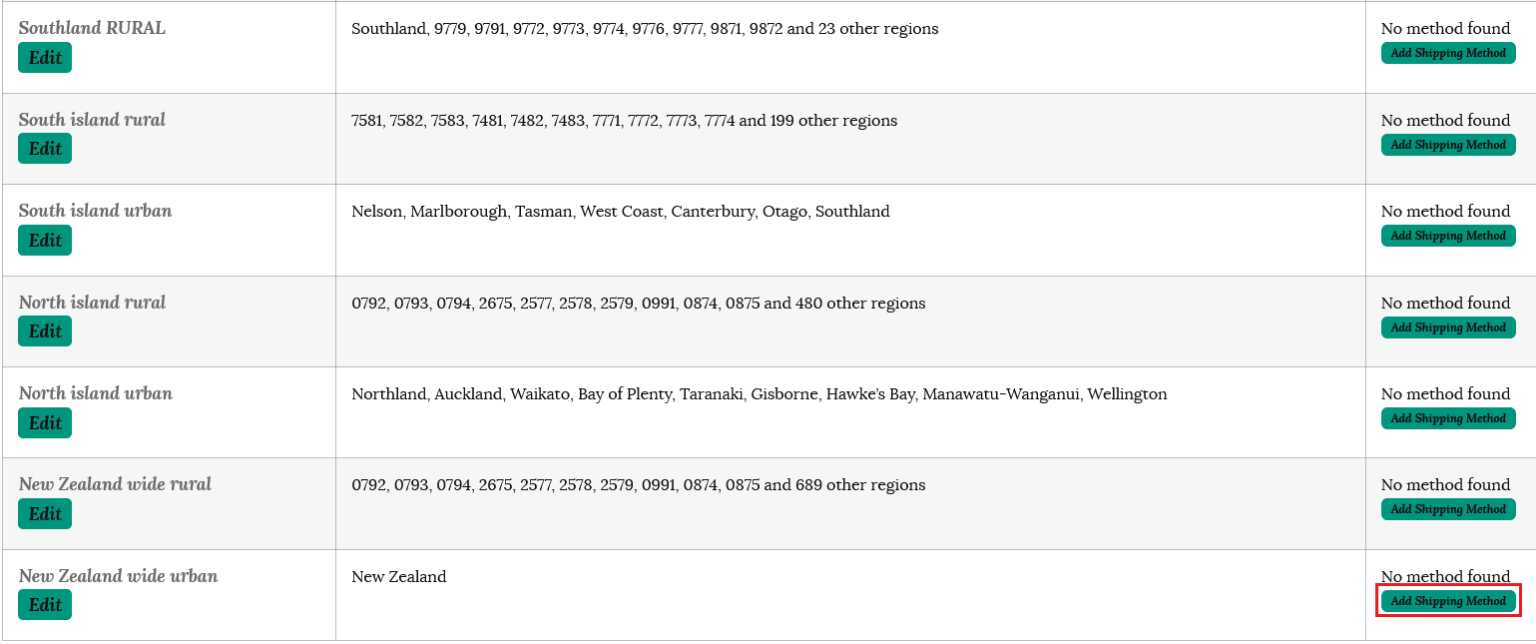
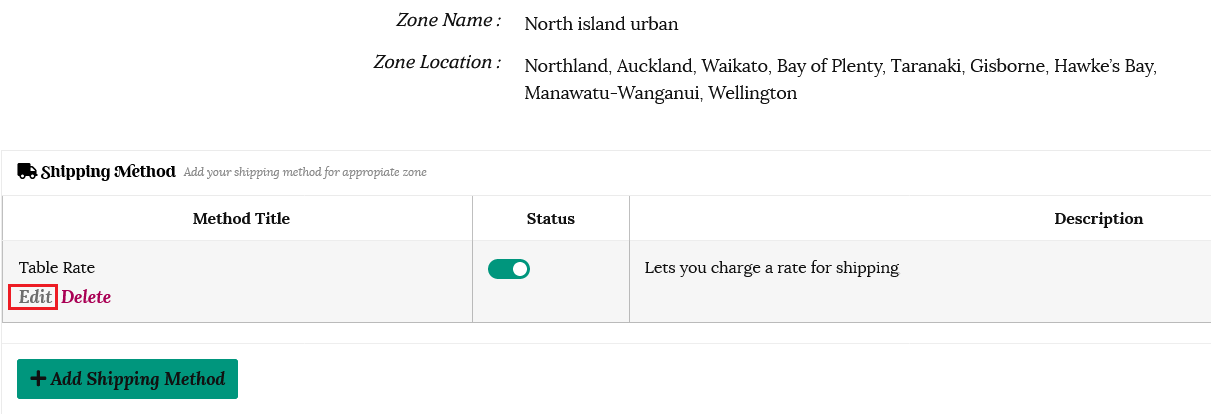
To configure the shipping costs for your store, go to the Settings tab in your dashboard and select “Shipping.” Here you will find the shipping zones for New Zealand listed.
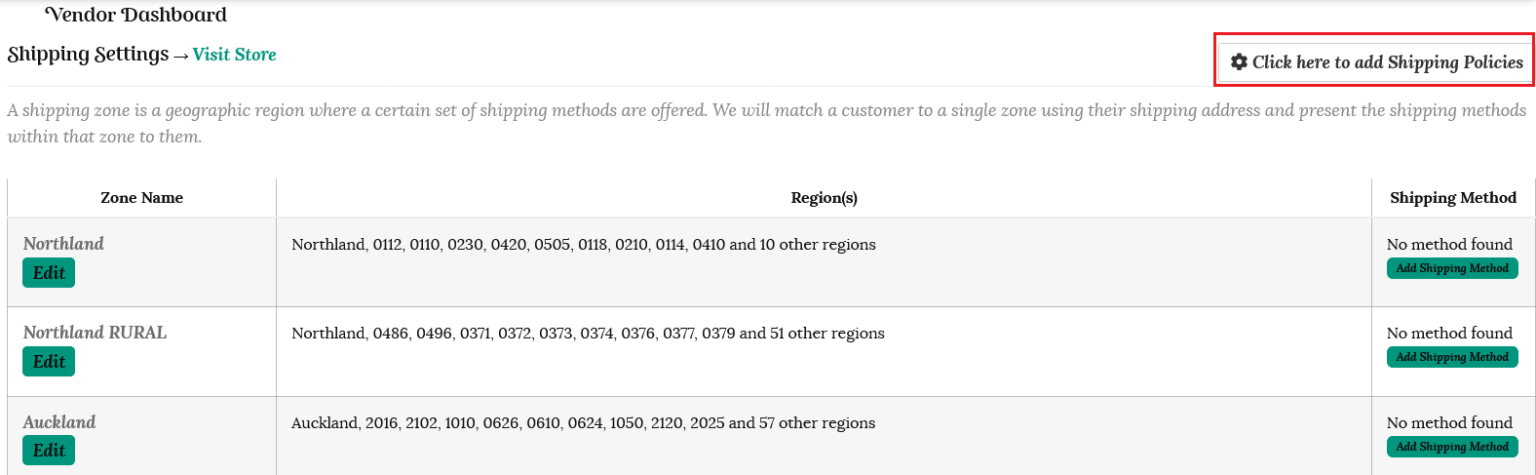
Shipping policies
Click the button on the top right to add your shipping policies.
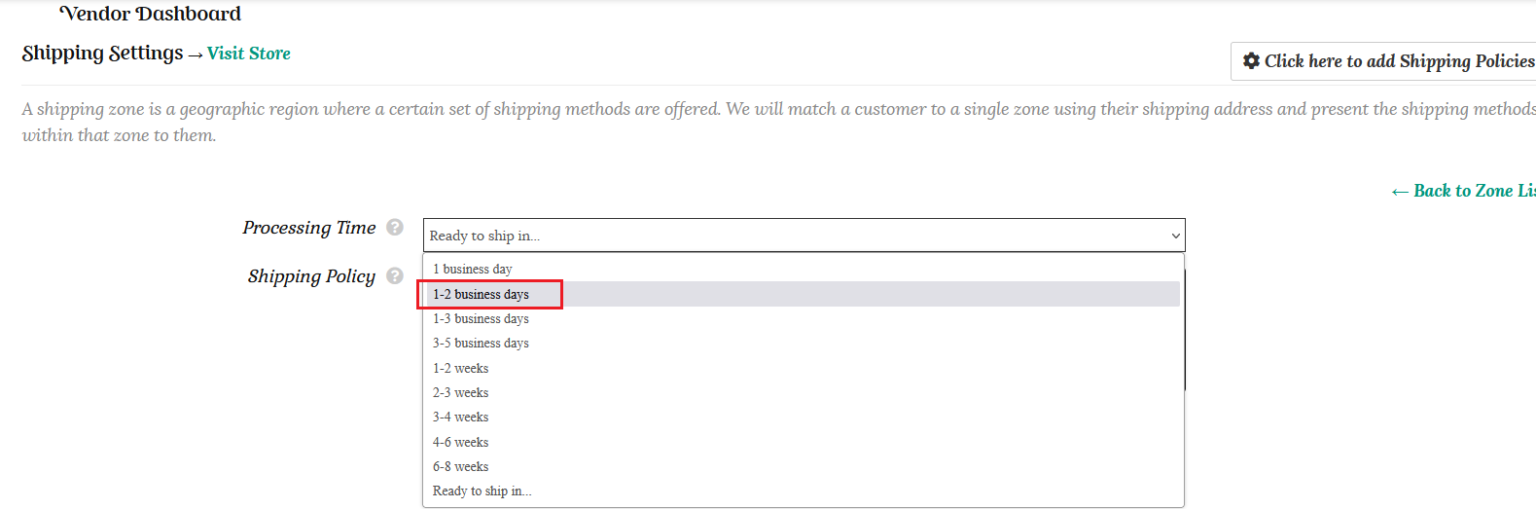
Unless you sell customised items, we expect that you will ship your items in 1 -2 business days, so select this option from the dropdown.
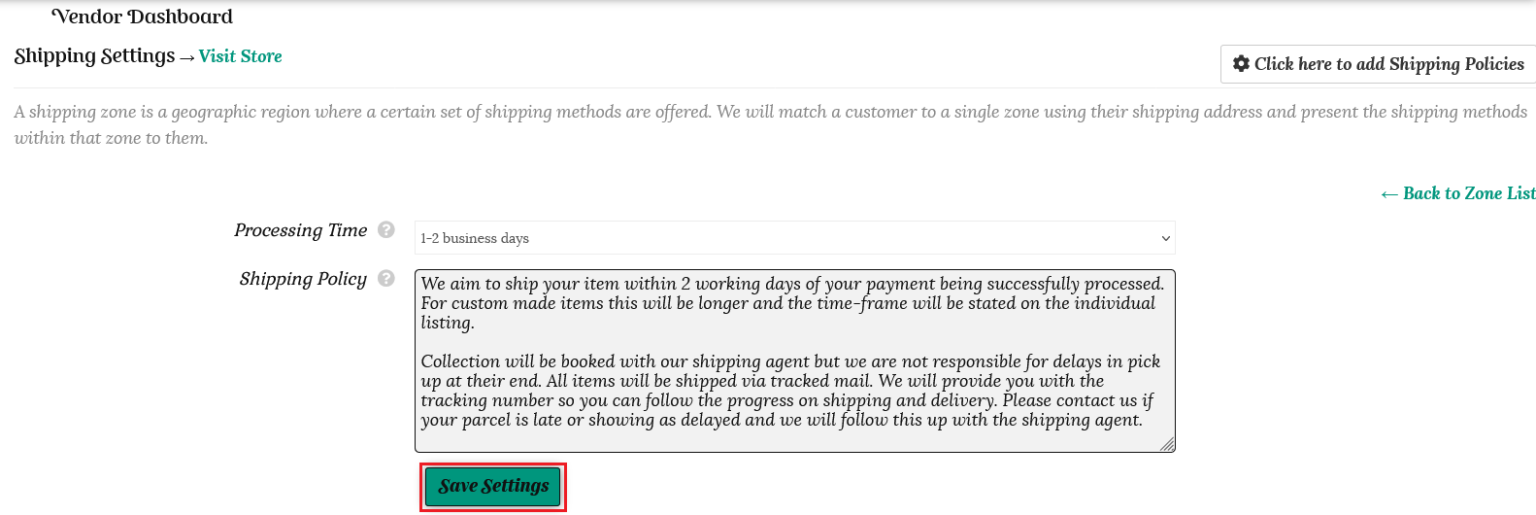
Fill out your store shipping policy in the box. You are welcome to use the template below and edit it to suit your store;
“We aim to ship your item within 1 – 2 working days of your payment being successfully processed. For custom made items this will be longer and the time-frame will be stated on the individual listing.
Collection will be booked with our shipping agent but we are not responsible for delays in pick up at their end. All items will be shipped via tracked mail. We will provide you with the tracking number so you can follow the progress on shipping and delivery. Please contact us if your parcel is late or showing as delayed and we will follow this up with the shipping agent.”
Make sure you click the “Save Settings” button once you have finished.
Shipping zones
A customer will be matched to a single zone using their shipping address and your shipping cost will be presented to them.
Postcodes are being updated constantly, so please let us know if we need to add a new postcode to the shipping zone list.
You can choose to set a fixed shipping cost for all of New Zealand, or break it down to North Island, South Island, or each shipping zone, both rural and urban.
The customer’s address will be matched to each individual zone first, down to the larger areas of grouped zones for New Zealand. So if you want to offer one cost for nationwide shipping then you only need to fill out your store shipping cost for New Zealand wide, urban and rural.
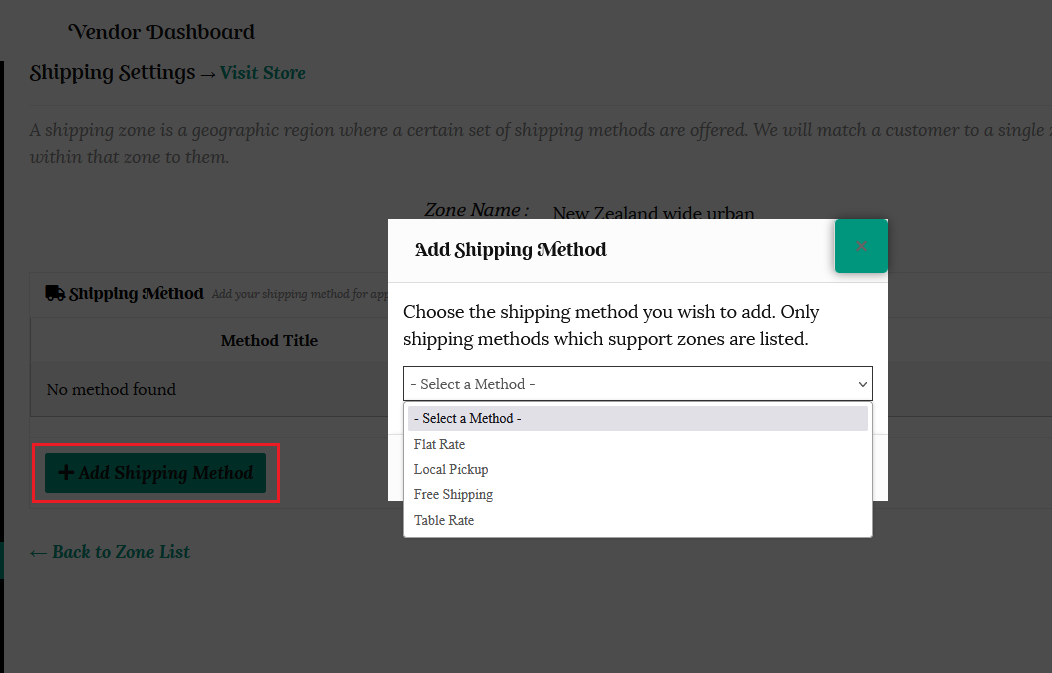
Choose your selected zone or group and click the “Add Shipping Method” button.
Once you click the +Add Shipping Method button, a popup box will appear listing the available shipping methods.
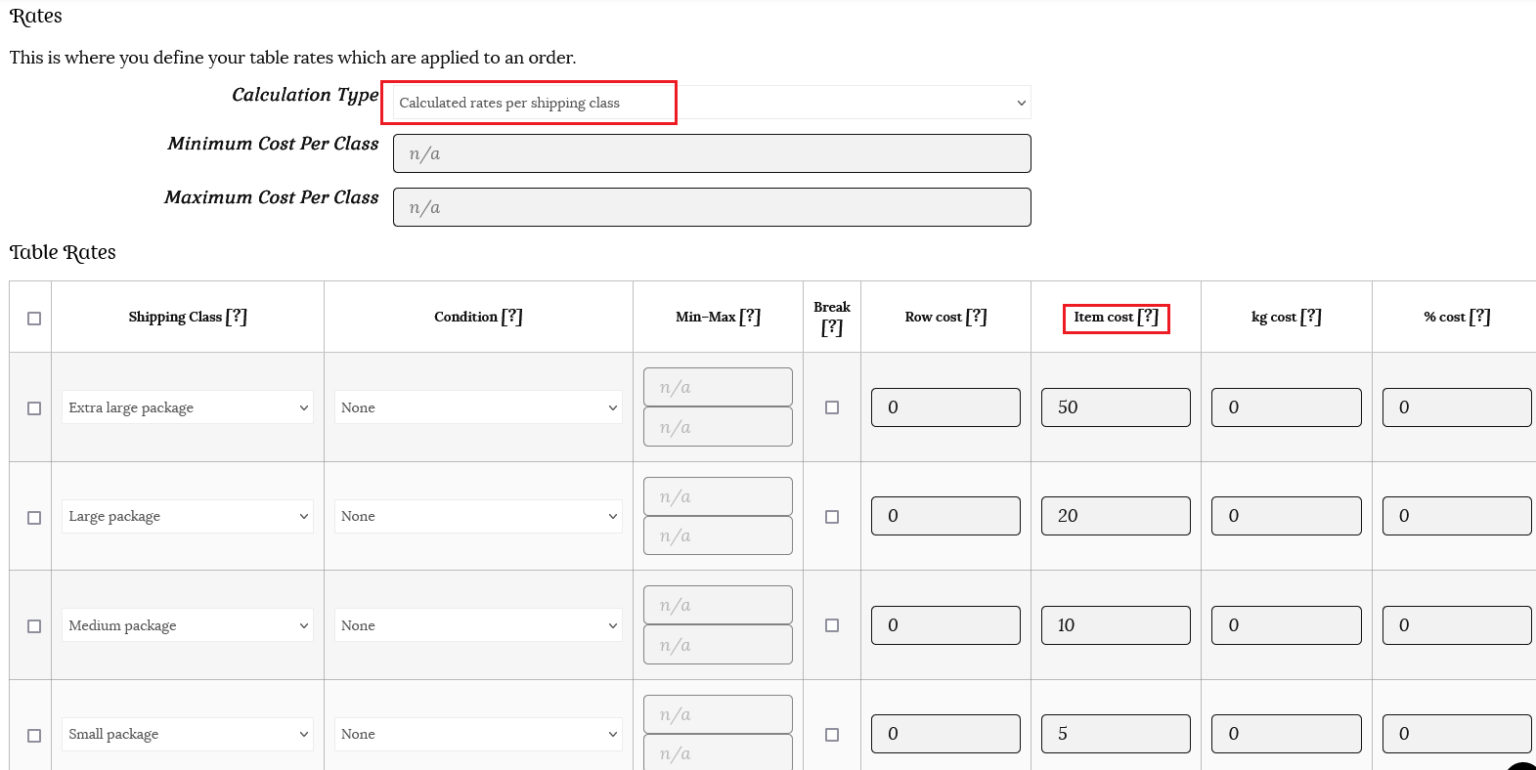
Flat rate shipping: allows you to define a standard rate per item, per shipping class, or per order.
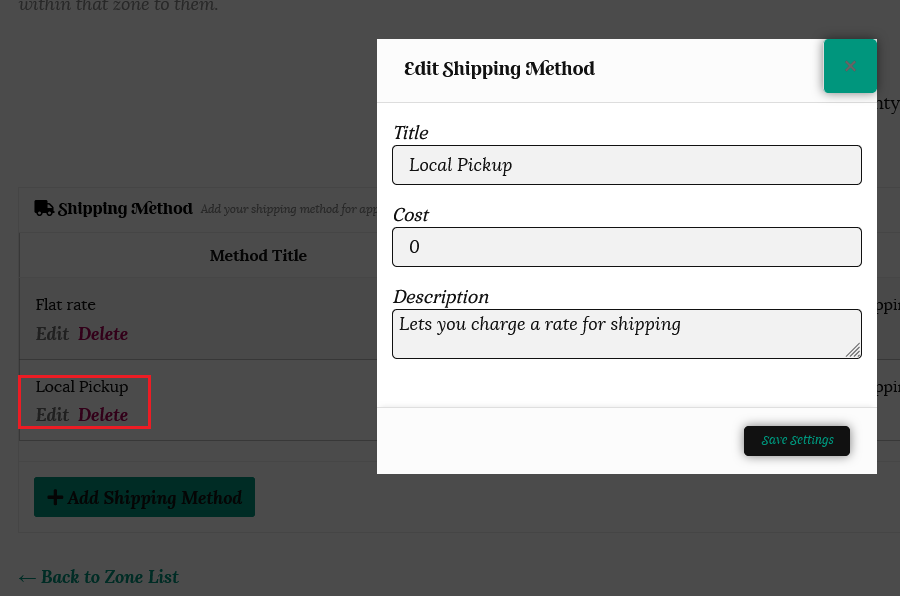
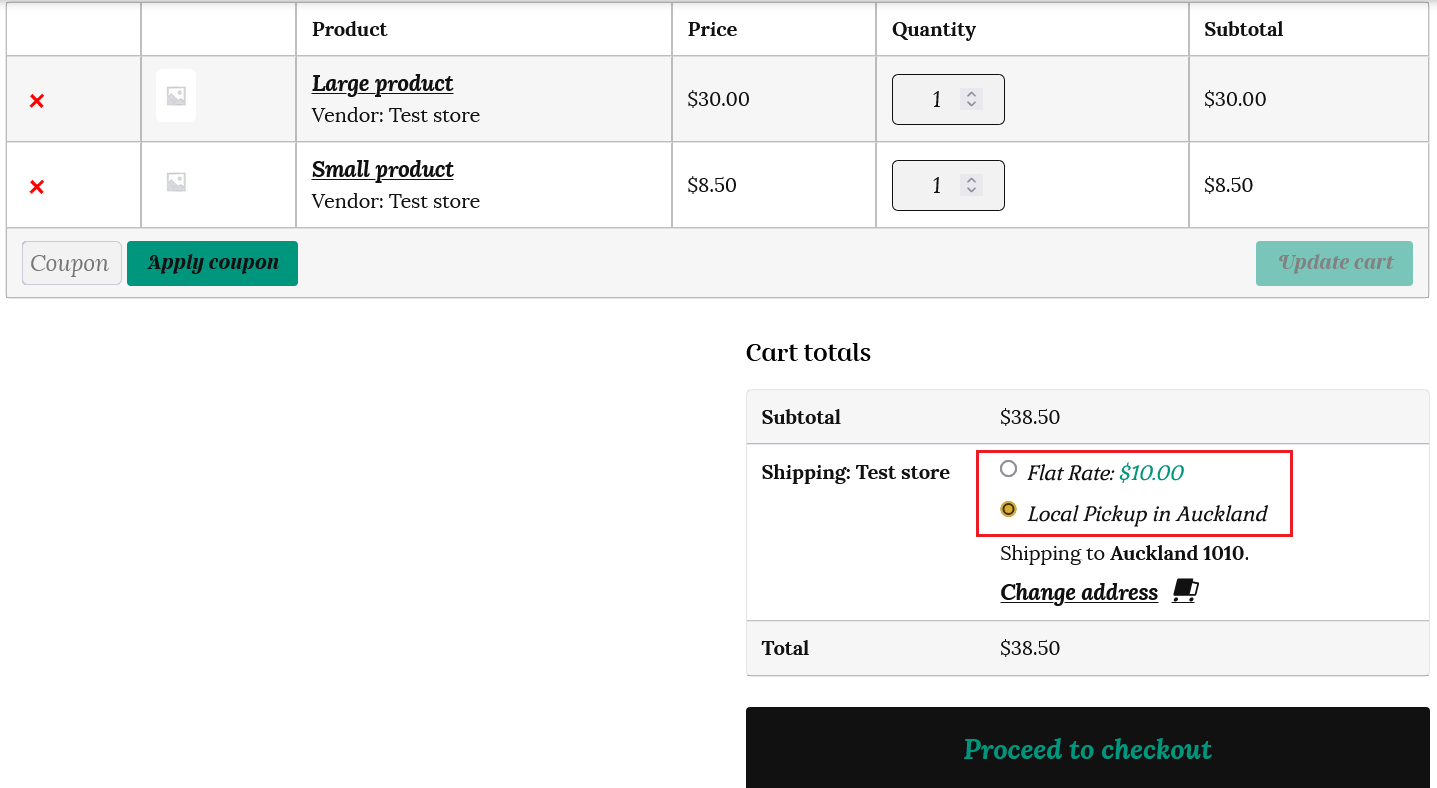
Local pickup can be selected if you would like to offer this option to customers. It will show as an option at checkout.
Free shipping can reduce the abandonment carts rate by 18% and increase average order value by 97%.
Table rate allows you to set rates for shipping when customers purchase multiple items from your store.
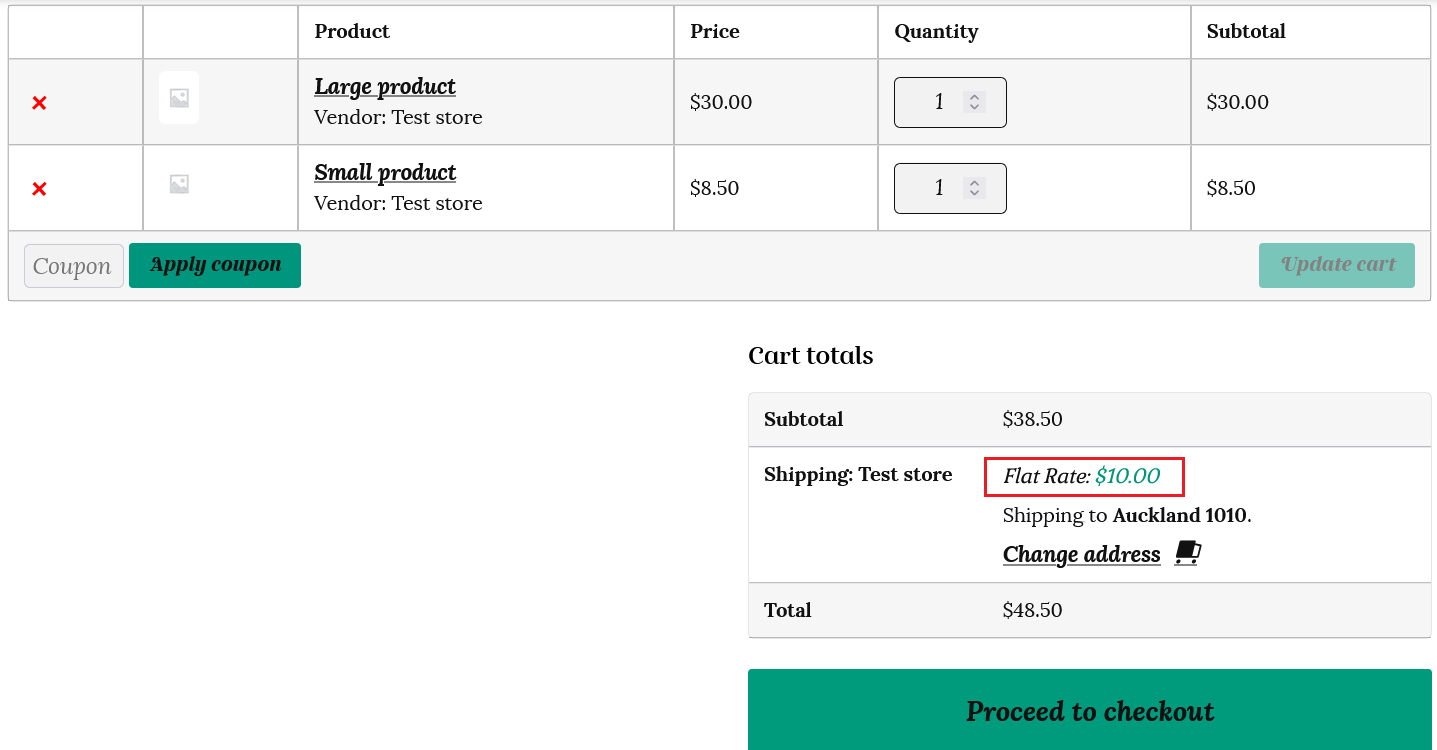
Flat Rate Shipping
Shipping fees remain one of the major factors that determine customer behavior when shopping online.
Shipping costs not only affect conversion but can also impact customer retention and purchase quantities.
As a store vendor, offering optimized shipping rates can benefit your business tremendously.
Flat rate shipping has proven to be the second most preferred after free shipping.
ECommerce statistics reveal that consumers do not like surprises at checkout. 28% of online shoppers abandon their carts due to unexpected shipping costs.
Offering flat rate shipping means your customers have a clear idea of the shipping fees upfront. Flat rate shipping is ideal if your store only has a few items so customers buying in bulk is not a shipping option that needs to be catered to.
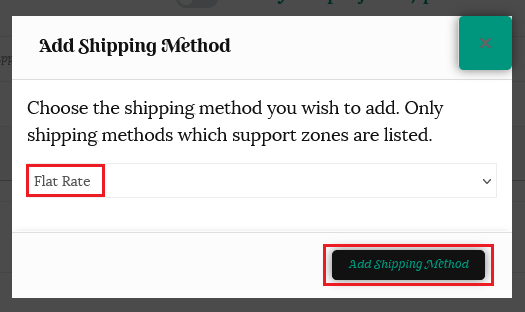
Select “Flat Rate” from the dropdown menu, then click the “Add Shipping Method” button.
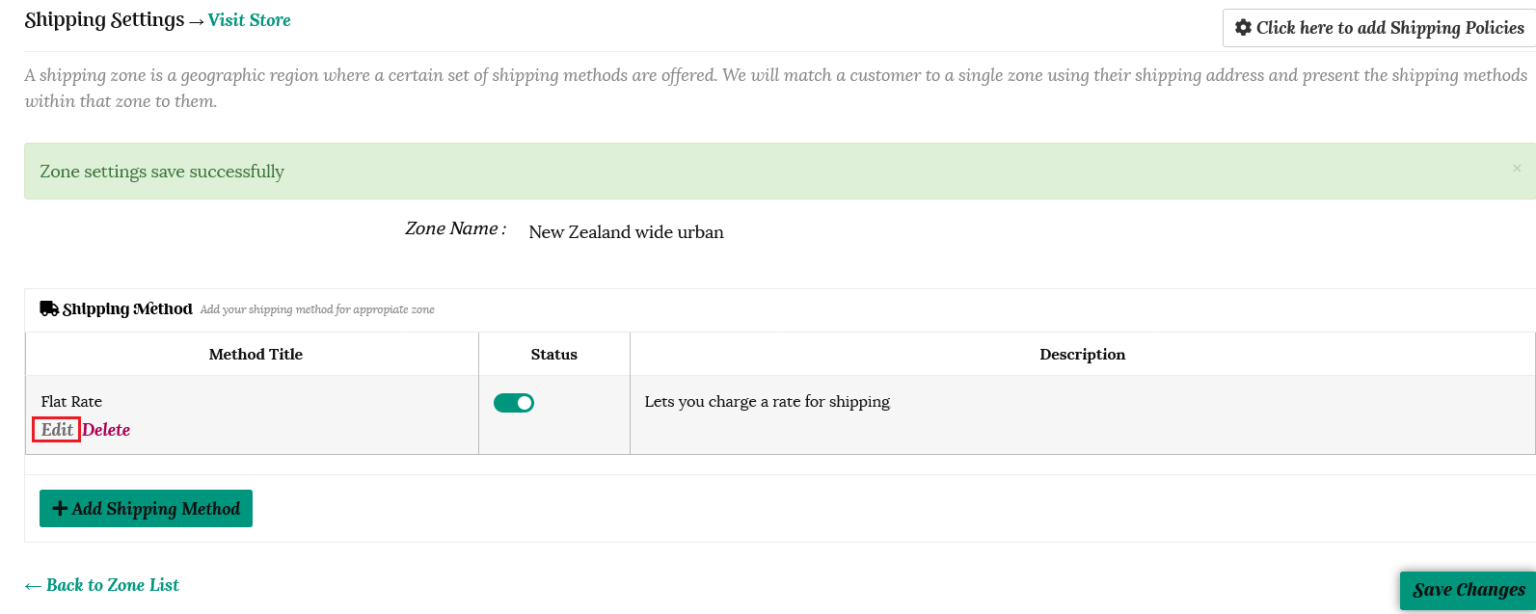
This will take you back to the shipping method page for that zone. Flat Rate will now be shown as a shipping option. Click “Edit” to set your rates.
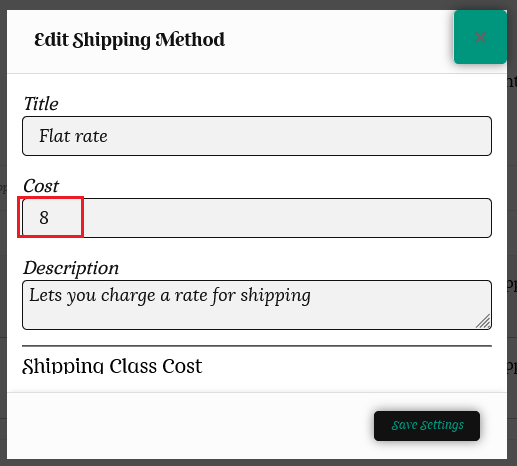
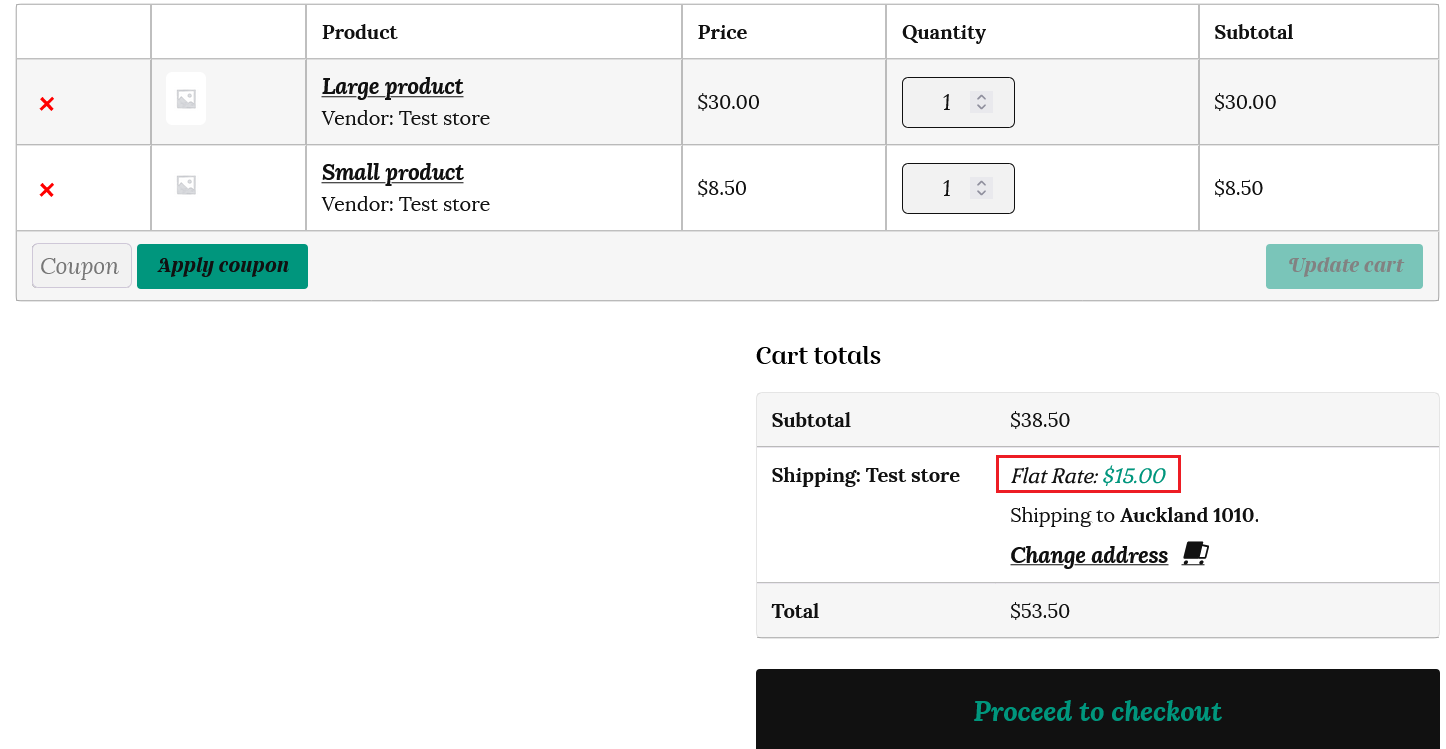
A pop up box will open up and you can enter your flat rate shipping cost. The Title is the name of the shipping method visible to the buyer during checkout. You can edit this to suit. In this example we have used $8 as the standard shipping cost.
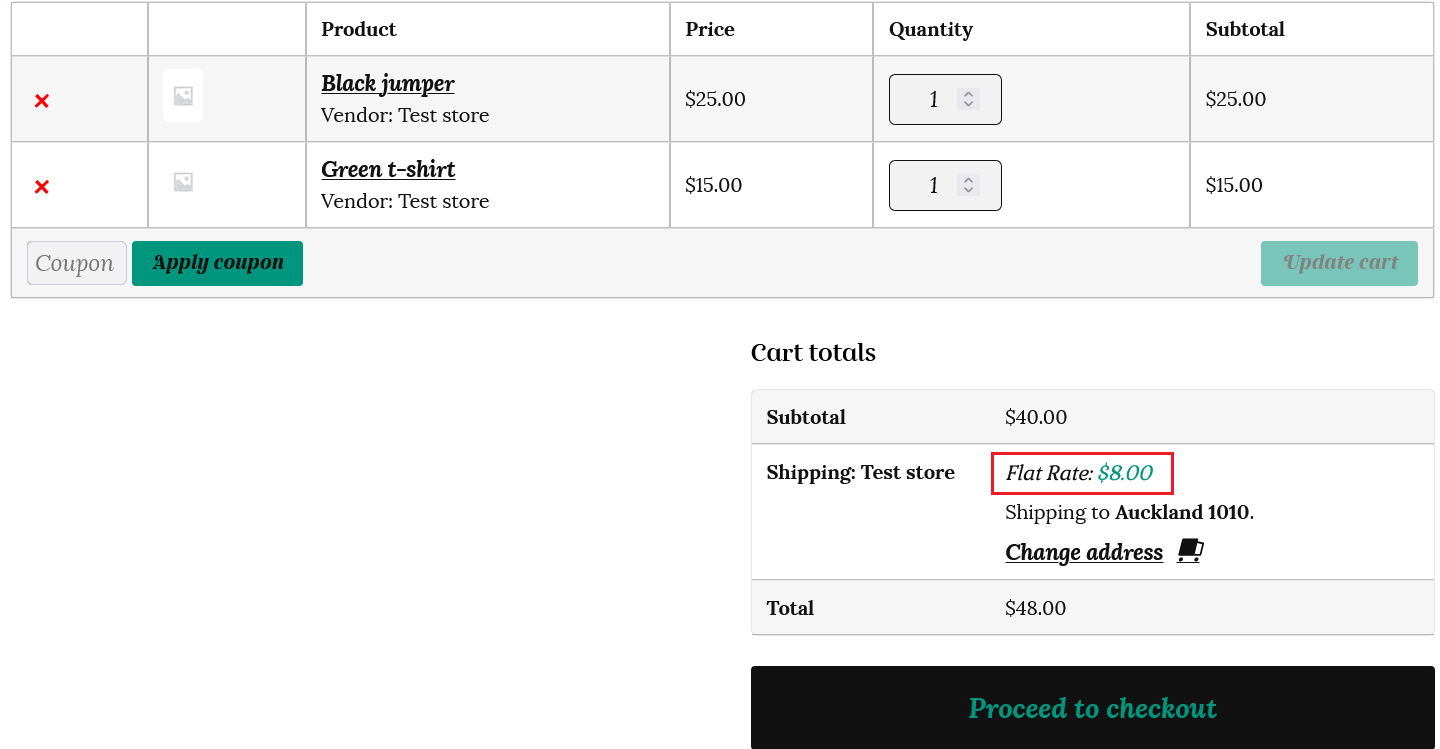
This is how it will appear in the customer’s cart.
Shipping classes
If you scroll down you will see the shipping class options.
Shipping classes are used to indicate groups of products that are similar for shipping purposes.
You won’t need to set up shipping classes if all your products have the same shipping cost.
However, if your product shipping costs vary due to your store stocking varying sized items, you can implement one shipping class for each product type. This way you’re neither overcharging nor undercharging customers for real shipping costs.
For example, if your store sells stationery, you may use the “small” shipping class to apply to bookmarks and “medium” for books. You may also wish to apply the “small” class to pencils and pens, as all are similar in size and weight, and can have the same shipping rules applied.
Or if your store stocks larger furniture type items, you can group these into the “Extra large” shipping class and increase your shipping price for these items accordingly.
The shipping classes are preset at;
Extra large – for example if you sell heavy or bulky furniture products, then they come with an additional delivery fee
Large – for example a product that needs a larger box to ship
Medium – your average product size
Small – lightweight items that can fit in an envelope and do not need a box
No shipping class cost – this will be your standard flat rate
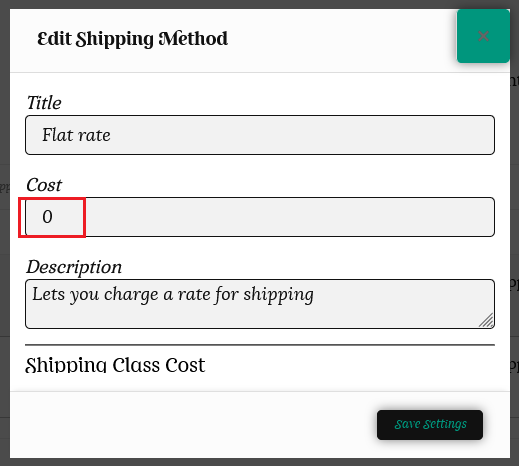
To set your shipping classes; first ensure the flat rate cost is set to zero (0). If this is not set to zero, then the flat rate cost will be added to your table rate costs.
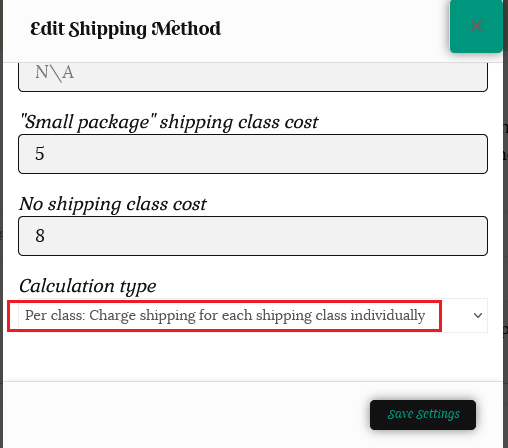
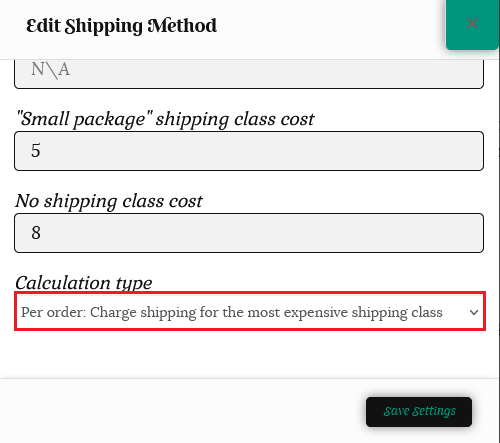
Now you can add your different shipping class costs. If you do not need to use all the classes, just leave them as N/A.
Enter your standard flat rate in the “No shipping class cost” box. This means you will not have to choose the class for every individual product in your store.
If you want to offer free shipping for a particular shipping class, input 0 in the cost field.
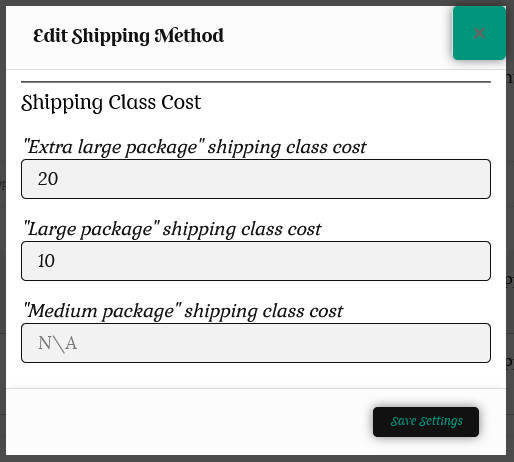
In the example below;
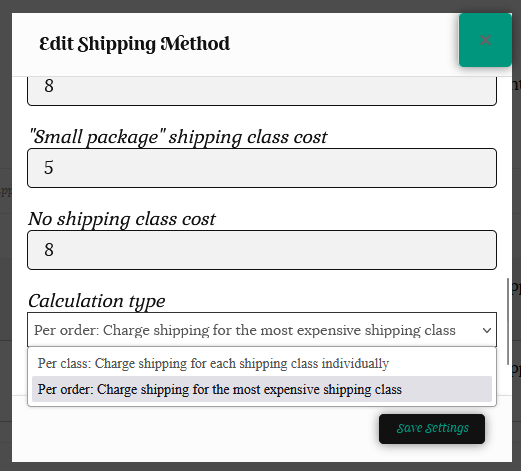
The customer will be charged $20 for shipping extra large packages, $10 for large packages, as we do not need the medium class we leave this as N/A, $5 for a small package, and $8 for all other products in our store that we have not assigned to a shipping class.
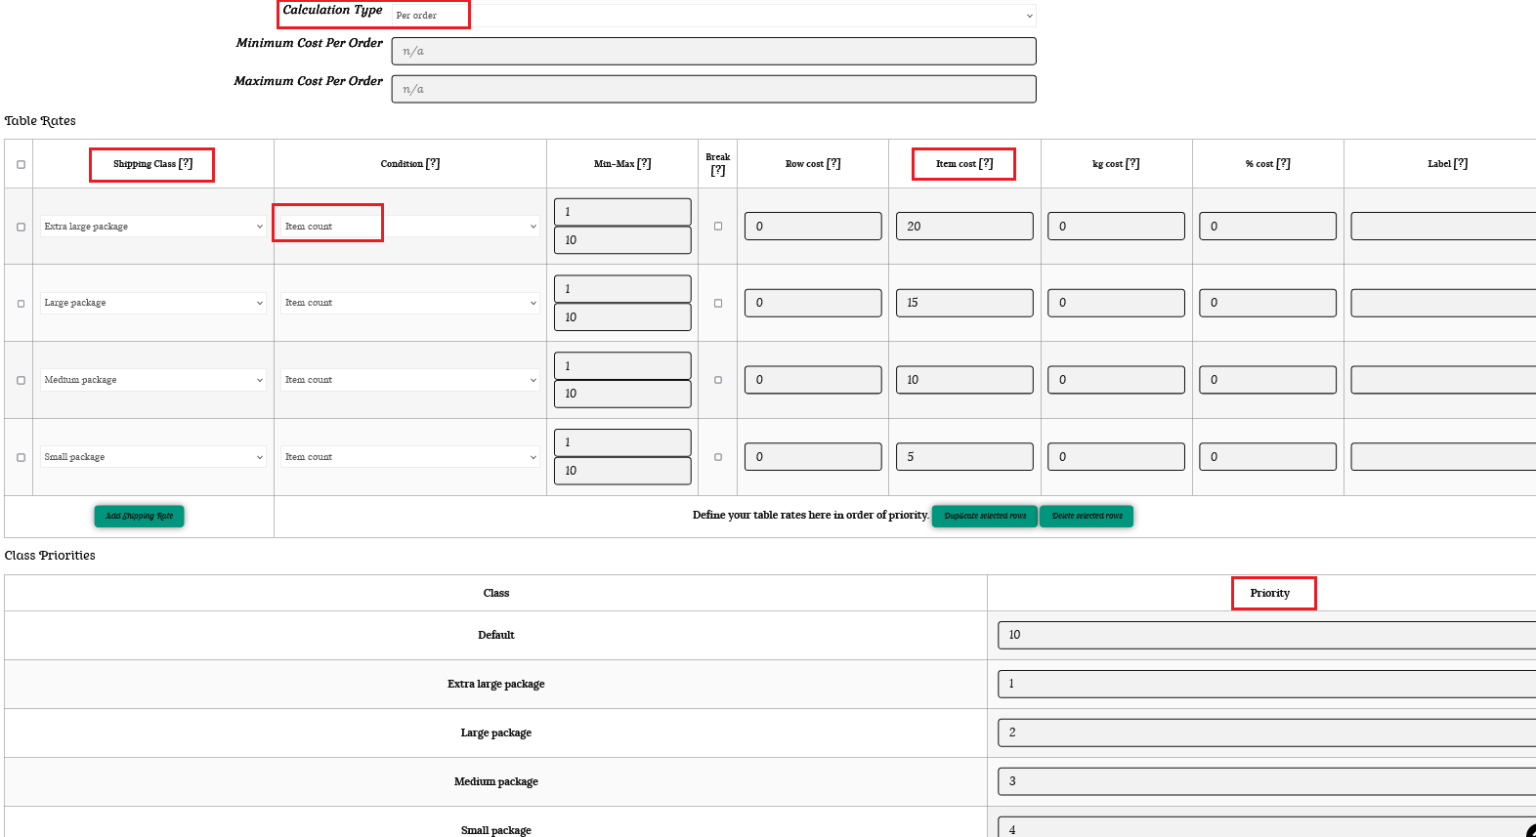
Finally you need to set your preferred calculation type from the dropdown menu.
Per class: this option will charge the customer a shipping fee for each individual shipping class in their cart. In our above example, if a customer has one large item and one small item in their cart, then they will be charged $10 + $5 = $15 shipping
Per order: alternatively, you can decide to charge a flat rate for the entire order based on the most expensive shipping class in the cart. This option is more economical for the customer and can boost purchase quantities per order. In the above example, the customer will only be charged $10 in total as the “large” item was the most expensive shipping class.
Local pickup
If you would like to give buyers the choice to collect their purchase from your address, you can select this option from the “+Add Shipping Method” dropdown. You can change the title to suit. For example, add your location – Local pickup in Hamilton. The cost for pickup should be set at 0.
Your customer will be given the option of local pickup at checkout if this option is enabled.
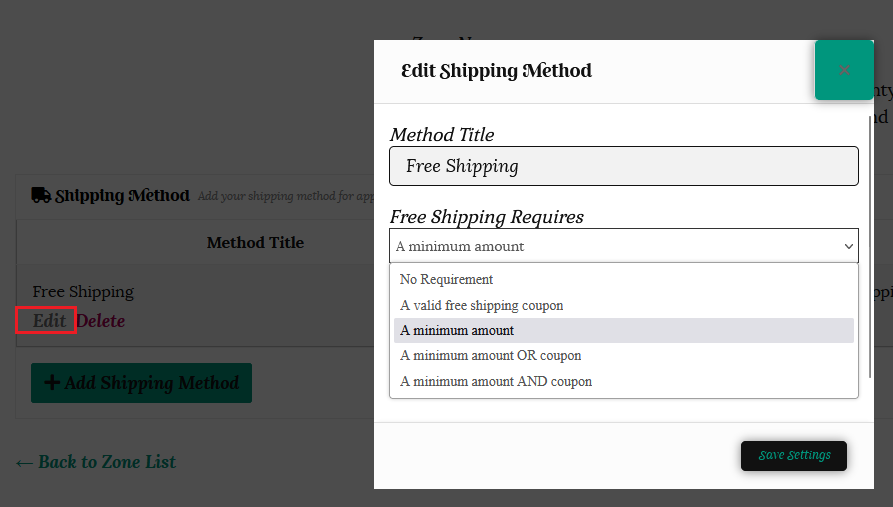
Free shipping
Studies show that offering free shipping can reduce the abandonment of carts rate by 18% and increase average order value by 97%.
To offer your customers free shipping, choose “Free shipping” from the “+Add Shipping Method” dropdown, and then the Edit link once this has been saved.
The popup box will allow you to change the title if you prefer, and enter a minimum order amount to qualify for free shipping. Keep this at zero if you would like to offer free shipping on all of your products.
You may also choose an option for free shipping coupons if you would like to offer coupons for your store. Please see our tutorial on coupons here for further information.
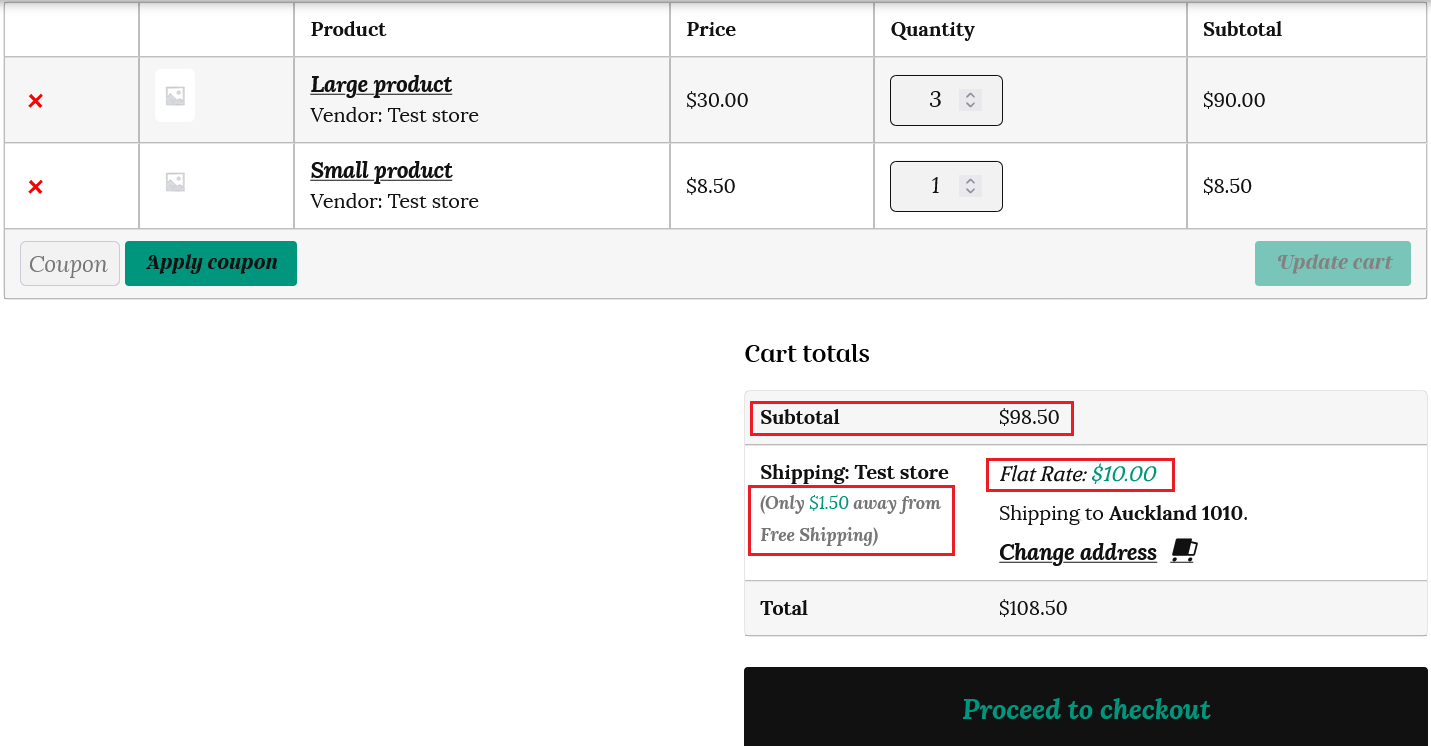
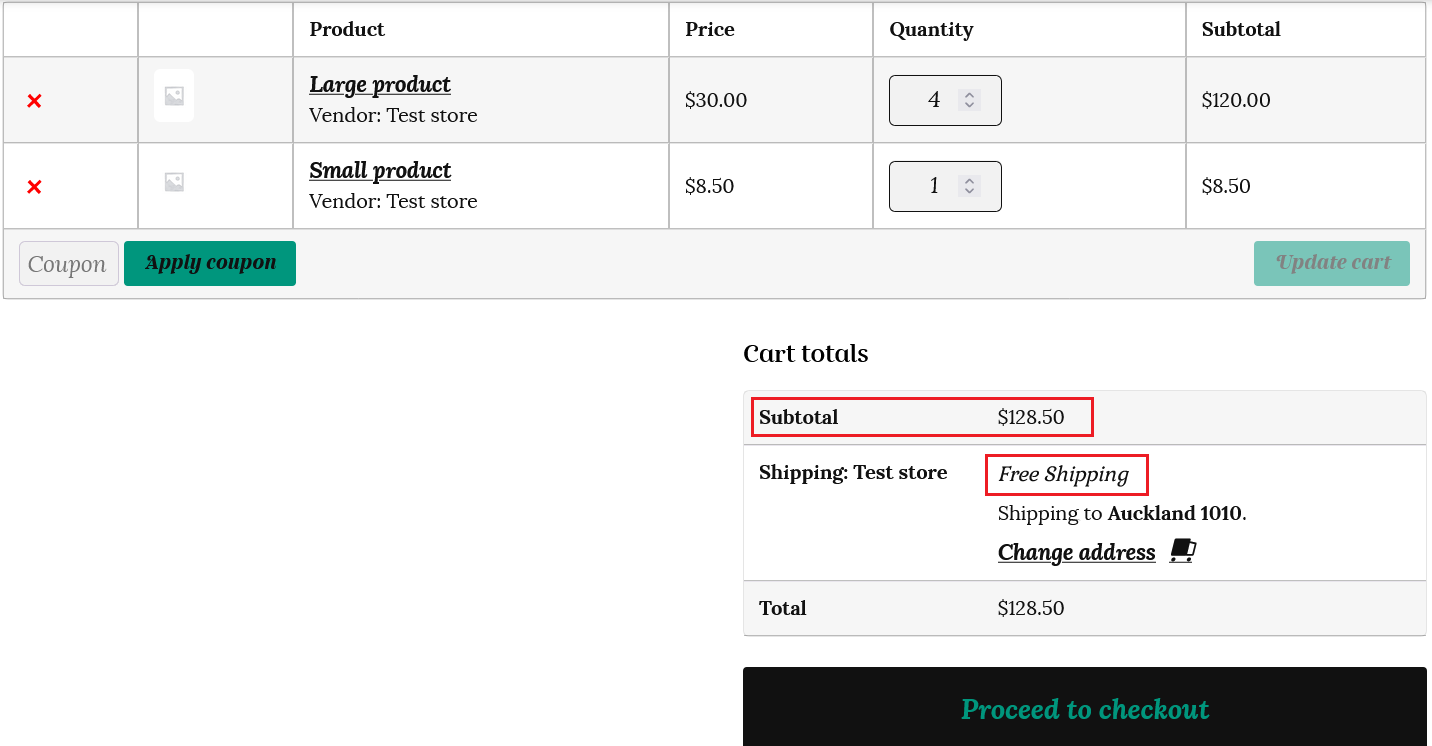
The Free shipping option can be added to a zone with your other shipping options and just come into effect once a customer meets a minimum order amount. For example, if you set the free shipping amount to $100, your other shipping methods will apply until the buyer adds $100 or more to their cart.
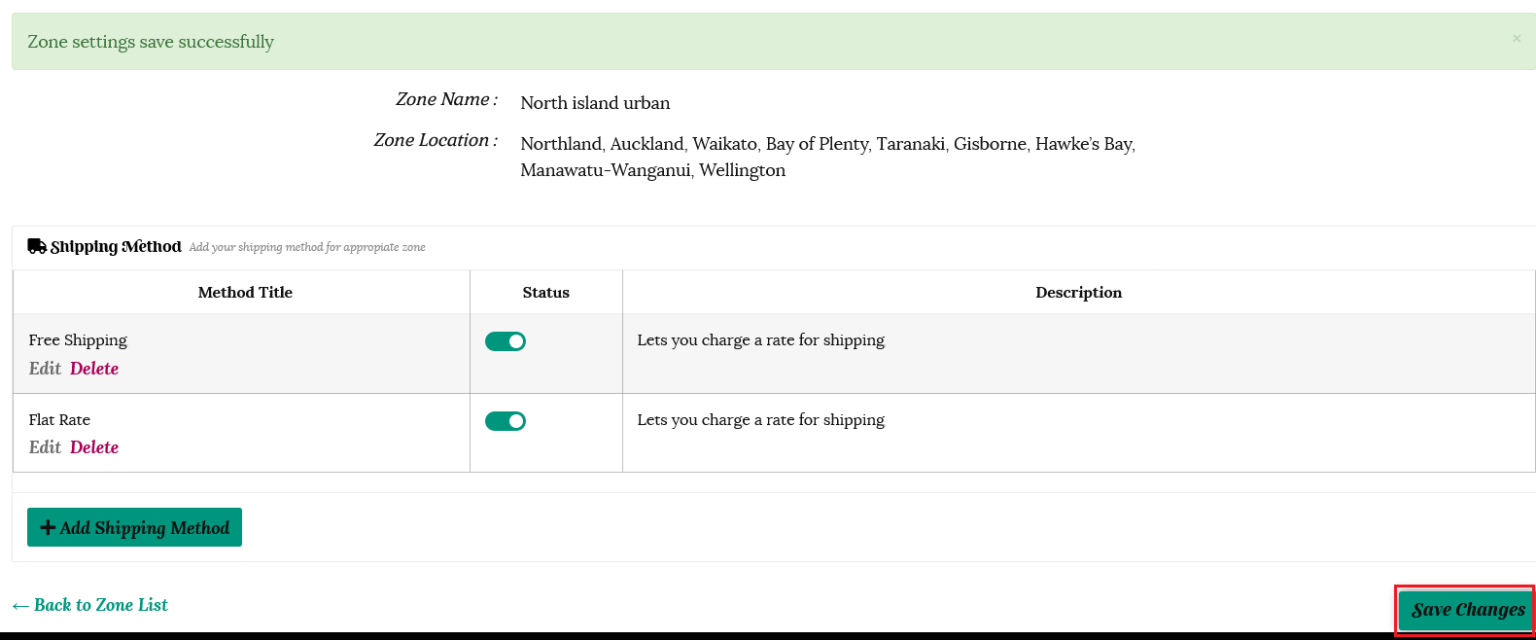
Save your changes!
***Don’t forget to go back to each zone and save your changes once you have completed your shipping methods.***
If the customer places an order under our example of $100, then flat rate shipping is charged. The customer is informed of the remaining amount required to gain free shipping.
If a customer places an order over $100 then free shipping applies.
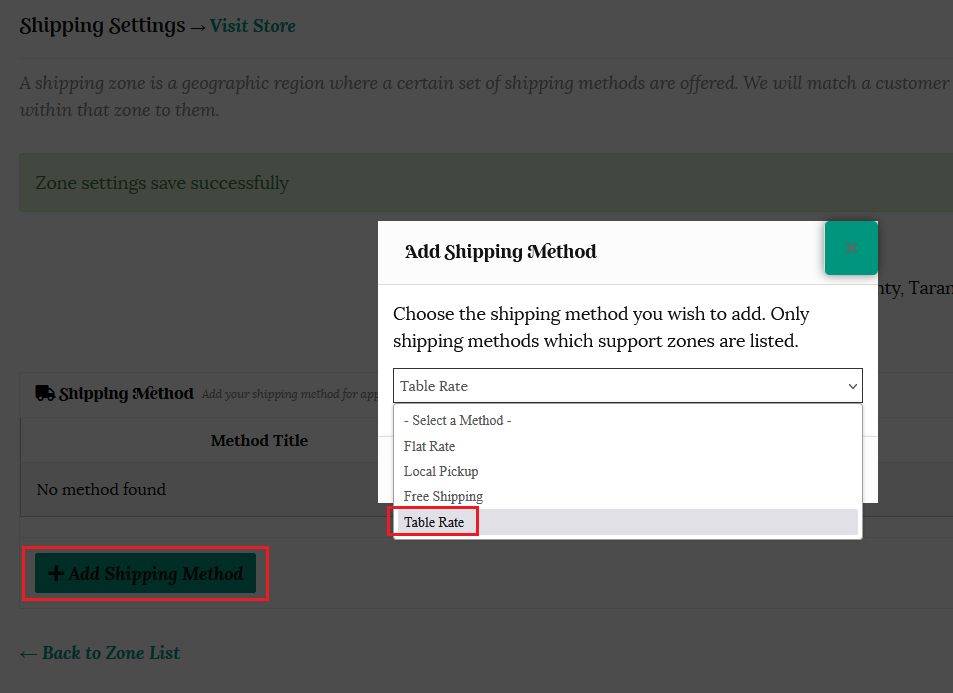
Table rate shipping
Shipping tends to get quite complicated when you are selling products of varying size and weight. As the name suggests, table rate shipping helps you to configure all your shipping rules inside a table. If a customer buys multiple products from your store, then you want to be able to pass on the true cost of shipping to reduce the likelihood of the customer abandoning their cart.
You can add multiple rate tables for each shipping zone and calculate the shipping rate rules based on a number of variables.
Choose Table rate shipping from the “+Add Shipping Method” dropdown box and click the “Add Shipping Method” button.
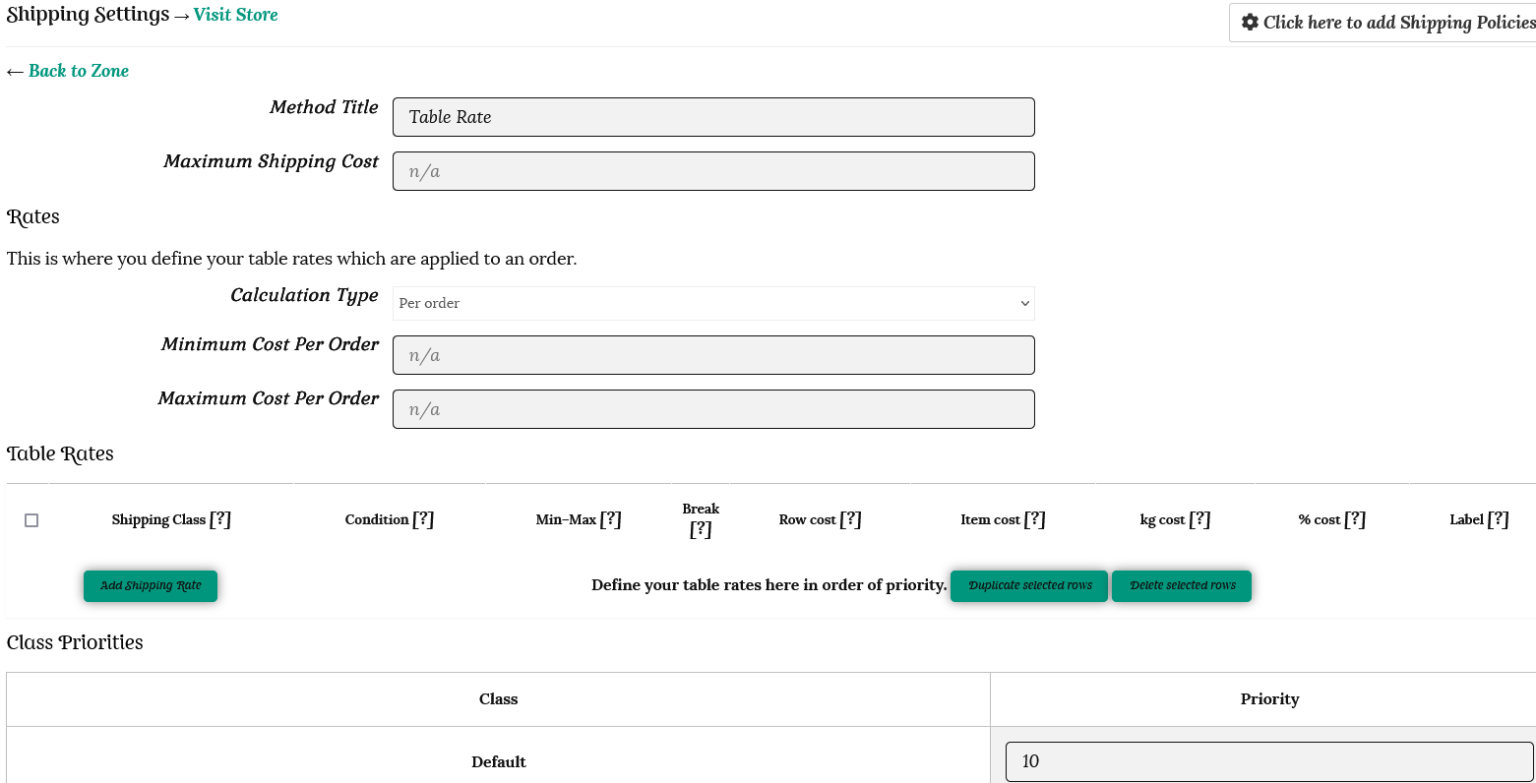
Table Rate will now be shown as a shipping method for your chosen zone. Click Edit to set your rates.
On the page that opens up you will find different fields for setting up your shipping rules.
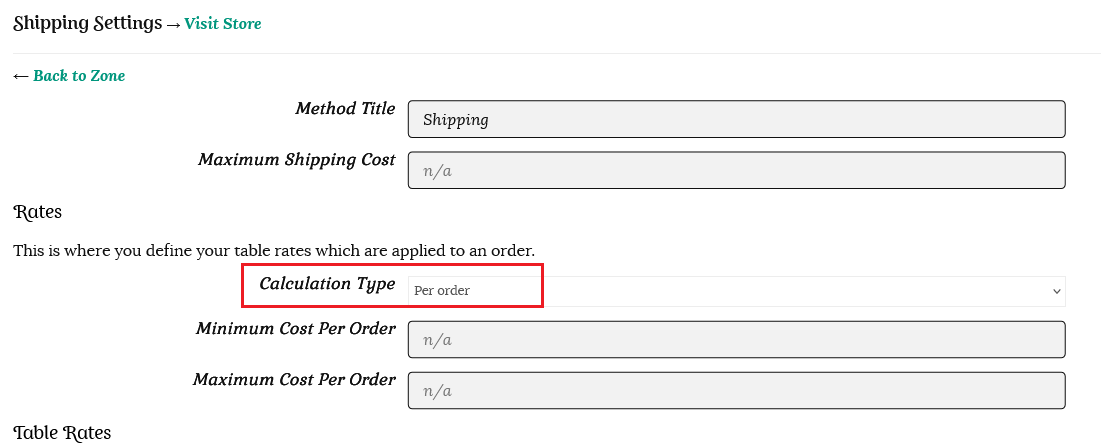
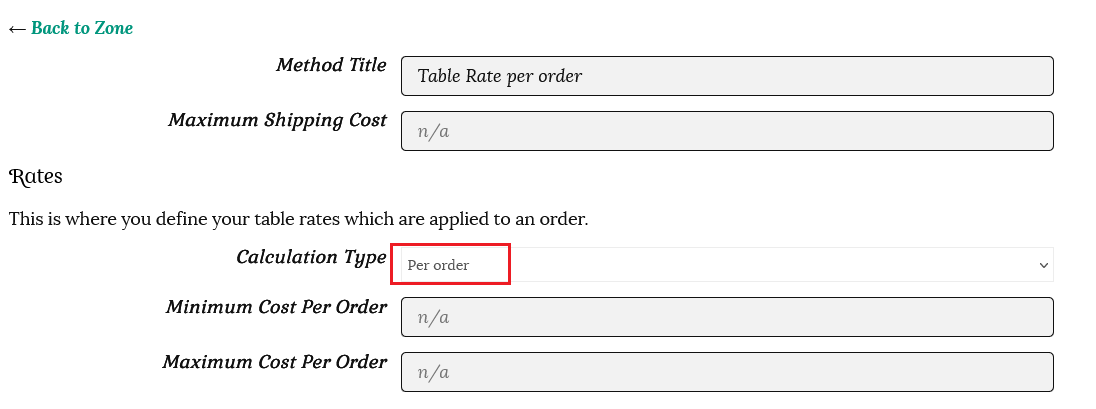
Method Title — This is the name of the shipping method displayed to customers. You can change this to suit.
Maximum Shipping Cost — You can choose to assign a maximum shipping cost in dollars. For example, if you set the maximum shipping cost price at $100, even if the total shipping cost is calculated at $150, it will still show $100 shipping to the customer.
Rates
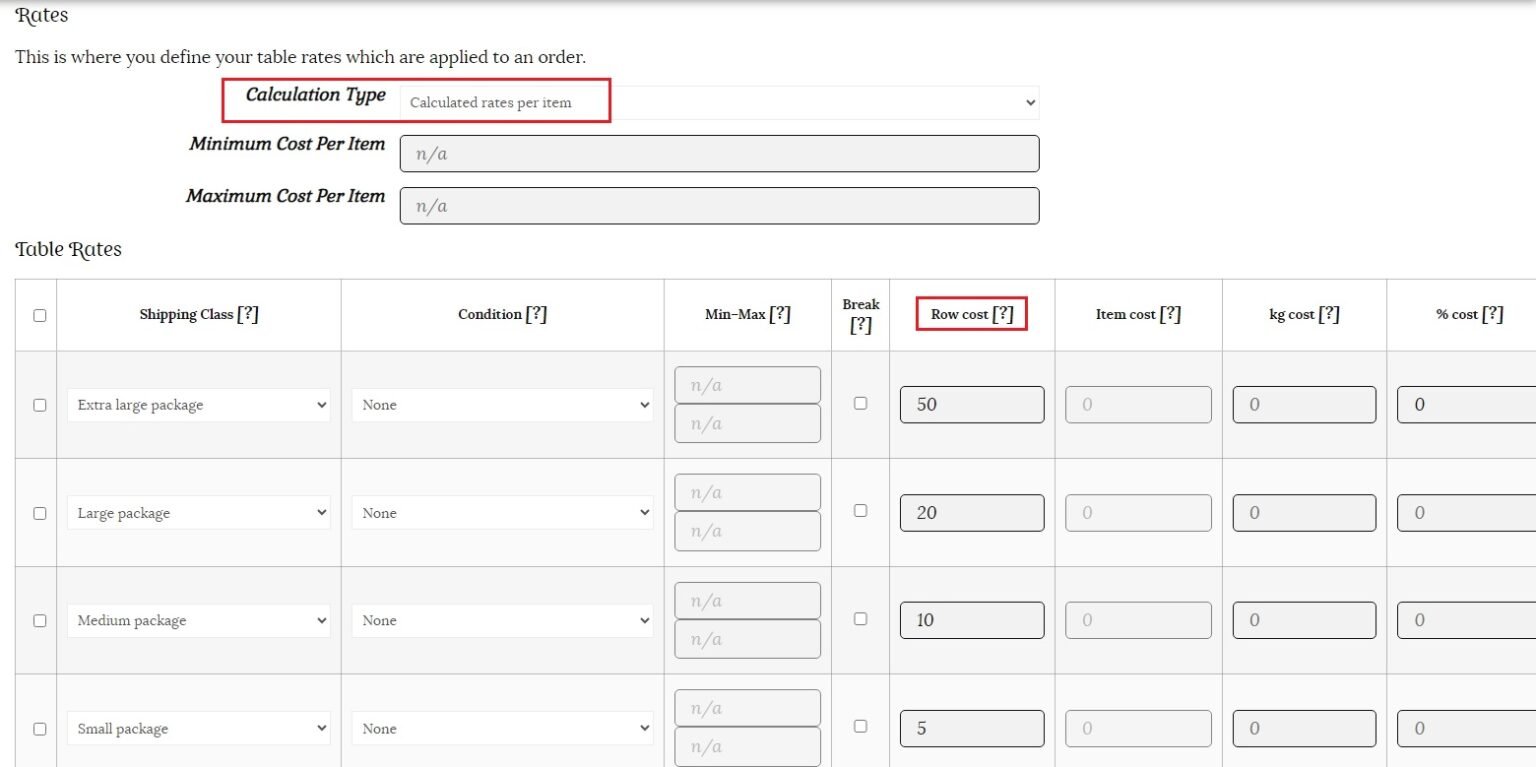
Calculation type
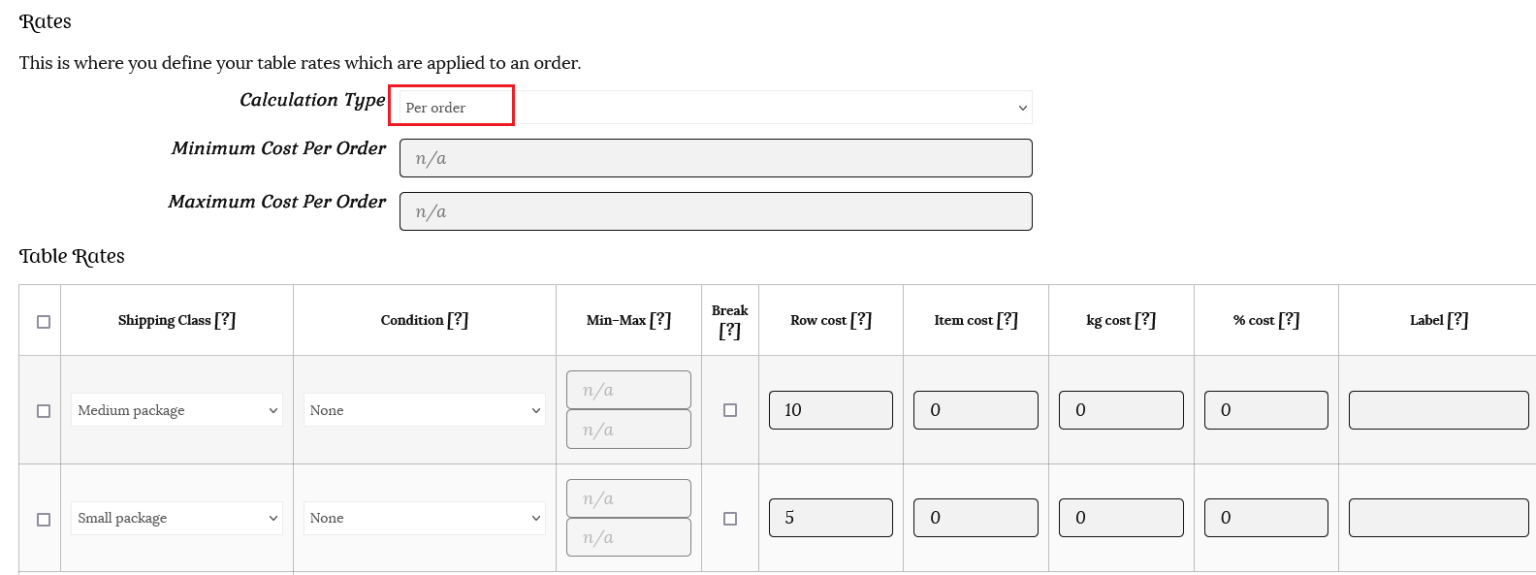
Per order – calculates shipping for the entire cart. If there are varying shipping classes in the customer’s cart, the class with the highest priority will be used for all items (where 1 is the highest priority). Calculated rates per item – calculates the rate by checking the total number of items in the customer’s cart. Calculated rates per line – looks at each line in the basket and checks that against the table. The customer will only be charged once for multiples of the same item. Calculated rates per shipping class – each shipping class in your basket is totaled and offered at a final rate.
Adding Table rates
Once you’ve chosen your method to calculate rates, it’s time to start adding your rates. Click on the “Add Shipping Rate” button to add your table rates.
This will open up a table where you can enter your shipping rates. Define your table rates here in order of priority – the highest shipping cost should be added first.
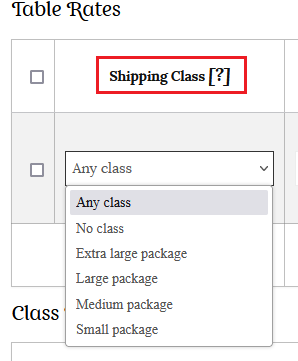
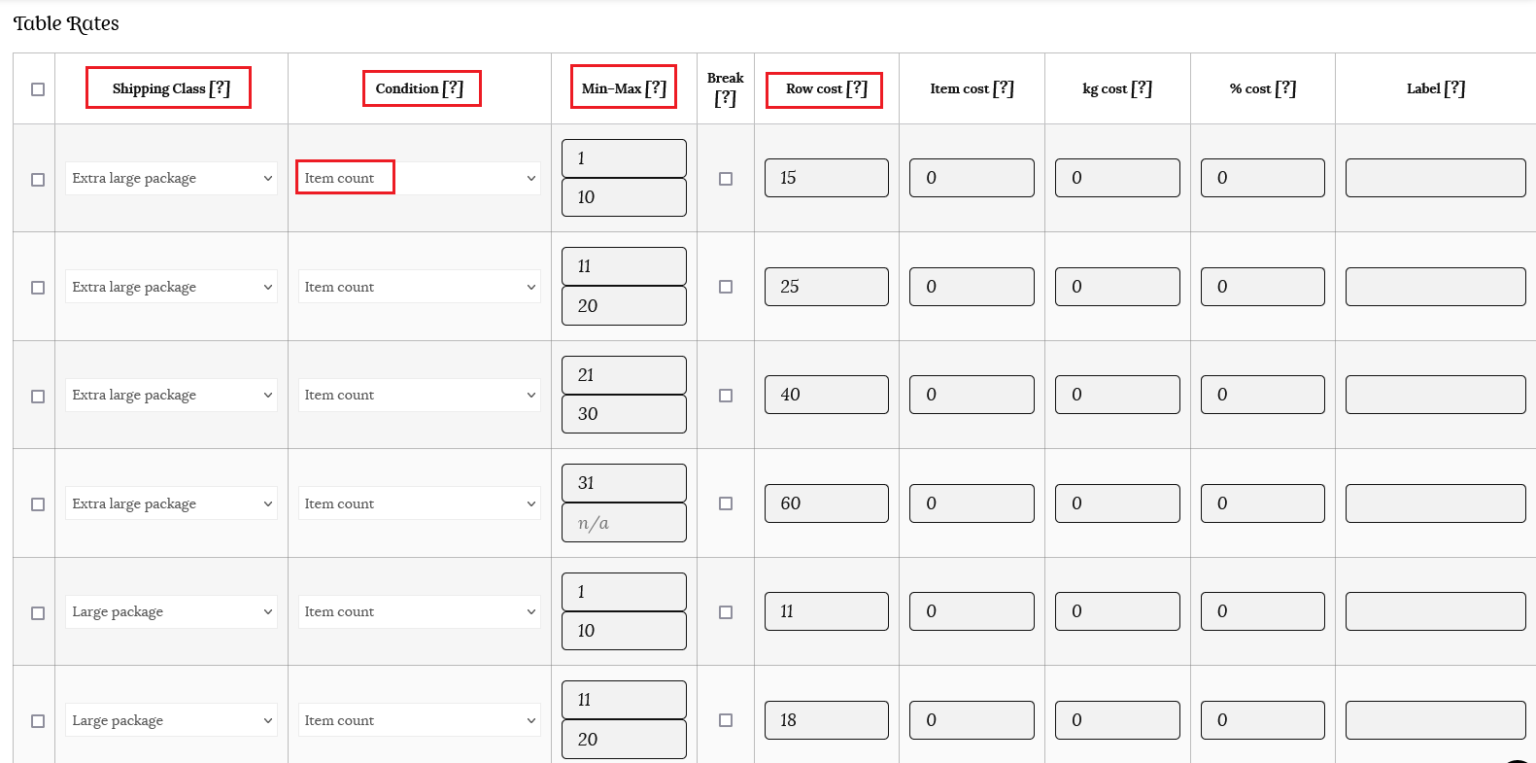
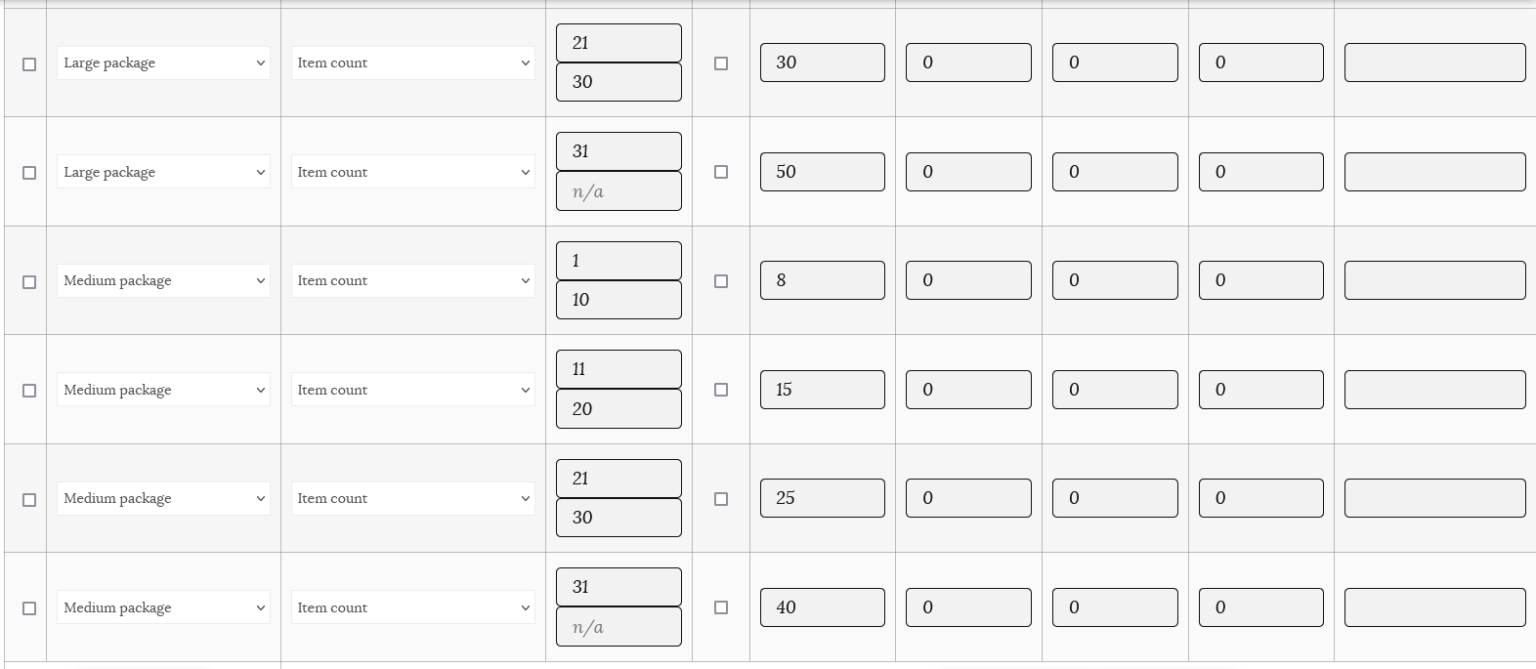
Shipping Class
Choose the shipping class to which this rate will apply. You can also choose to apply the rate to items in any shipping class or in no shipping class. If you sell items that are all the same size, then you will not have to worry about setting shipping classes… you can just use the table rate option to set the shipping cost if multiple items are purchased.
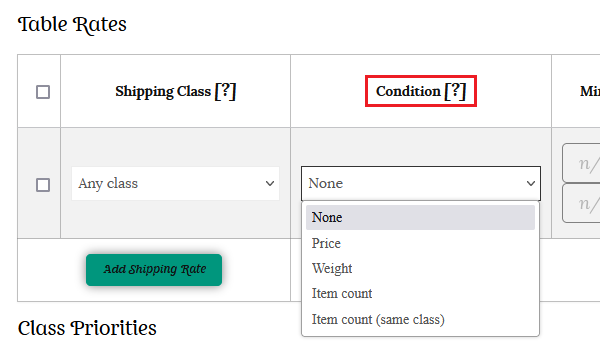
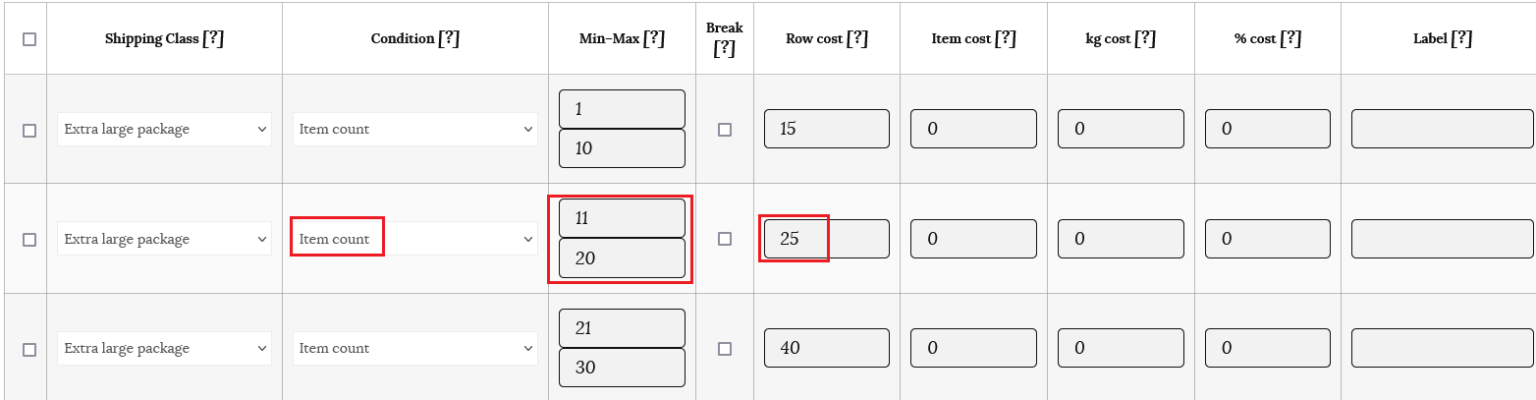
Condition
This column tells the system what product information it should use to calculate shipping rates. Your options are:
None – you don’t wish to use product information to calculate the total Price – the price of the items Weight – the weight of the items Item Count – the number of an individual item Item Count (same class) – the number of items in the same shipping class
Remember that the calculation is determined by the Calculation Type dropdown.
Min-Max
This column sets the minimum and maximum amounts for your chosen condition. These will be:
Price – the minimum and maximum price in dollars ($) Weight – the minimum and maximum weight in kilograms (kg) Item Count – the minimum and maximum number of an individual item. For example, you may wish to have one price for 1-10 items and another for 10+ items Item Count (same class) – the minimum and maximum number of items in a specific class
Note: If you are filling in minimum and maximum amounts for your item, ensure that you account for as many items as a customer would conceivably order. For example, for item count, it’s good practice to have a row that has a maximum up to 999. This will ensure that shipping rates will always be calculated.
Break
When you check this option, you’re telling the shipping calculator: “If you reach this row of the table, stop the calculation from going any further.” Meaning, you’re telling the process to break.
This is used for:
Per order – to tell the plugin to offer a specific rate and no others
Calculated – to stop any further rates being matched, with priority given to the top of the list. This is particularly important when merging/combining shipping (see further details and examples below).
Shipping Prices
This is where you set the cost for your shipping. You can add the following figures:
Row Cost – the base cost for shipping this item. This could include the cost of your packaging. Item Cost – the cost for each individual item. This is in addition to the base cost. Cost per kg – the cost per kg for the items. % Cost – the percentage of the items’ total that should used to calculate shipping.
Label
If you are creating a “per-order” table of rates, you have the option on adding a label for each individual rate. If you want to offer free shipping for a certain order threshold, and some of the rates are set to 0, you’ll want to clarify that to customers by editing the Label column with a message such as “Free Shipping” which will display when viewing the cart, and at checkout.
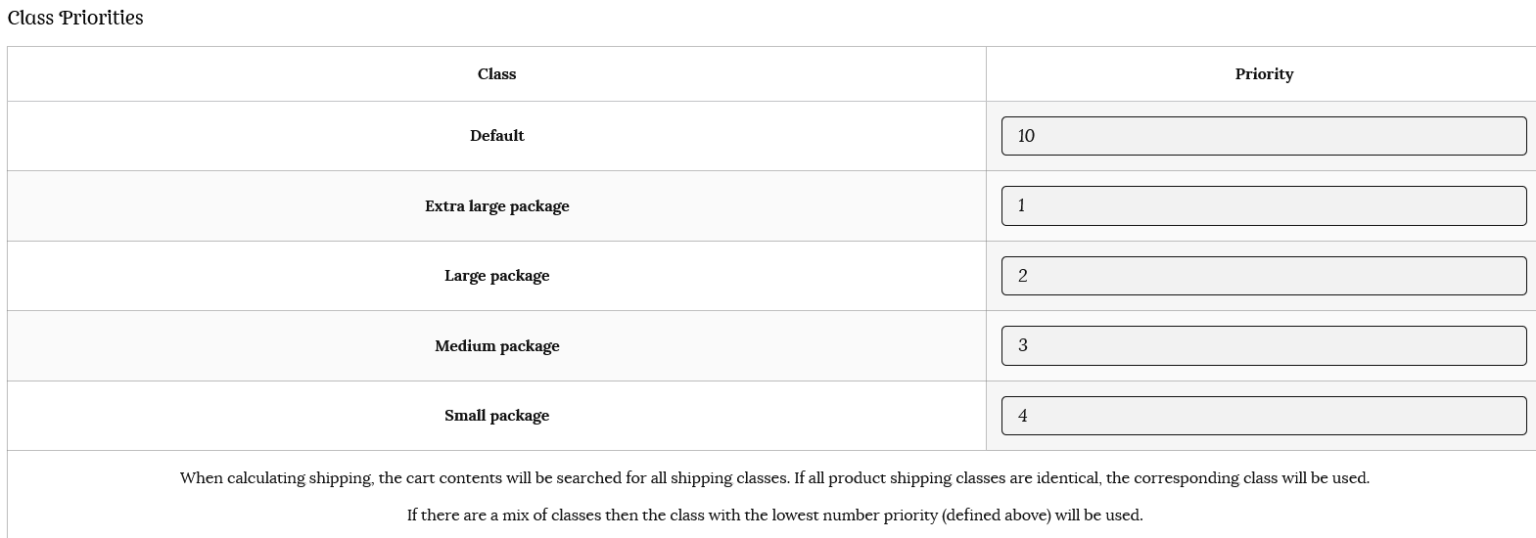
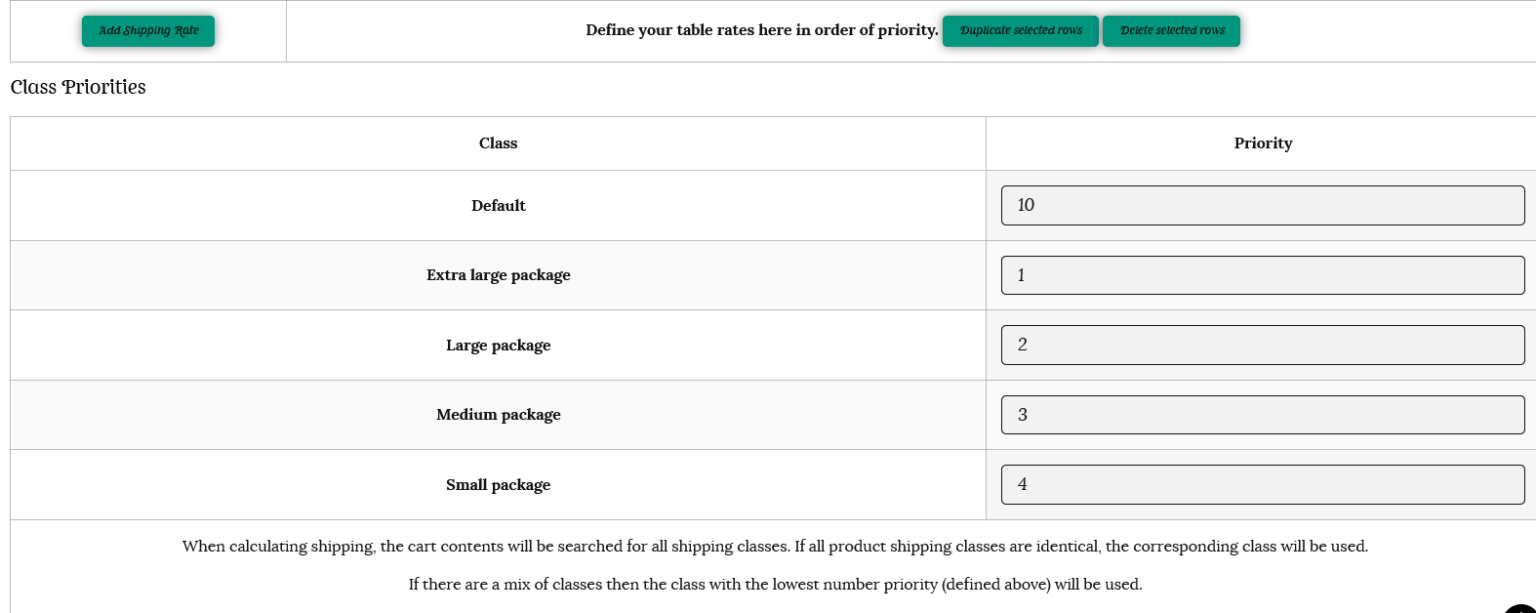
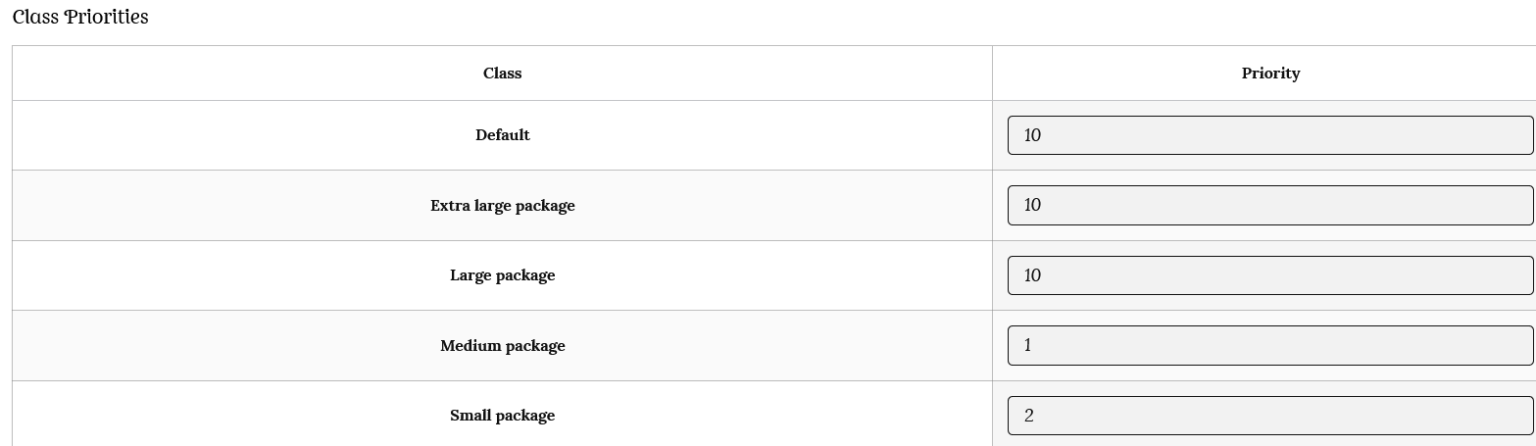
Class Priorities
If you have chosen “Per order” as the Calculation Type, you will see a section called “Class Priorities”.
If there are items in different shipping classes in the cart, it will calculate the total based on those items in the shipping class with the highest priority (or the lowest number). For example, number 1 will be given first priority, number 2, second priority, number 3, third priority and so on.
In the example below, the Extra large shipping class is number 1, so is more important than the other shipping classes.
***Make sure you click the “Update Settings” button once you have finished.***
Simple table rate shipping for products of similar sizes
To use table rate shipping when you sell multiple items of similar sizes please see the simple example below. We then go into greater detail for more complicated shipping scenarios with both bulk and varying sized products.
Lily’s store
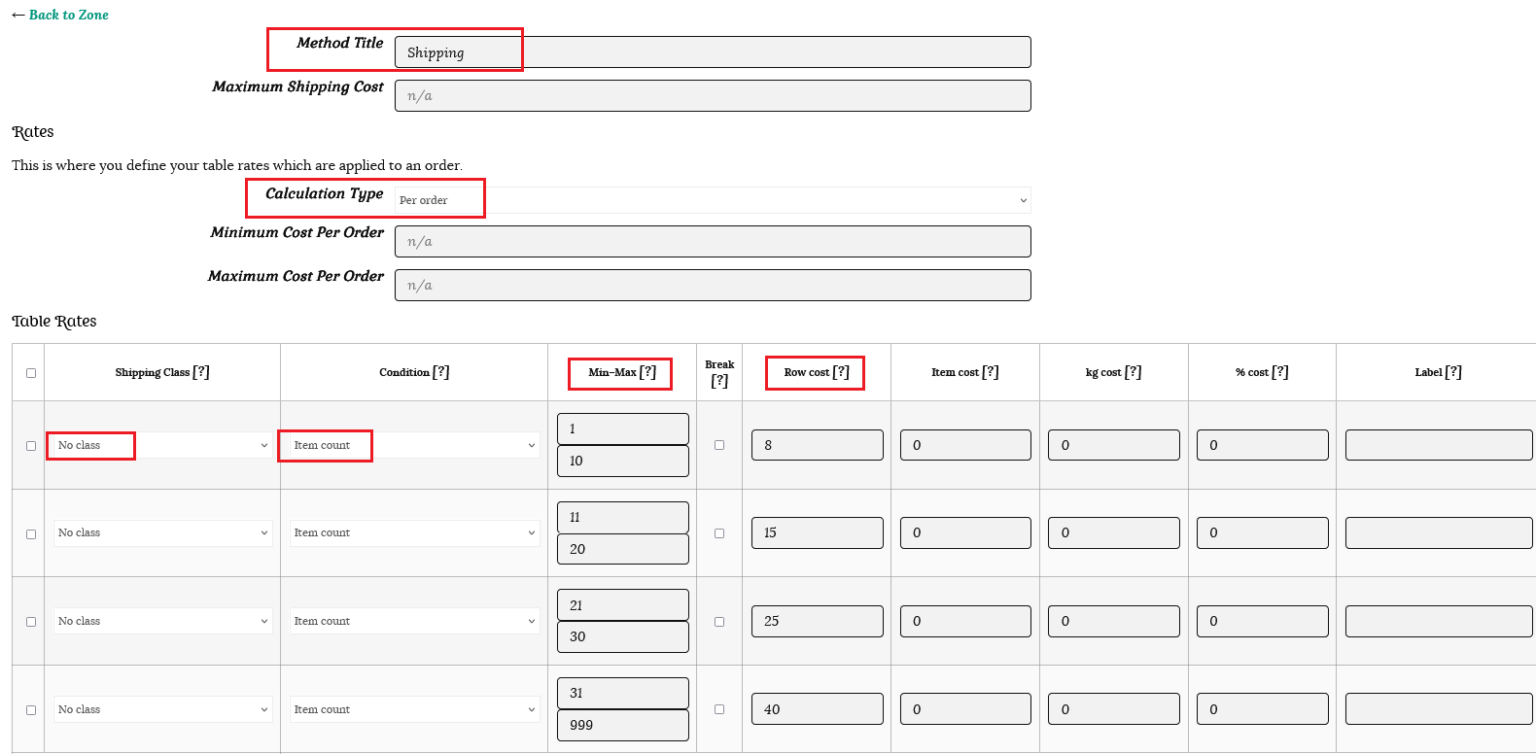
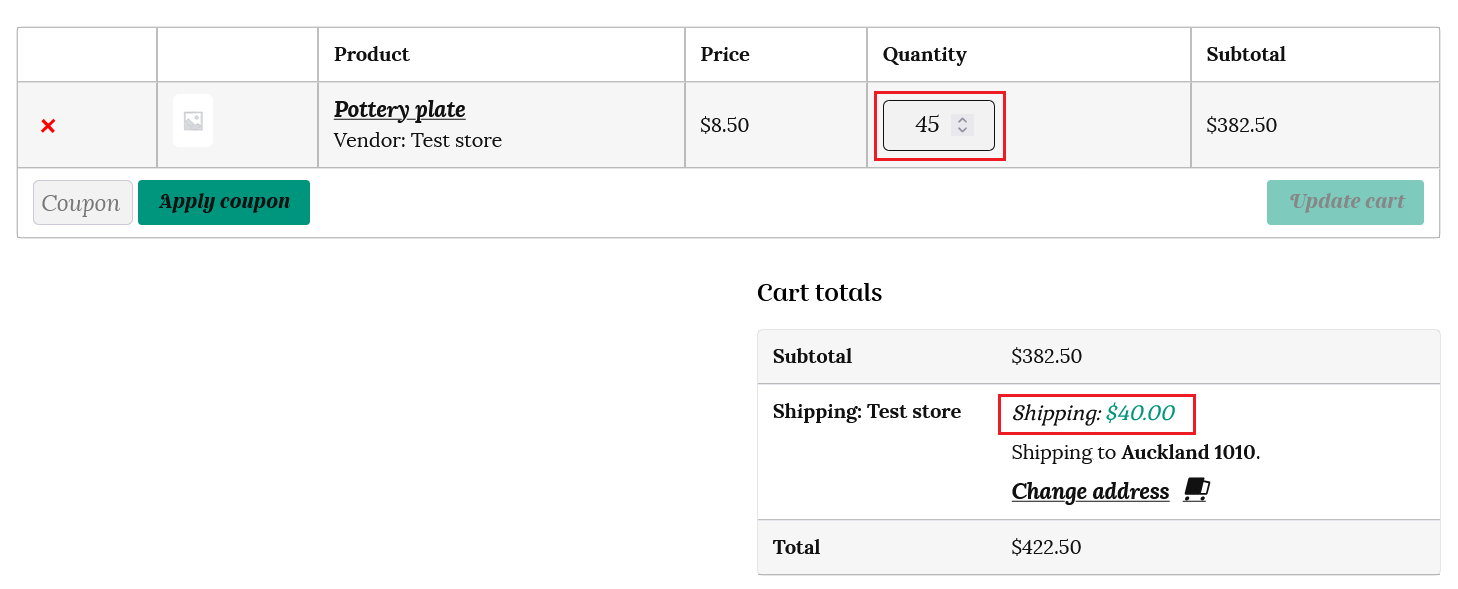
Lily sells pottery plates. They are all similar sizes, but customers can purchase up to 20 of each variety, so she needs a way to adjust the shipping cost to the number of plates purchased. Lily can send up to 10 plates to North island urban addresses for $8, 11 – 20 plates for $15, 21- 30 plates for $25 and 31+ plates for $40.
As all her plates are similar sizes, Lily does not have to worry about choosing a class for each product. She just leaves this as the default “No shipping class” on each of her product pages.
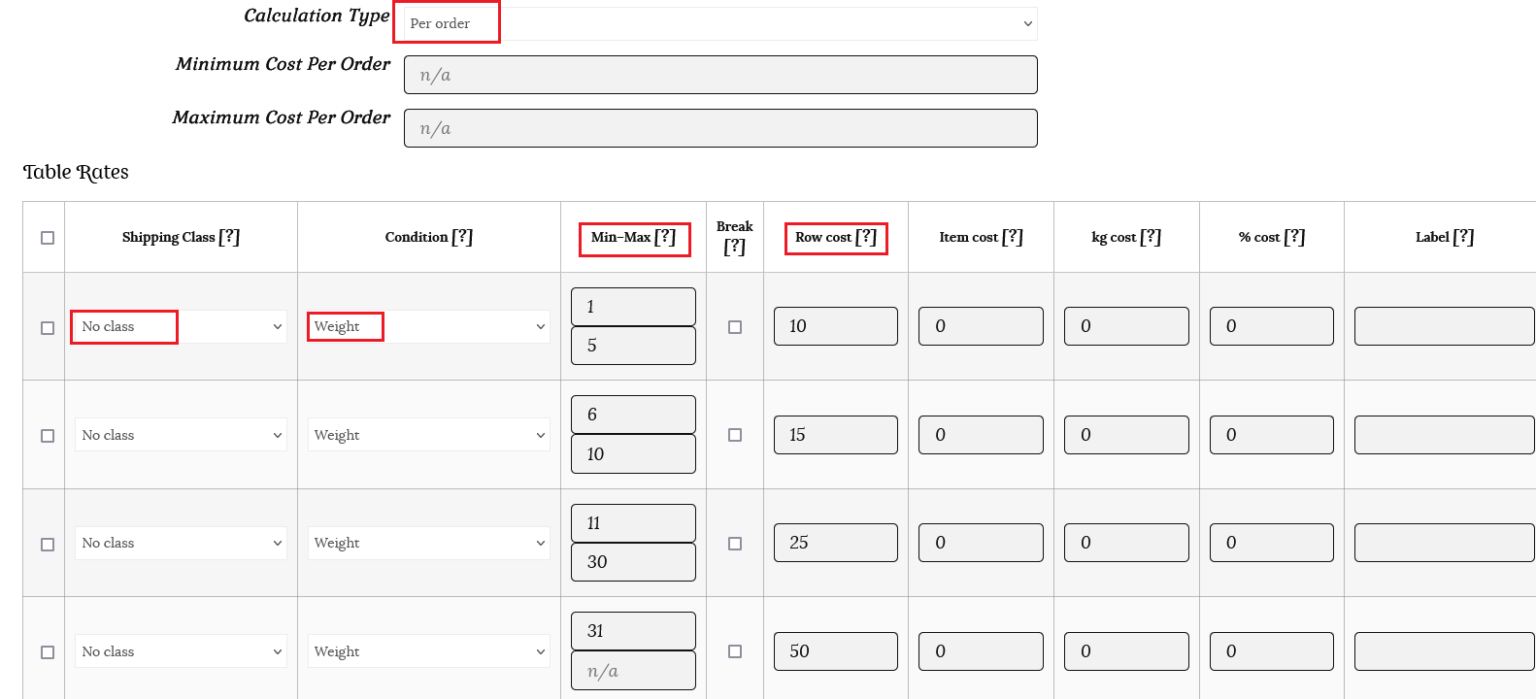
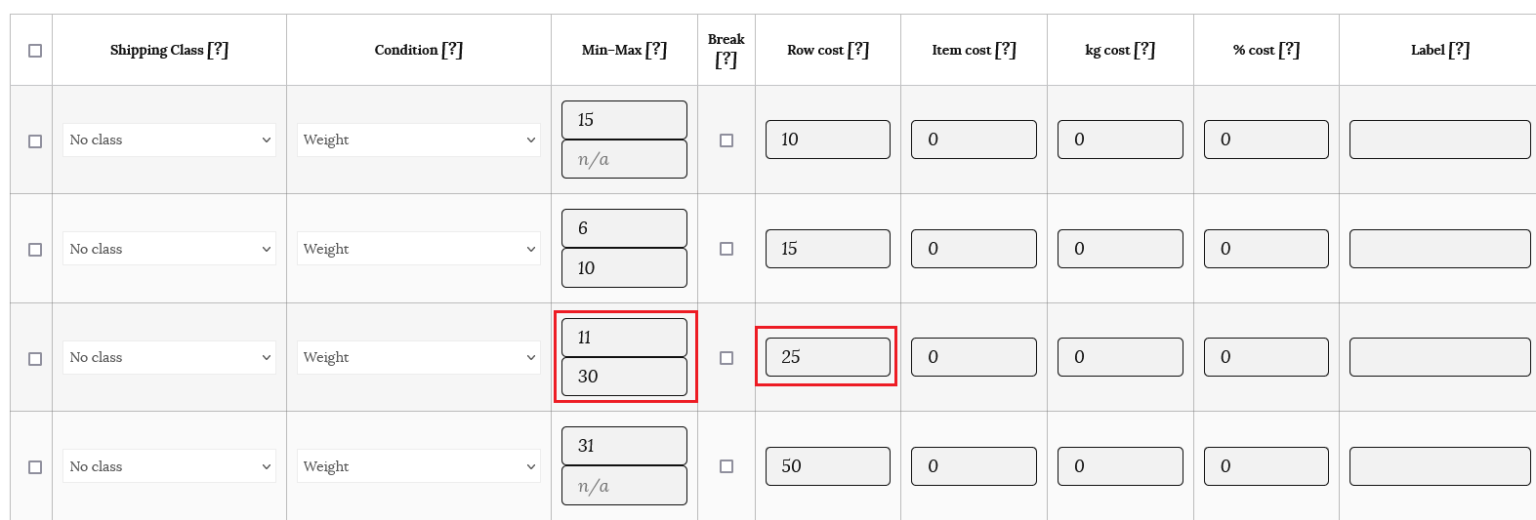
This is how Lily would fill out her table rate shipping. She does not need to choose class priorities, as her plates are all the same size. Use the “Row cost” column to enter the total shipping cost in dollars, as this calculates the rate for the whole order combined. Lily does not need to set any extra amounts in the item cost column.
This is how the shipping will appear to the customer.
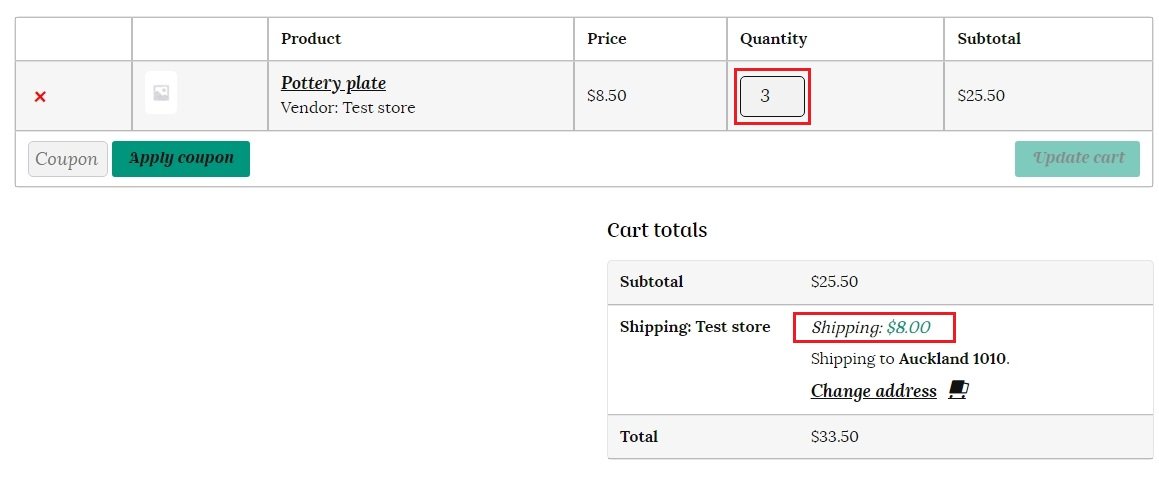
The customer adds 3 plates to their cart and the total shipping will be $8 as the item count is between 1 and 10.
The customer adds 17 plates to their cart so the total shipping cost will be $15 as the item count is between 11 and 20 items.
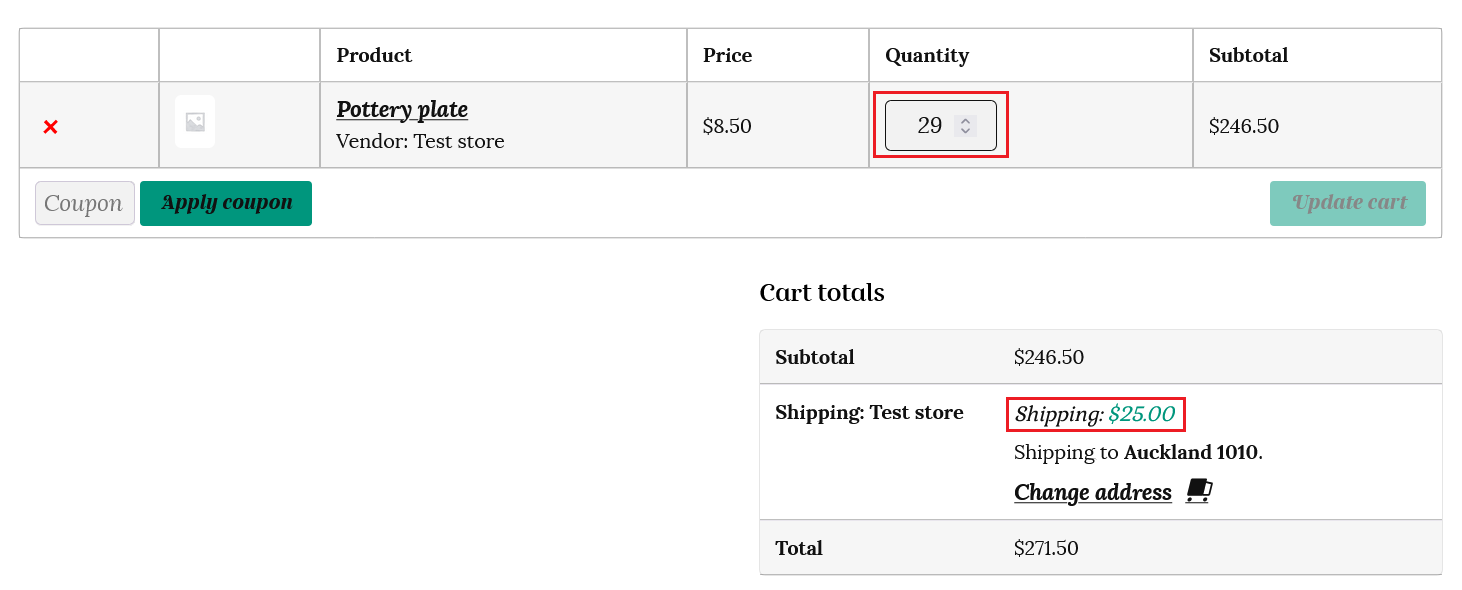
The customer adds 29 plates to their cart so the shipping will be $25 as the quantity is between 21 and 30 items.
The customer adds 45 items to their cart and the shipping cost will be $40 as the quantity of items is over 31.
That is all you need to do if your store sells bulk items of similar sizes.
However, you can choose more complex calculations if your store sells multiple items of varying sizes.
Table rate shipping for a store selling multiple, varying sized products
Using our above example; as well as selling pottery plates, Lily decides to add pottery mugs and vases to her store. As these are larger, more fragile items, they will cost more to ship.
Using weight
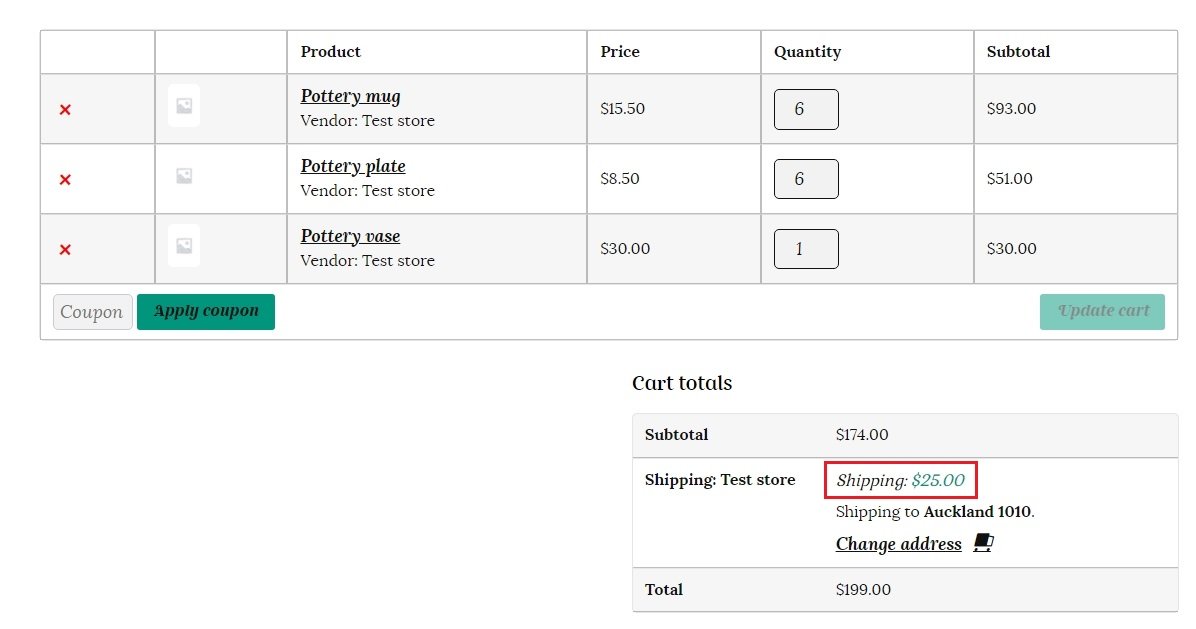
One way to work out the combined shipping cost of an order is to use the “weight” of the products. Lily has selected 0.5 kg as the weight of her pottery plates, 1 kg for the weight of her pottery mugs and 2 kg for the weight of her pottery vase.
These amounts are entered in kilograms for each item on the product page.
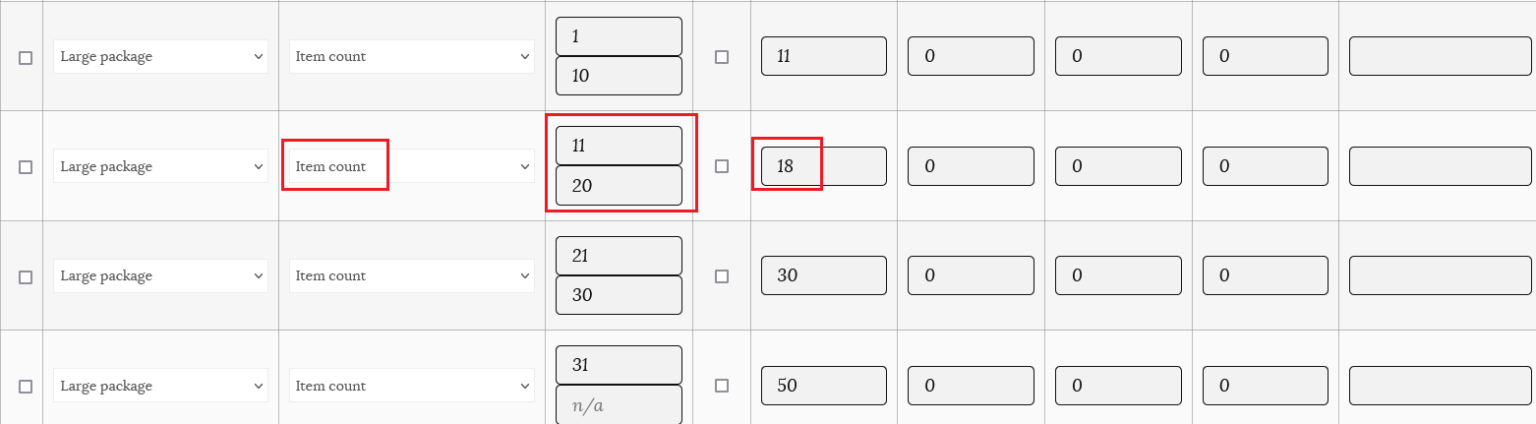
Then Lily fills out her table rates based on the total weight of the order in kg as below;
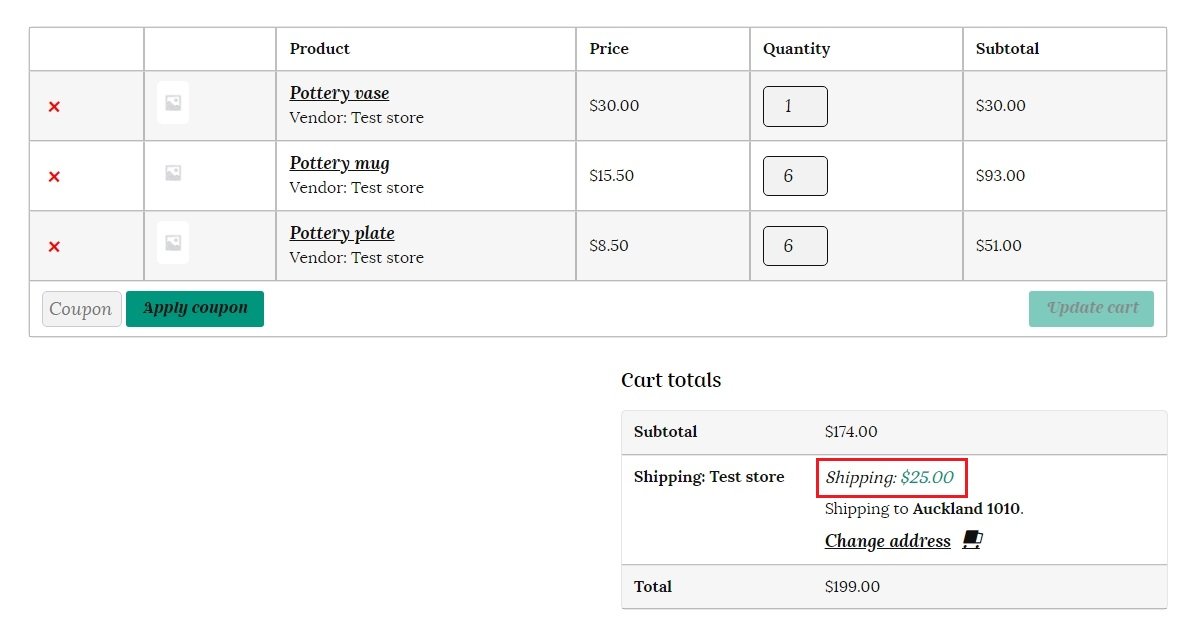
A customer adds 6 pottery mugs, 6 pottery plates and 1 pottery vase to their cart.
This is how the weight based shipping will be calculated in the customer’s cart. Total weight for all items is 6 x 1 kg (6 kg) for the pottery mugs, plus 6 x 0.5 kg (3 kg) for the pottery plates, plus 1 x 2 kg (2kg) for the pottery vase. This totals 11 kg, which costs $25 to ship on the table rate chart.
So the order shipping cost will be shown as $25 in the customer’s cart, as below.
Using classes
This time Lily uses classes to group her products into similar shipping costs.
She sets the class for the pottery plates as medium, the mugs as large, and the pottery vases as extra large.
Because a customer can add a combination of different products to their cart, Lily needs a way to combine shipping to make sure the shipping cost covers the largest items, as well as the quantity of items.
Lily is able to use table rate shipping to calculate the shipping cost per order as follows;
She sets the Calculation type to “Per order.”
She then fills out the table rates for each of her classes.
Lily then sets her class priorities. The lowest number will be actioned first. So she set number 1 for her highest cost with the Extra large package/vases as she wants these items to be considered 1st. Then number 2 for the 2nd highest priority – Large package for her mugs. Then the medium package set at 3 as the 3rd priority for her plates.
Let’s see how this shipping calculation works for the same customer at checkout.
The customer added 13 items in total to their cart with a range of sizes/classes.
Lily set her class priorities as 1 for the extra large package/vases, so the shipping calculator will check for this class first. As the customer has added a vase/extra large item to their cart, this class will be used for all the products so Lily can combine shipping without undercharging.
If we look at the table above, Lily set $25 as the shipping cost for 11 to 20 items, so this is what the customer will be charged.
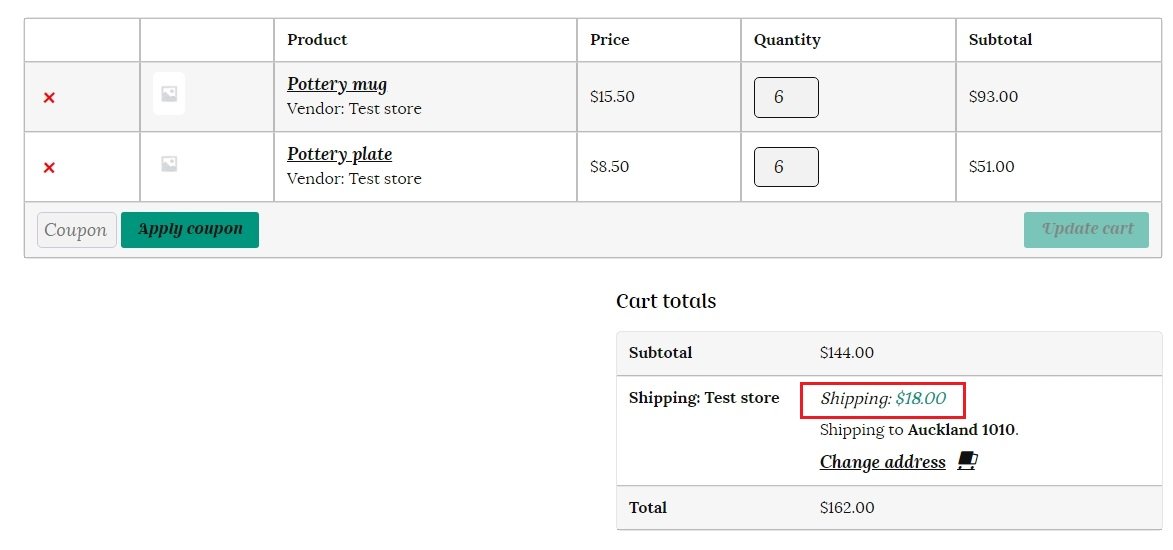
This time the customer added only 6 mugs and 6 plates to their cart. Let’s see how the table rates calculate this for the customer. The shipping calculator checks for 1st priority items, but there are none in this case, so it goes on and checks for 2nd priority items – in this case the mugs. The calculator now stops and checks the rate for the quantity of items in the customer’s cart. The customer has 12 items in total, so the shipping is calculated at 12 items of the large class, which is $18.
Table rate shipping examples using further options
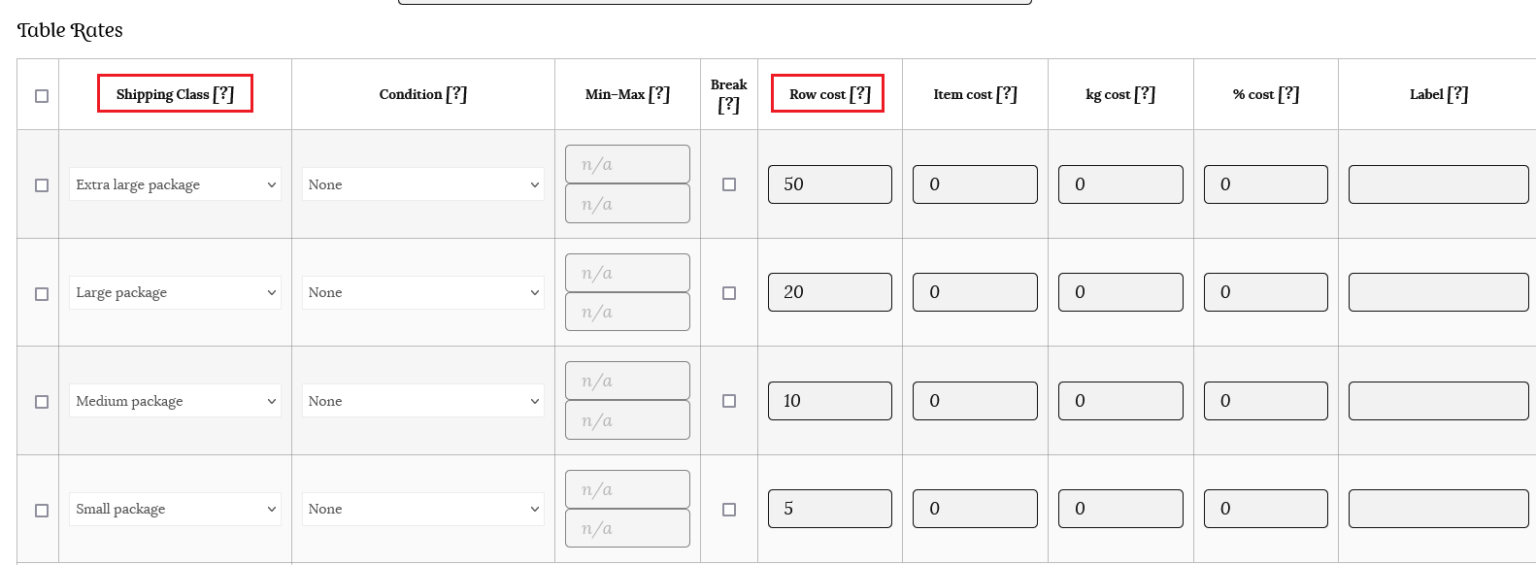
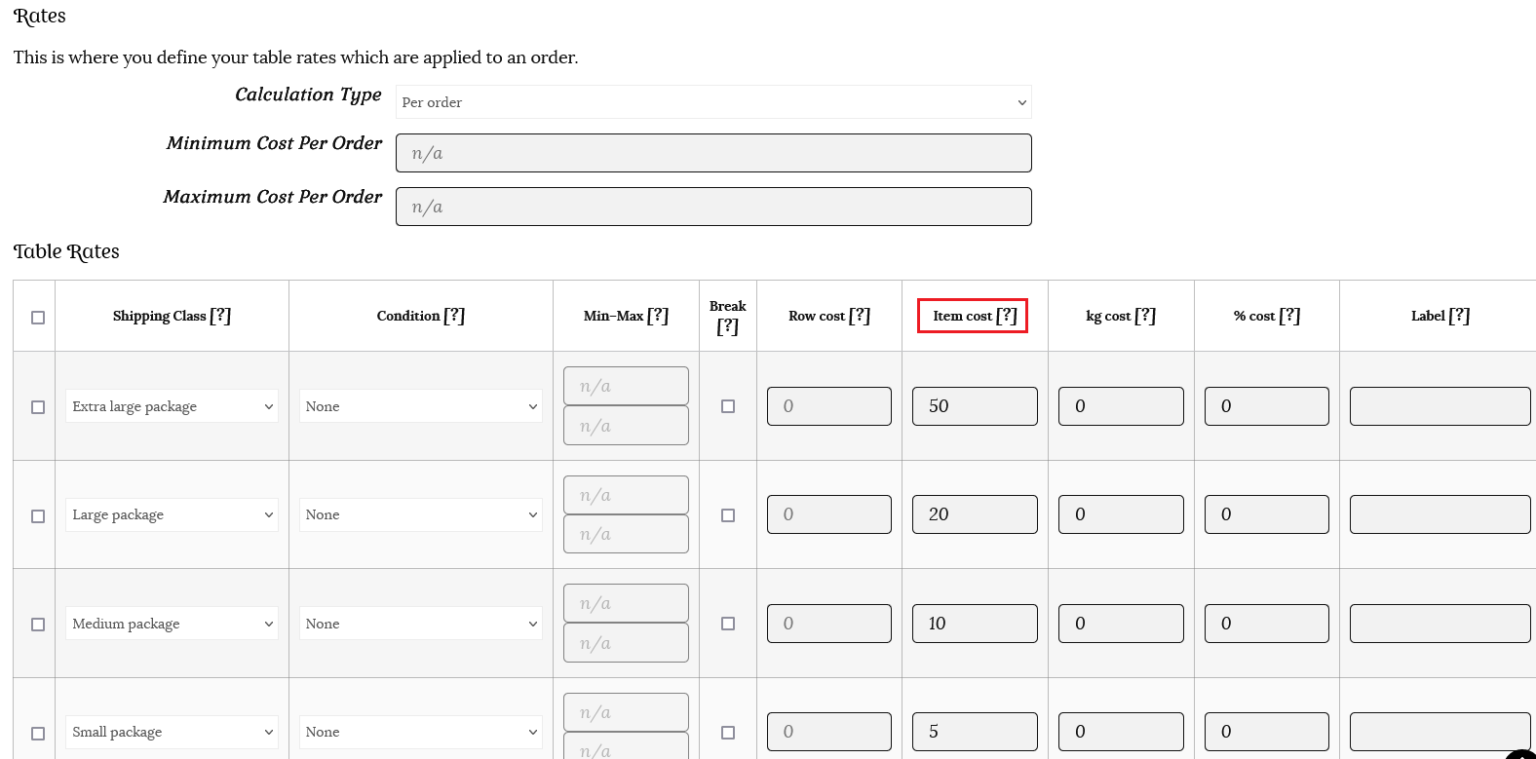
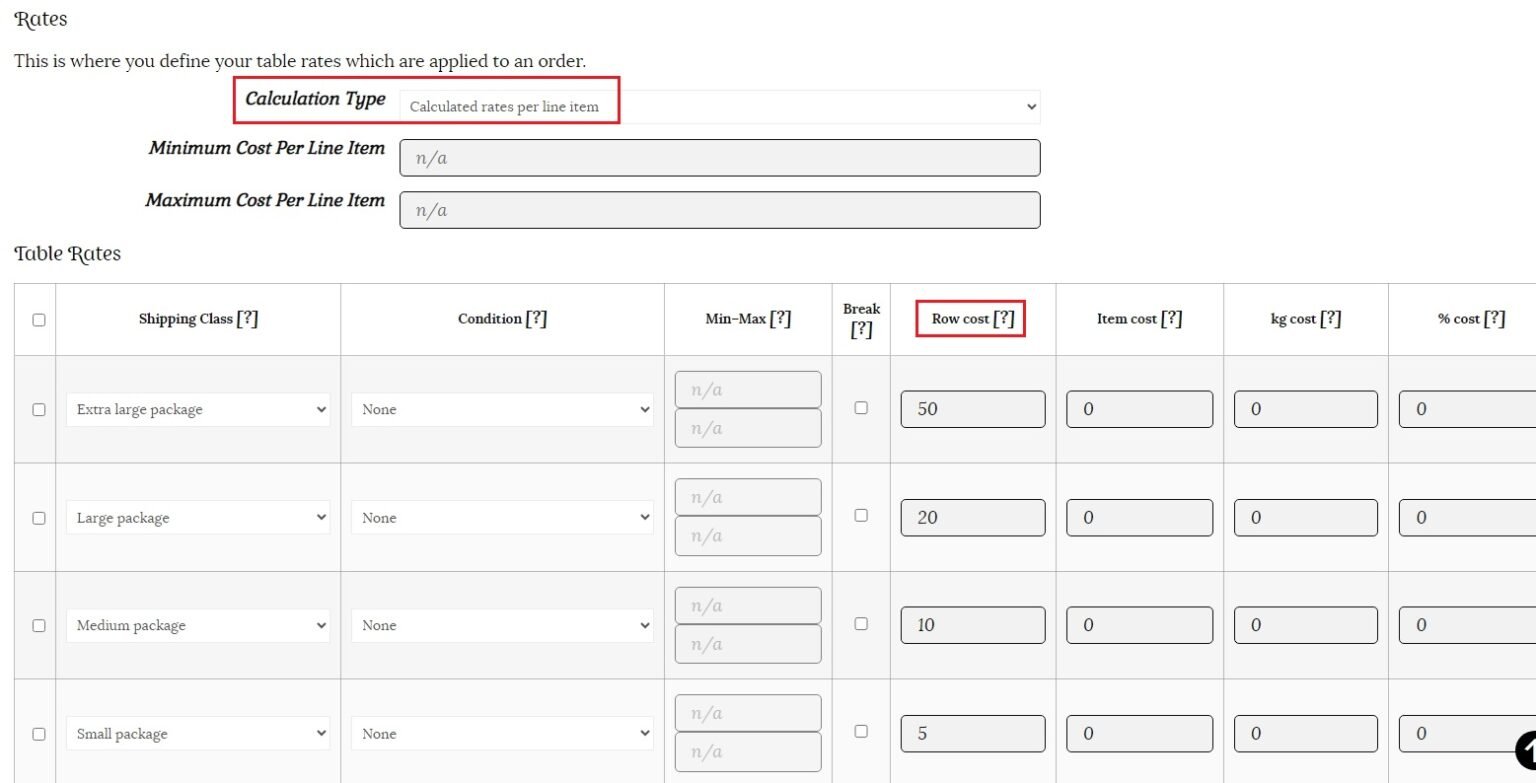
For the example below, we have used the following rates for our shipping calculations. The “Row cost” calculates the cost for shipping the total order. We are not adding any extra charge for each individual item (item cost column).
We have set our class priorities as below. The lower number will have the highest priority. Number 1 is the first/highest priority, number 2 is second priority, number 3 is third and so on.
When calculating shipping, the cart contents will be searched for all shipping classes. If all product shipping classes are identical, the corresponding class will be used.
If there are a mix of classes then the class with the lowest number priority (defined above) will be used.
Per order calculation type
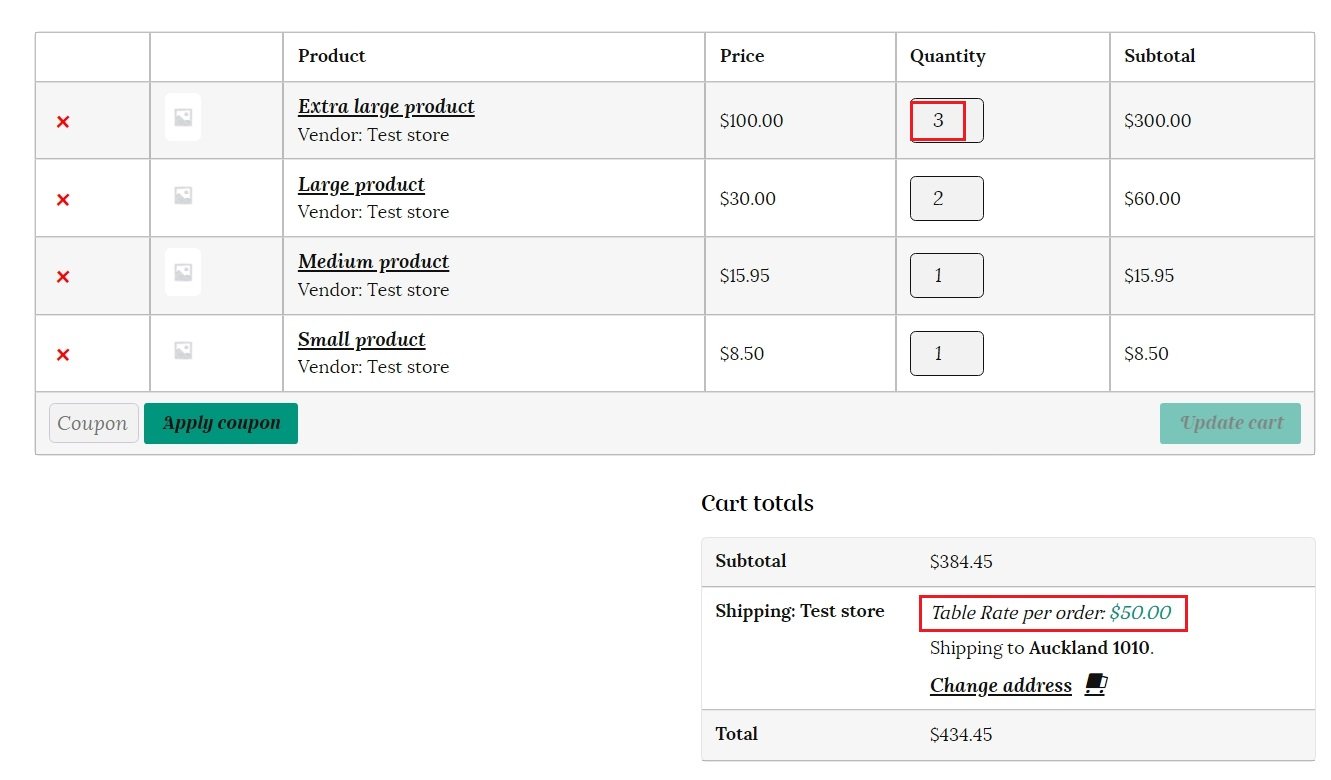
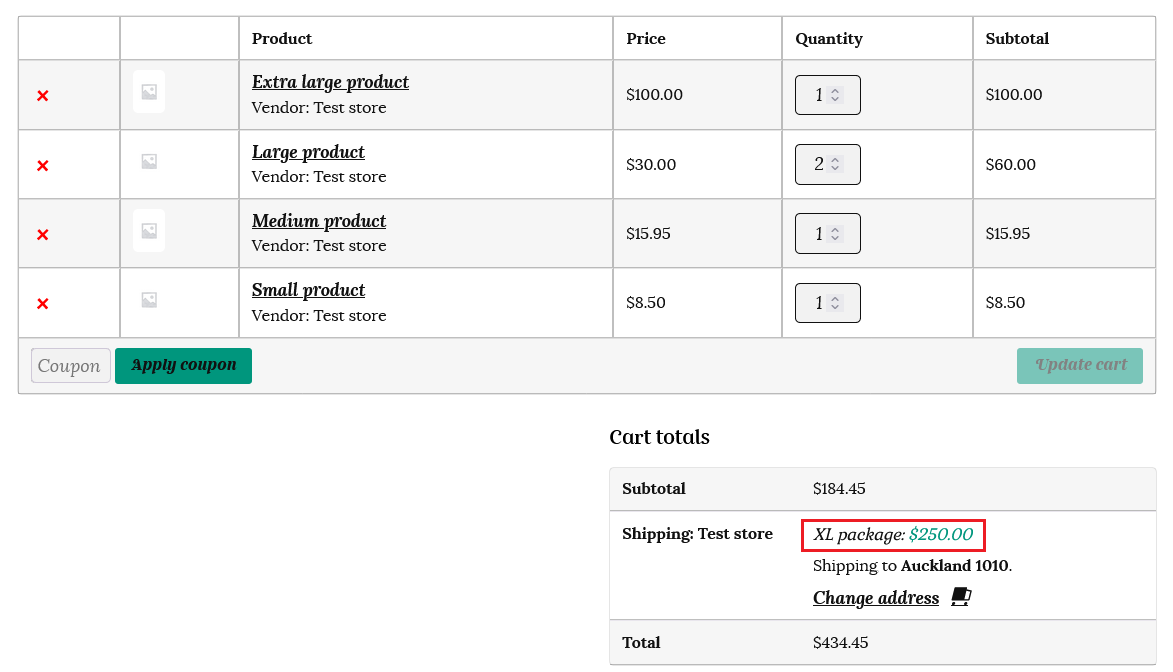
If a customer has added one extra large product, one Large product, two medium products and one small product from out test store to their cart, they will be charged $50 for shipping. This is because the entire order will be charged at the class with the highest priority – in this case the extra large product. This will only be charged once, no matter how many items of the highest priority are in the cart. Please see the 2nd example below. 3 x Extra large products are in the cart, but the customer is still only charged $50, as we selected “per order” as the calculation type and “Row cost” in the shipping table.
If we add our dollar amounts to the “Item cost” column instead, then the shipping will be calculated as the highest class for each item. So 5 items x $50, total $250.
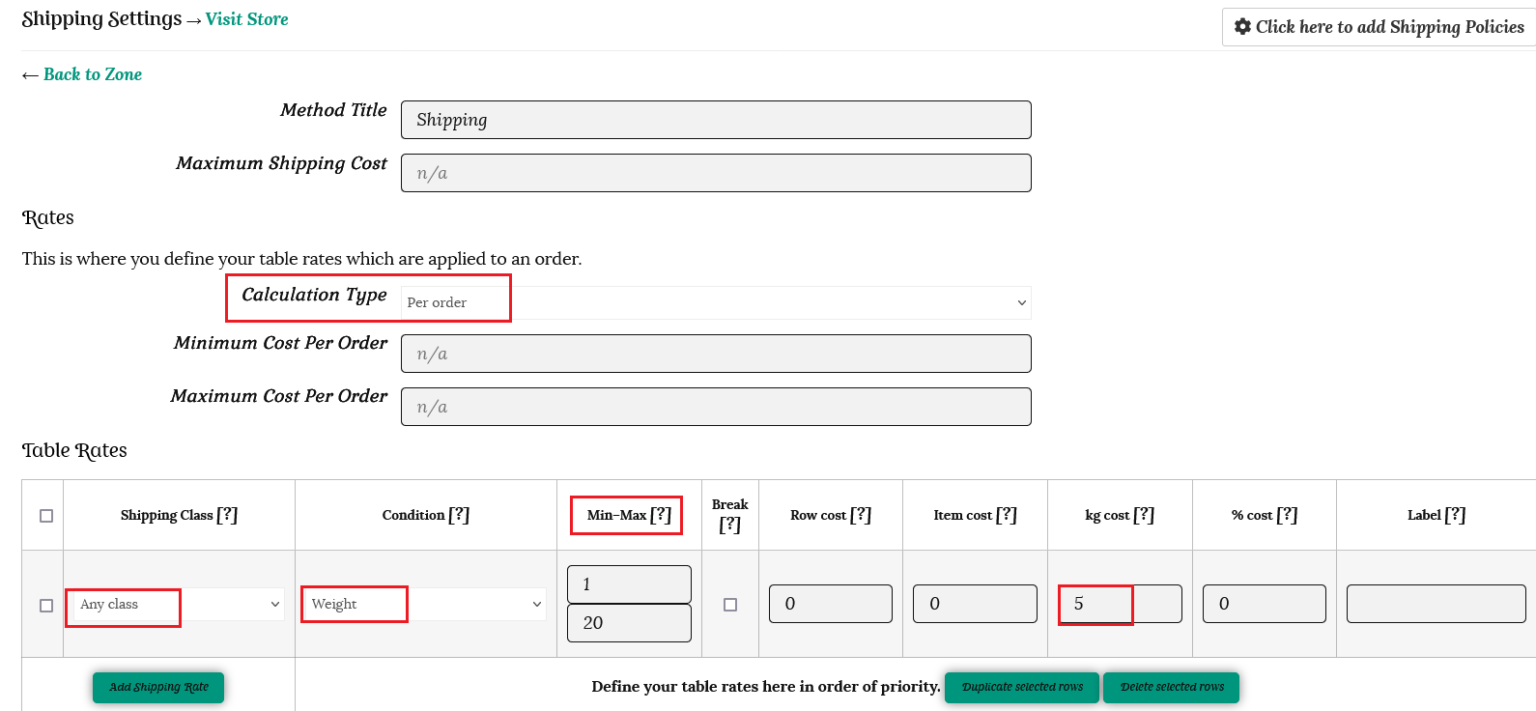
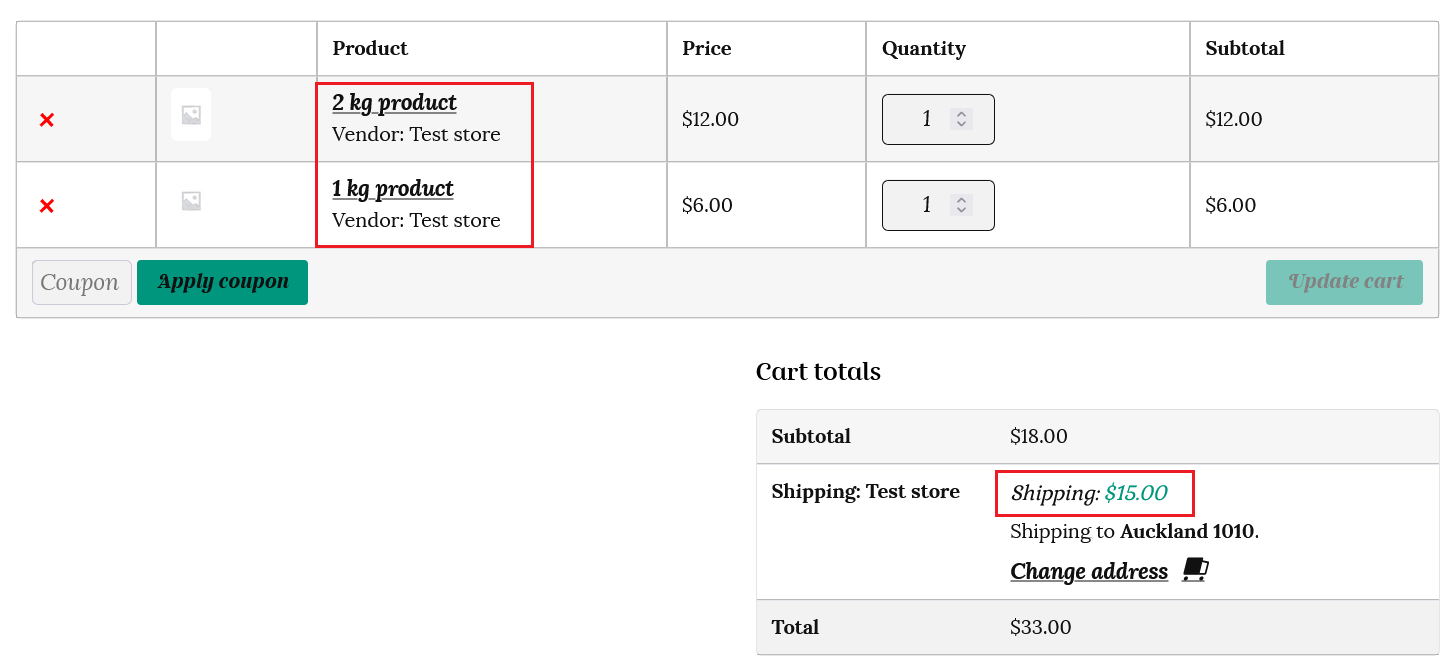
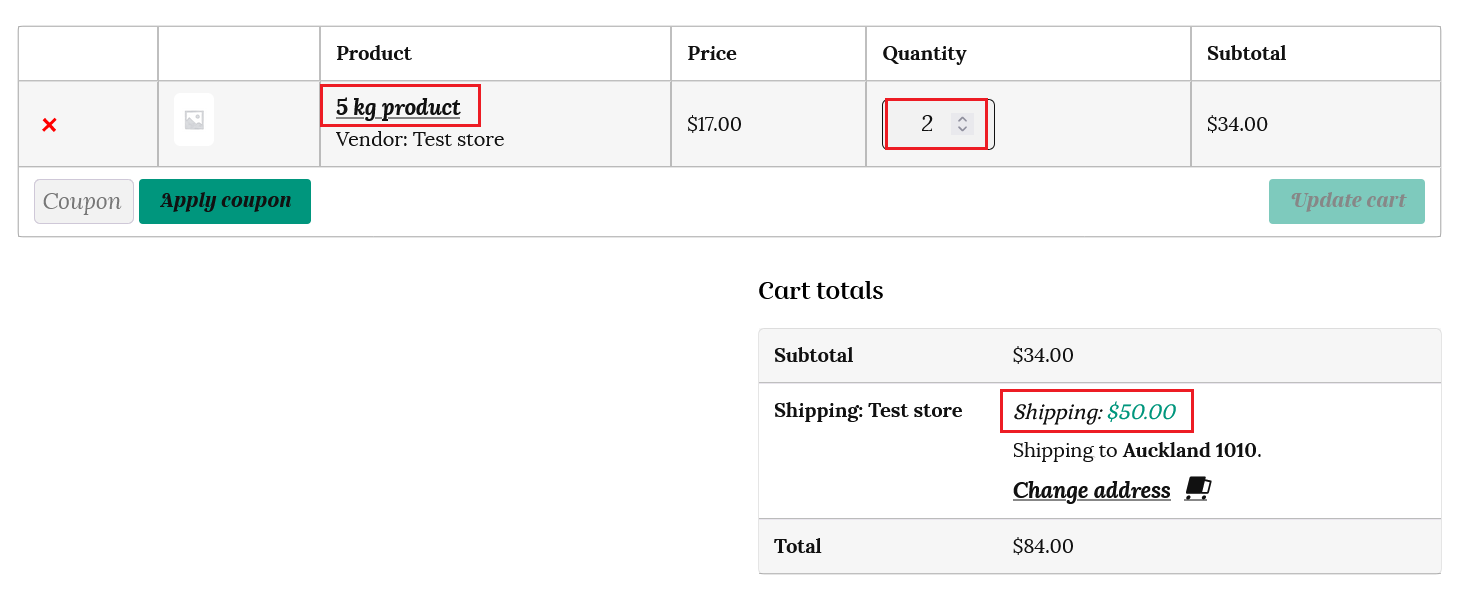
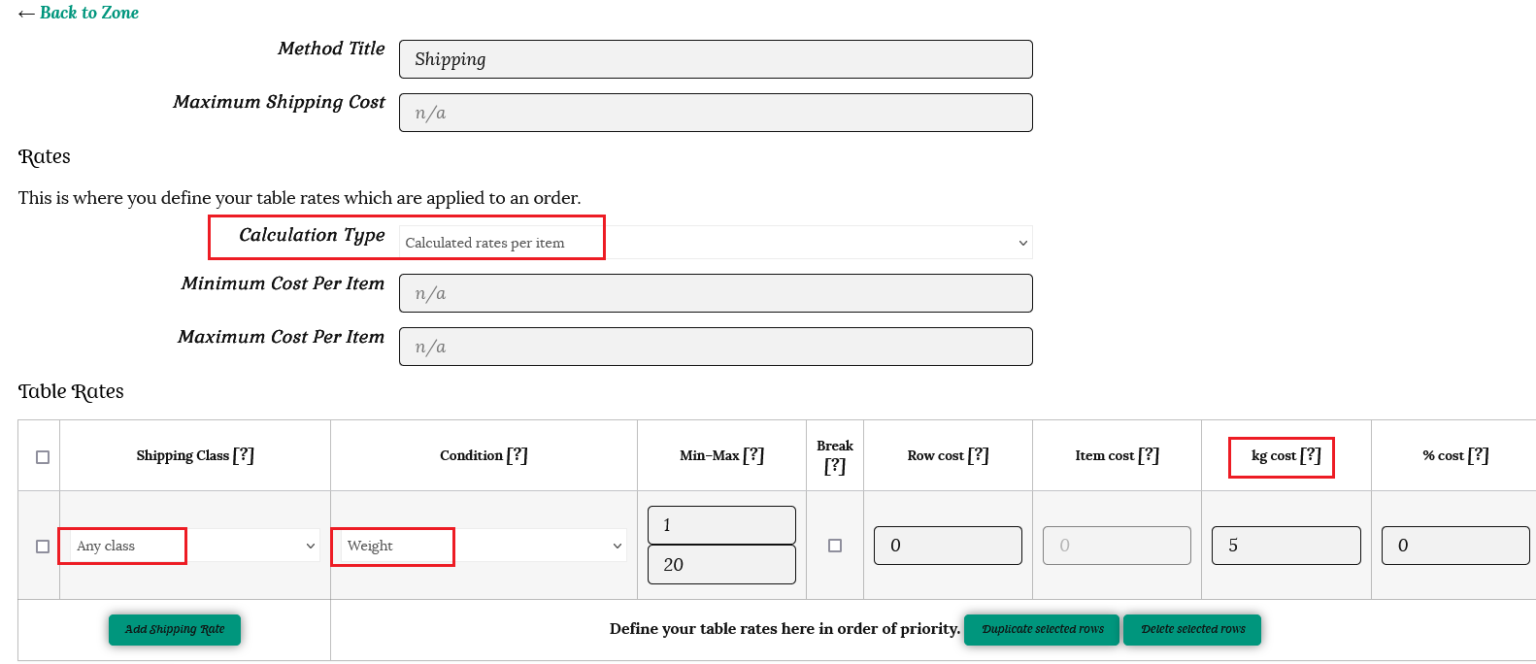
Using weight as the condition – Instead of specifying separate classes, you can use “no class” or “any class” to set your shipping rates based on weight. You will need to assign a weight value to every product listed for this condition to calculate the shipping accurately.
We have chosen the “Any Class” type from the table rates and the condition is “Weight”, with a minimum weight of 1 kg and a maximum weight 20kg. We are charging $5 per kg.
This means, if the total order is between 1 kg – 20 kg, we will charge $5 per kg. So, if the products in the customers cart total 3kg in weight for example, the shipping cost will be $15 (3 x $5).
If the customer has 10kg of products in the cart, then the shipping will be calculated at $50 (10 x $5).
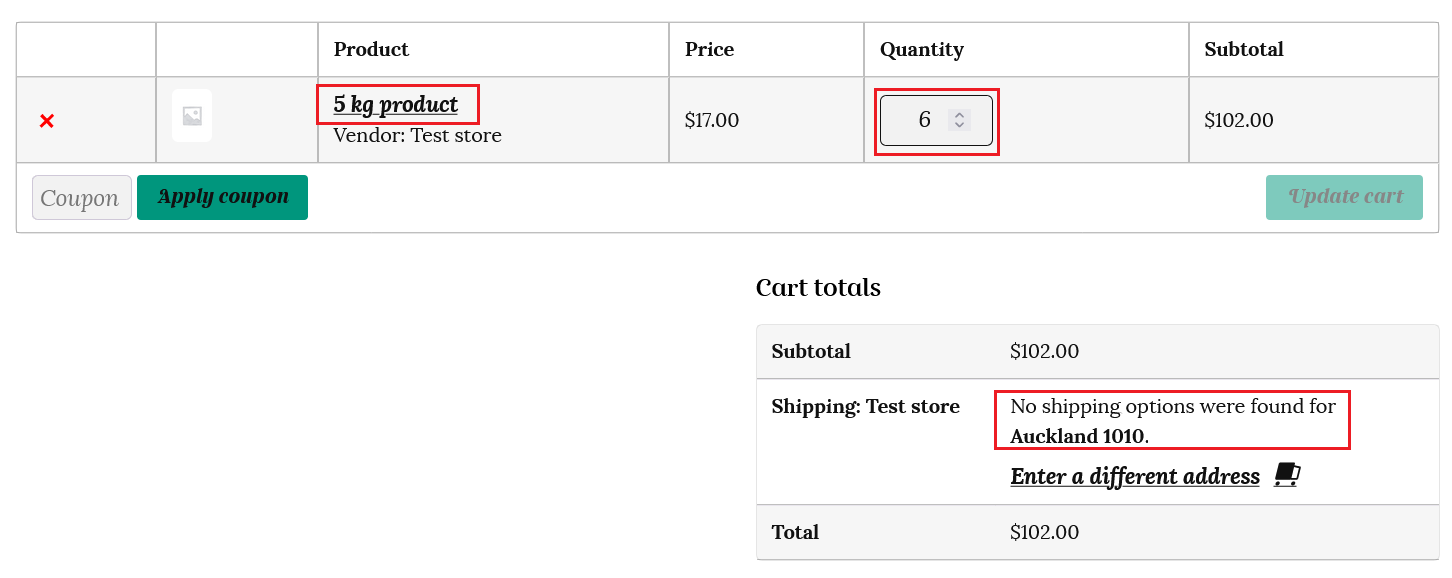
If the order exceeds the maximum amount mark, then it will show ” No shipping methods found.” For example, the customer has 30kg of products in their cart – as this is greater than the 20kg maximum, it will show as no shipping options found.
Using item count as the condition – The total number of items in an order will be counted and the shipping rate applied will be for the cost of shipping the highest priority item (lowest number item) in the class priority chart.
The customer has 1 medium item, 1 small item and 5 extra large items in their cart. The customer will be charged for 7 extra large items. Number of items x highest priority charge. In this example 7 items total x $20 for the extra large shipping class = $140.
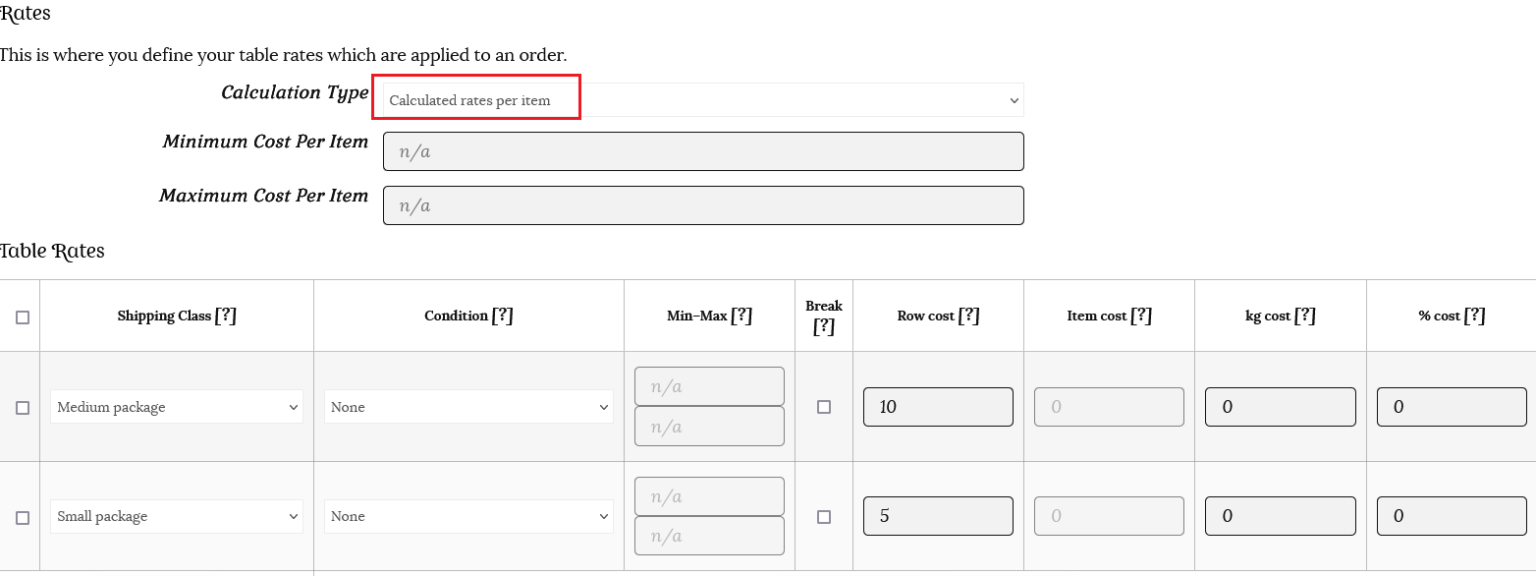
Calculated rates per item
This time we will use the same row cost rates, but choose “Calculated rates per item” as the calculation type. This option counts the shipping based on the price, weight, etc. There is no label option for this calculation type.
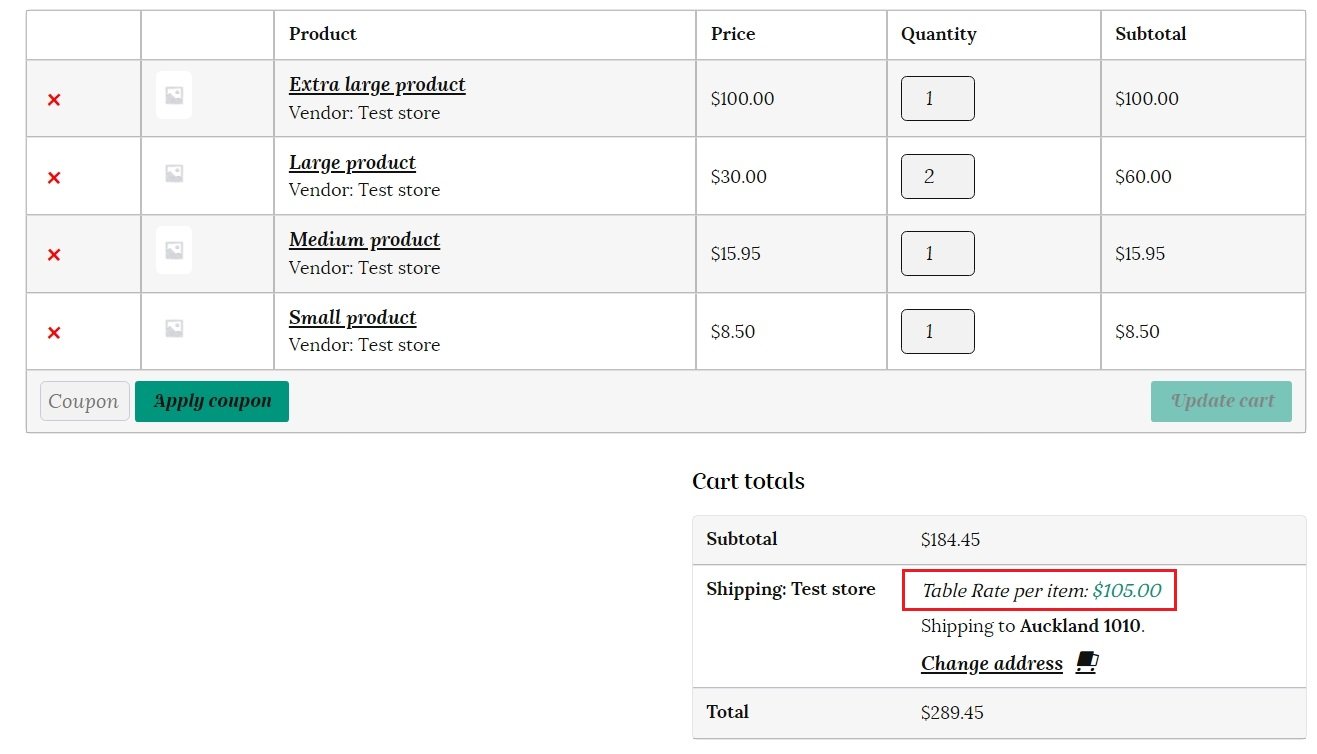
With the same items in their cart, the cost for each individual item according to it’s own class is tallied when “Calculated rates per item” is selected. So this time the shipping cost will be $50 (XL) + $40 (2 Large items @ $20 each) +$10 (M) + $5 (Small) = $105
Using weight as the condition –
This time we will use “weight” as the condition, 1 – 20 kg as our min-max amounts, and charge $5 per kg.
So if a customer has 3 products in their cart, with a total weight of 8kg, then the shipping will be calculated at 8 x $5 = $40.
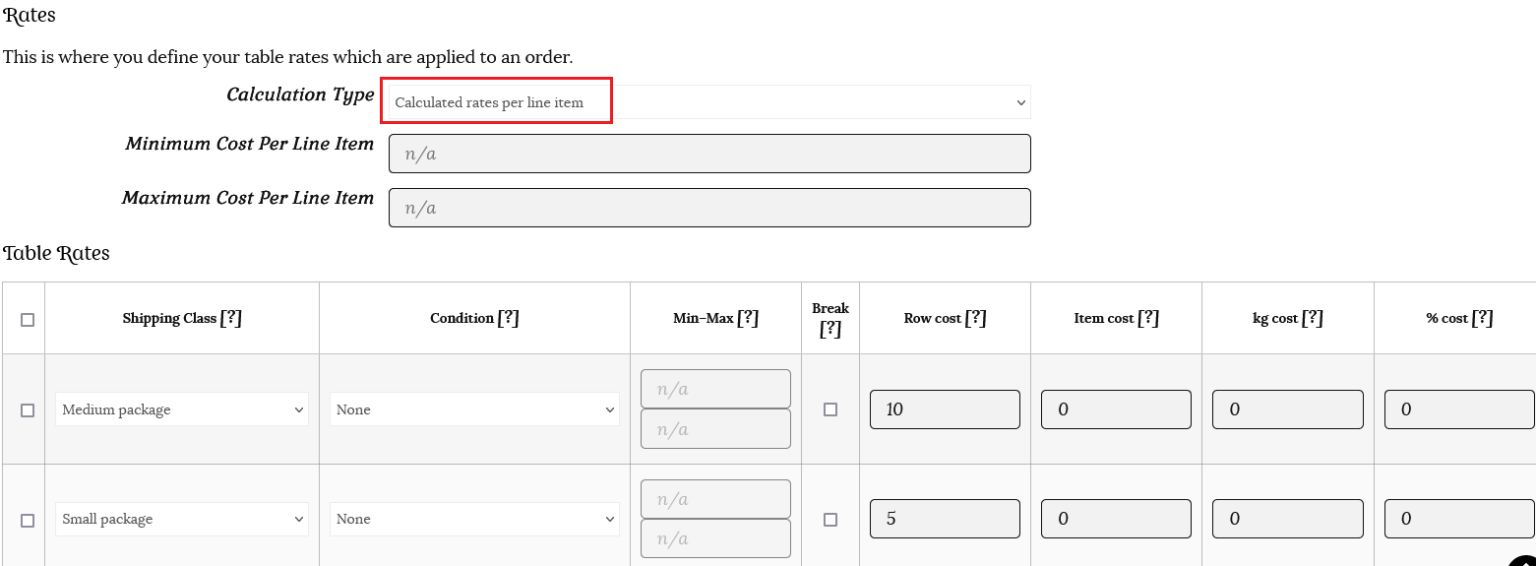
Calculated rates per line item
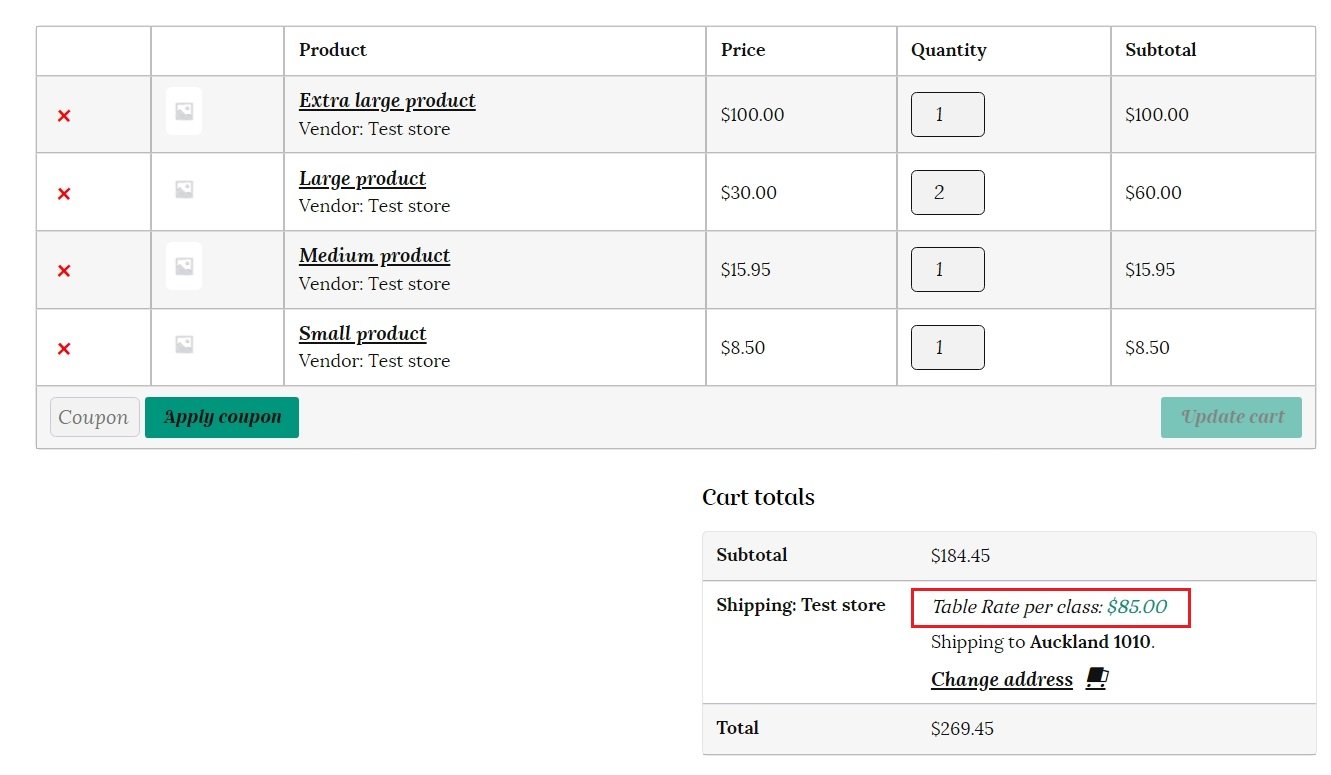
Changing the calculation type to “Calculated rates per line item” changes the shipping calculation to $50 (XL package) + $20 for the 2 Large items (these are on the same line so only one shipping charge is used) + $10 (M package) + $5 (S package) = $85
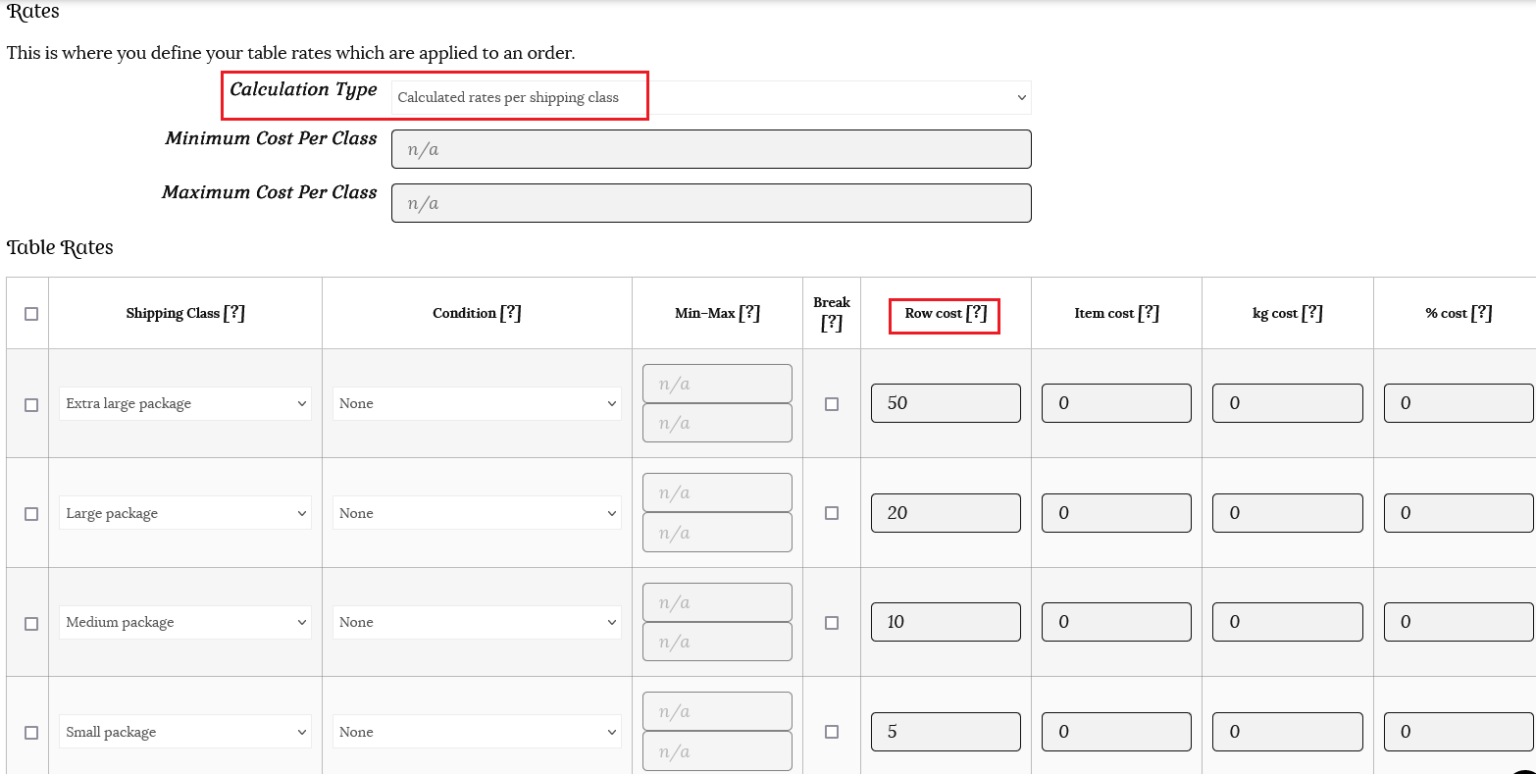
Calculated rates per shipping class
This calculation type calculates the shipping amount based on the shipping class. If the customer orders a product that falls under any shipping class, then the shipping cost will be calculated based on that class conditions.
If we select “Calculated rates per shipping class” for the calculation type, each individual shipping class in the cart is totaled.
A customer has 1 extra large product, 2 large products, 1 medium product, and 1 small product in their cart. So the shipping calculation would be $50 for the XL, $20 for the L (even thought there are 2 items they are counted as 1 base shipping class), $10 for the M and $5 for the S, making a total of $85.
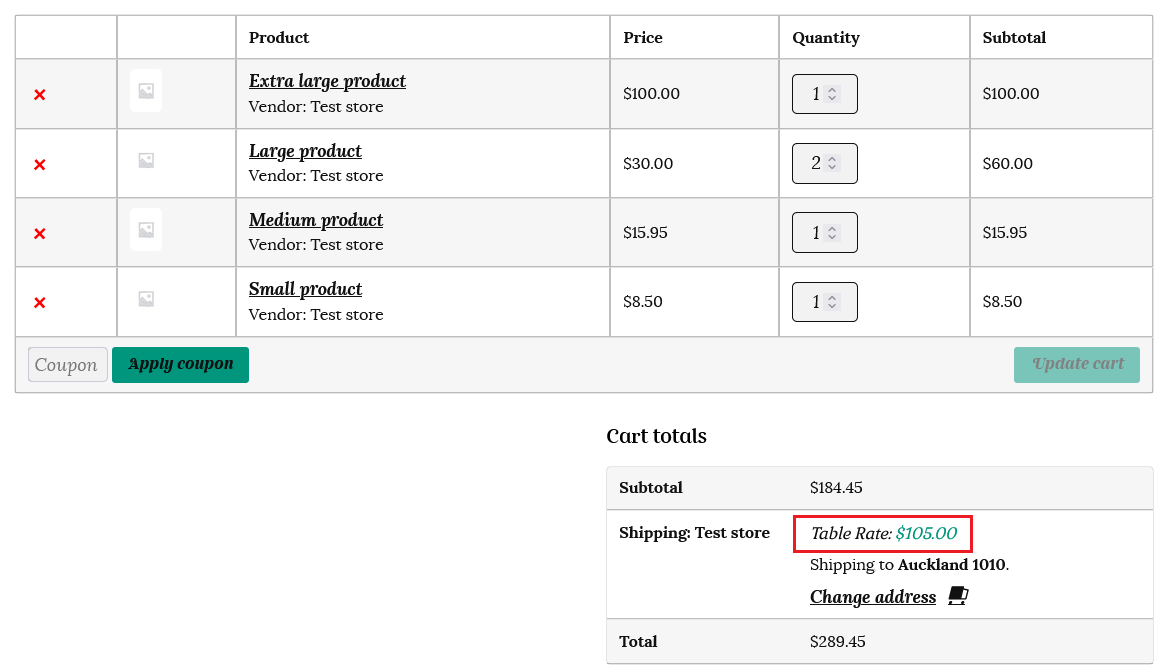
If we add our dollar amounts to the “Item cost” column, each item and it’s corresponding shipping class is totaled, so the shipping cost is $50 (XL package) + $40 ( 2 x $20 for the L package) + $10 (M package) + $5 (S package) = $105.
Using weight as a condition– Make sure you have assigned a weight value to each of your products when you list them to use the weight condition.
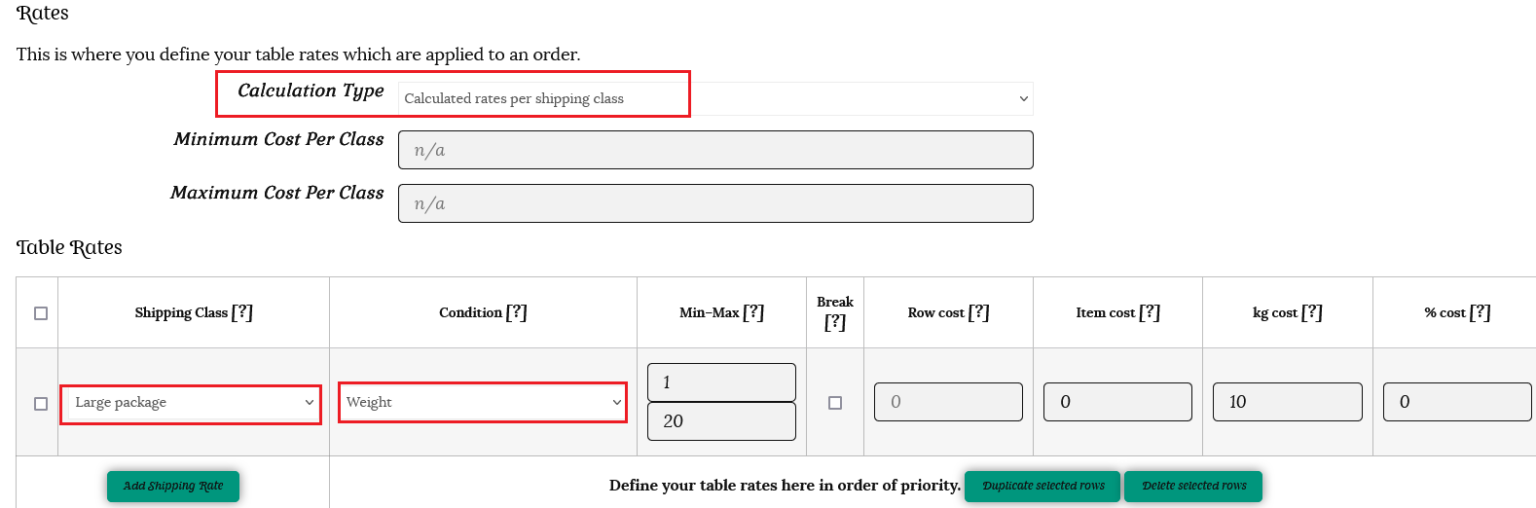
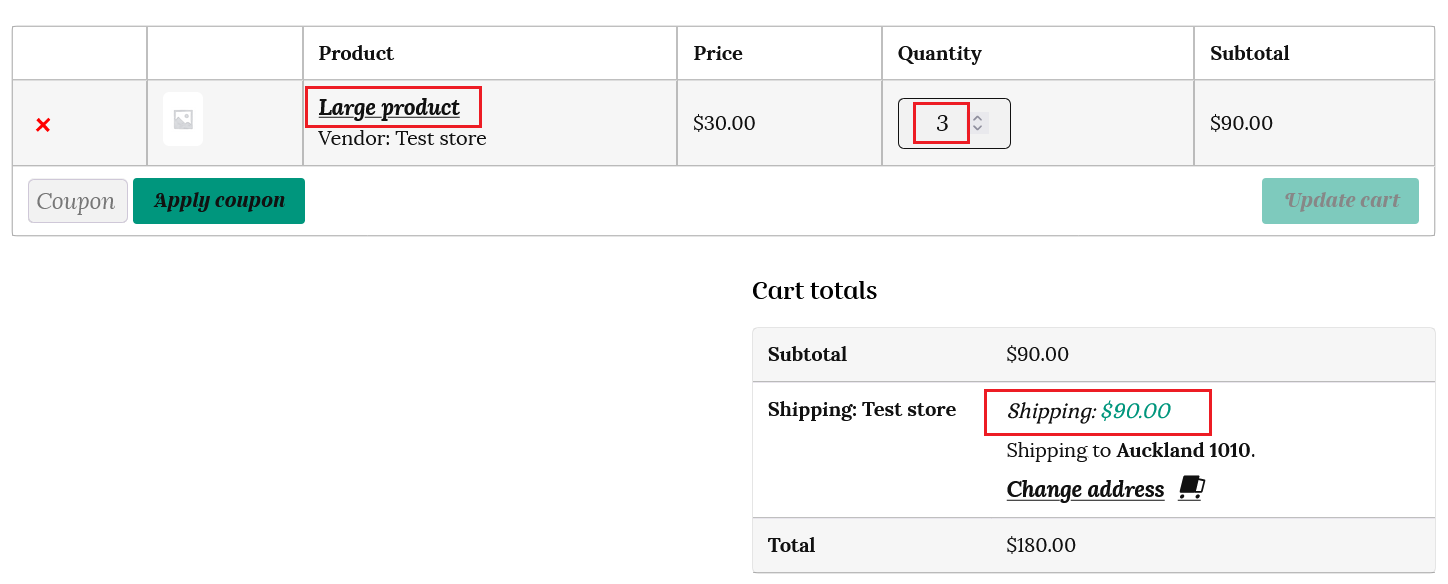
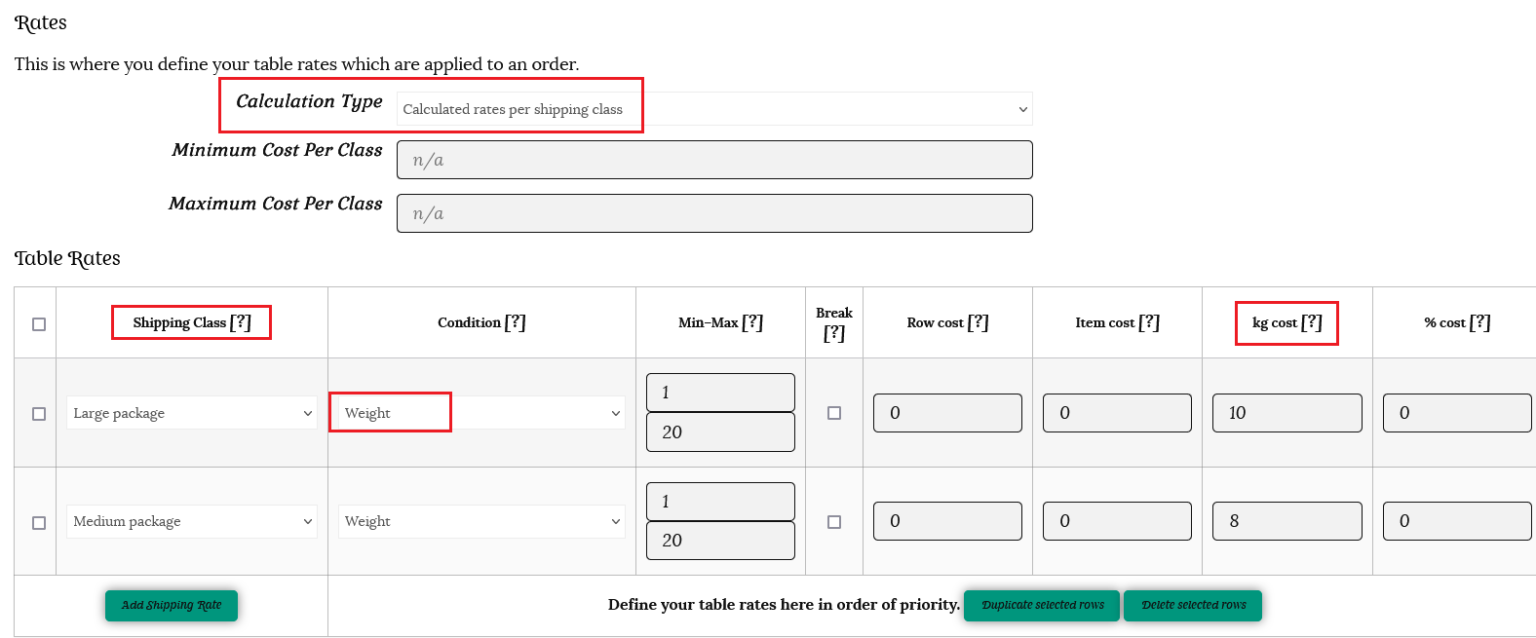
For the example below, we have chosen a class “Large.” So, if a customer orders a product of the Large Shipping class, then for every kg, we will charge $10. We have set the minimum weight to 1kg and the maximum weight to 20kg.
So, if a customer orders 3 large items weighing 3kg each that have the shipping class “Large package” then they will be charged 9kg x $10 = $90 for shipping.
For the example below, we will also set the rate for a “Medium package” as $8 per kg.
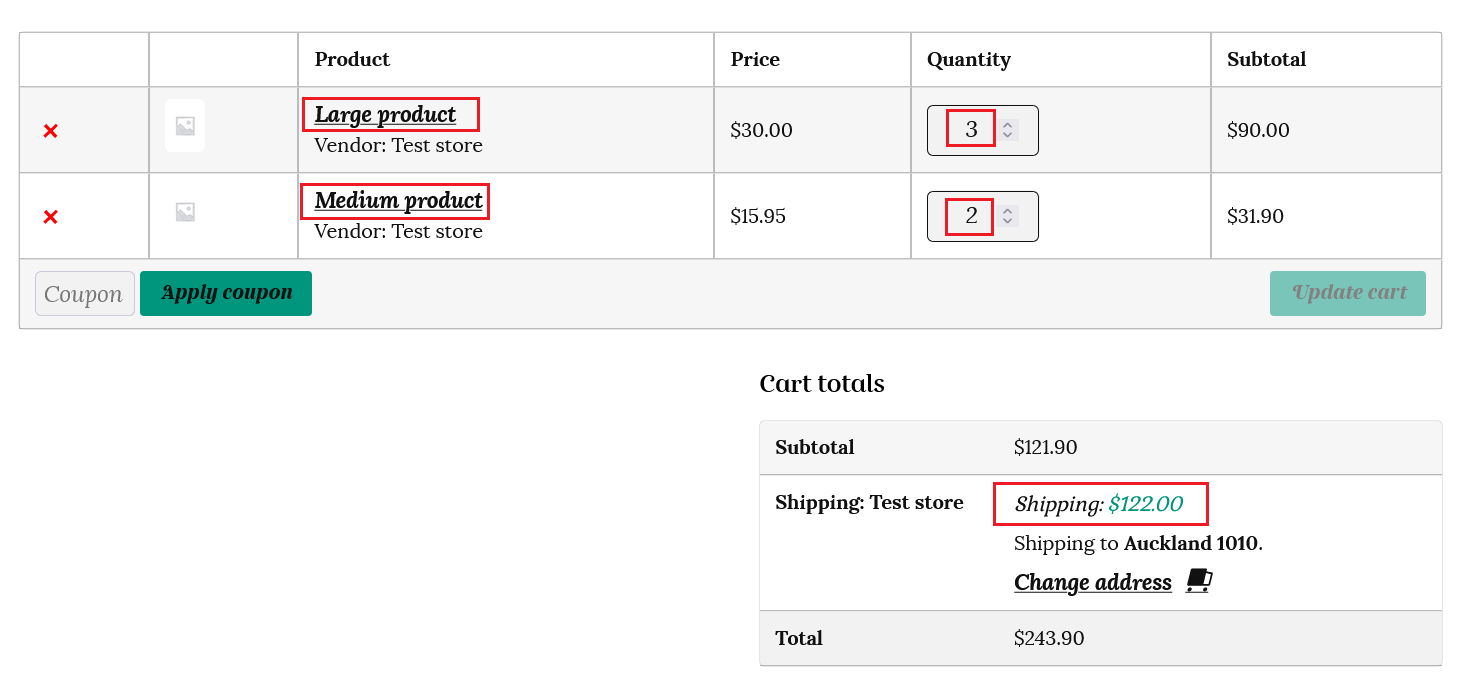
A customer adds 3 large items weighing 3kg each (9 kg total) and 2 medium items weighing 2kg each (4 kg total) to their cart.
The shipping will be calculated at 9kg x $10 ($90 total) for the large shipping class plus 4 kg x $8 ($32 total) for the medium shipping class. This makes a total shipping amount of $122.
Working examples – Tom’s store;
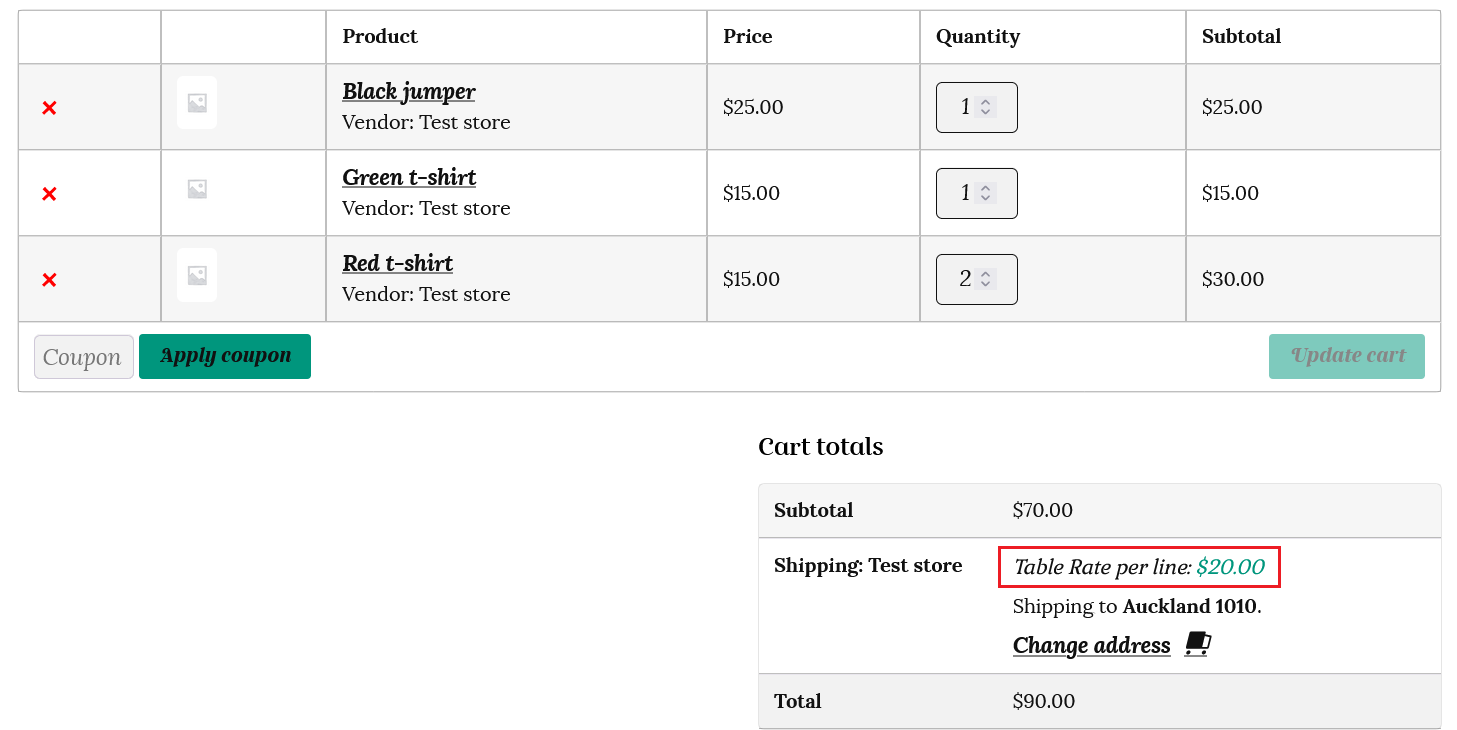
Tom’s store sells t-shirts and jumpers. A customer has the following items in their cart.
Number of items
Item
Shipping class
2
red t-shirt
small
1
green t-shirt
small
1
black jumper
medium
The following costs are set for medium and small shipping classes.
Cost for shipping class
Cost
Priority
medium
10
1
small
5
2
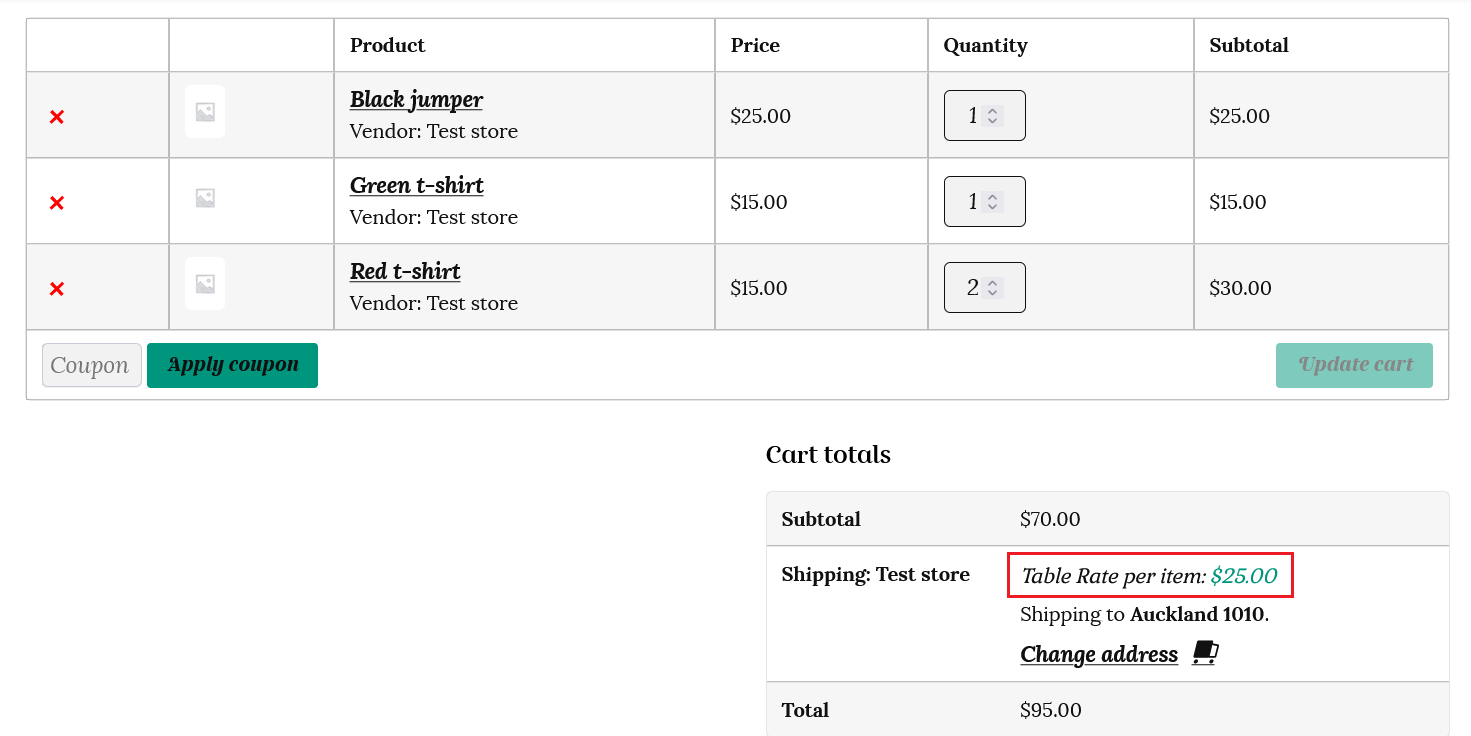
The total shipping cost for each calculation type is shown below;
Per order
Per item
Per line
Per class
10
25
20
15
Let’s go over this in more detail again;
i) The “per order” calculation type takes into account the item with the highest or 1st class priority. In this case it is the jumper with the medium class. So the shipping charge is total for the order is $10.
ii) the “Table Rate per item” method adds the shipping for each individual item in respect to their class. In this case their are 3 items (t-shirts) in the small class (3 x $5 = $15) plus 1 jumper in the medium class (1 x $10), making a total of $25.
iii) the “Calculated rates per line item” will calculate the shipping based on each line in the cart with respect to the class. So in this case it will total 1 x $10 (black jumper) plus 1 x $5 (green t-shirt) plus 1 x $5 for both red t-shirts as they are on the same line. This totals $20.
iv) the “Calculated rates per shipping class” method will add each different shipping class in the cart together. In this case $10 for the medium shipping class (black jumper) plus $5 for the small shipping class (this calculation type counts the 3 t-shirts as one small shipping class.) The total shipping cost will be $10 + $5 = $15.
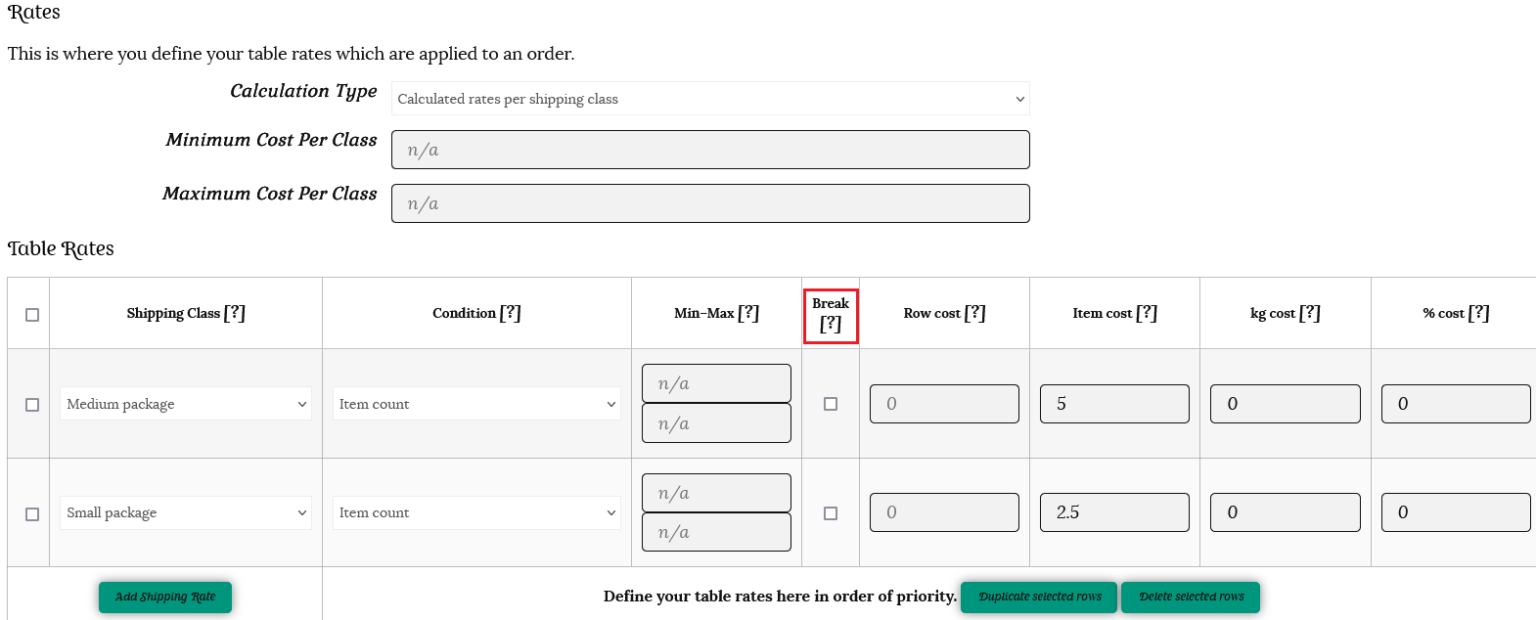
Applying multiple rules to the same shipping class
It’s all going well for Tom, but he realized that the basic shipping rate goes up when people buy more than 50 t-shirts. He needs to add another rate. The original rate is edited to a Minimum of 1 and a Maximum of 49. And he adds the following rule:
Shipping Class – small
Condition – item count (same class)
Min:50 Max:1000
Cost – 10
Item Cost – 1
His table is set up as follows:
When customers purchase his t-shirts, they are charged as follows:
Purchasing 49 t-shirts costs $51 for shipping (49 x $1)+ $2 base rate
Purchasing 50 t-shirts costs $60 for shipping (50 x $1)+ $10 base rate
In the example below, where a customer has a total of 100 t-shirts in their cart, they will be charged a base rate of $10 as the item count is over 50, and $1 for each of the 100 items ($10 + $100). This means the total shipping charge will be $110 as shown below.
Merging shipping for different shipping classes
There are times you may wish to combine shipping between different shipping classes.
Using the “Break” option;
Example 1;
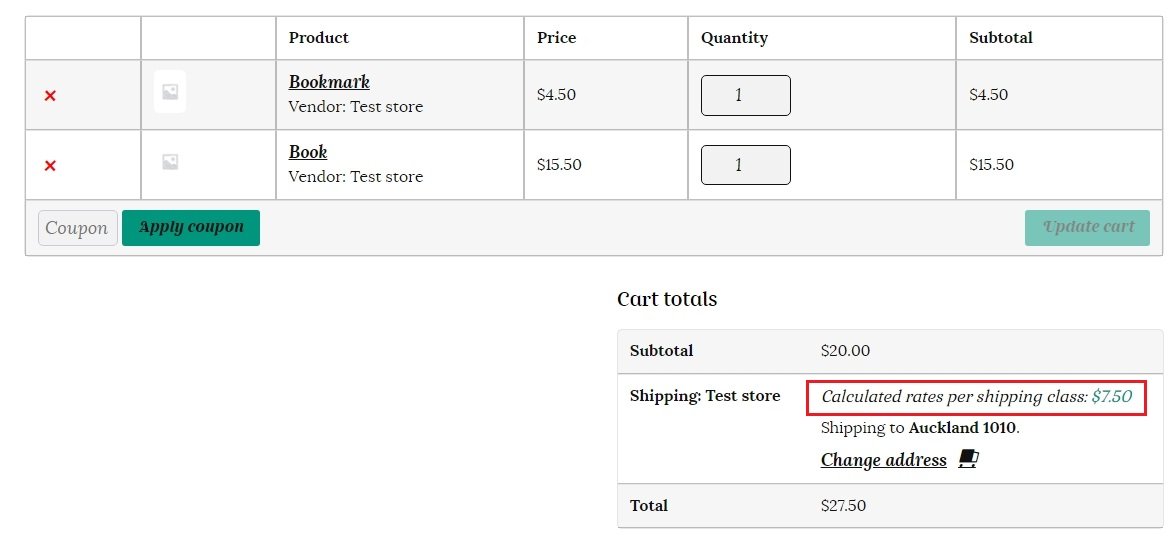
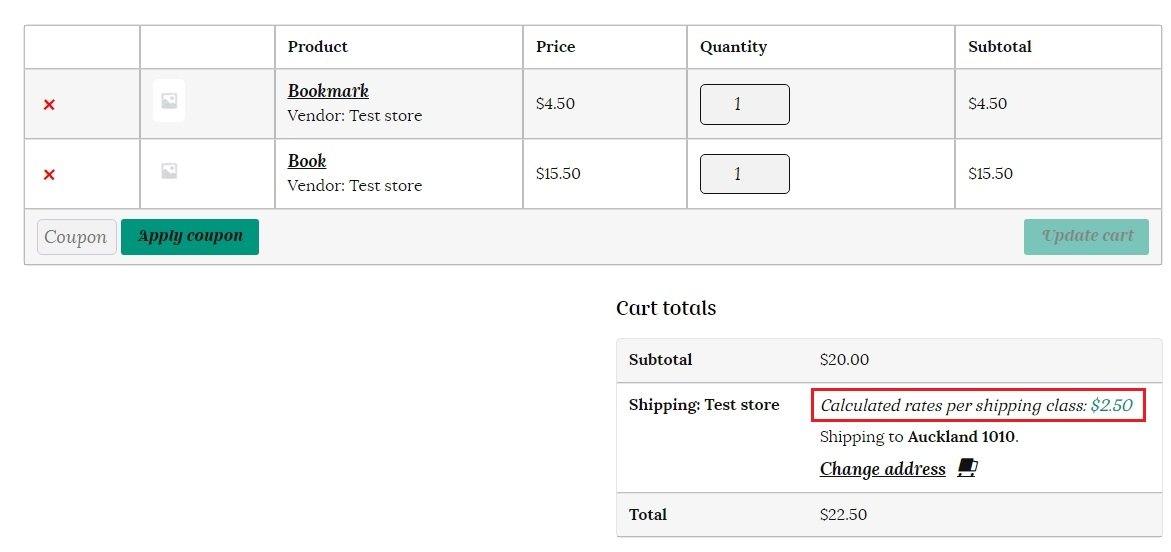
Daisy’s store sells both bookmarks and books. The bookmark is in the small shipping class, and the book is in the medium shipping class. If a customer orders a book and a bookmark then you can simply bundle this shipping together without having to charge shipping for the book and the bookmark separately.
If shipping for the bookmark is usually $2.50 and shipping for the book is $5, then you can offer a shipping cost of $5, not $7.50.
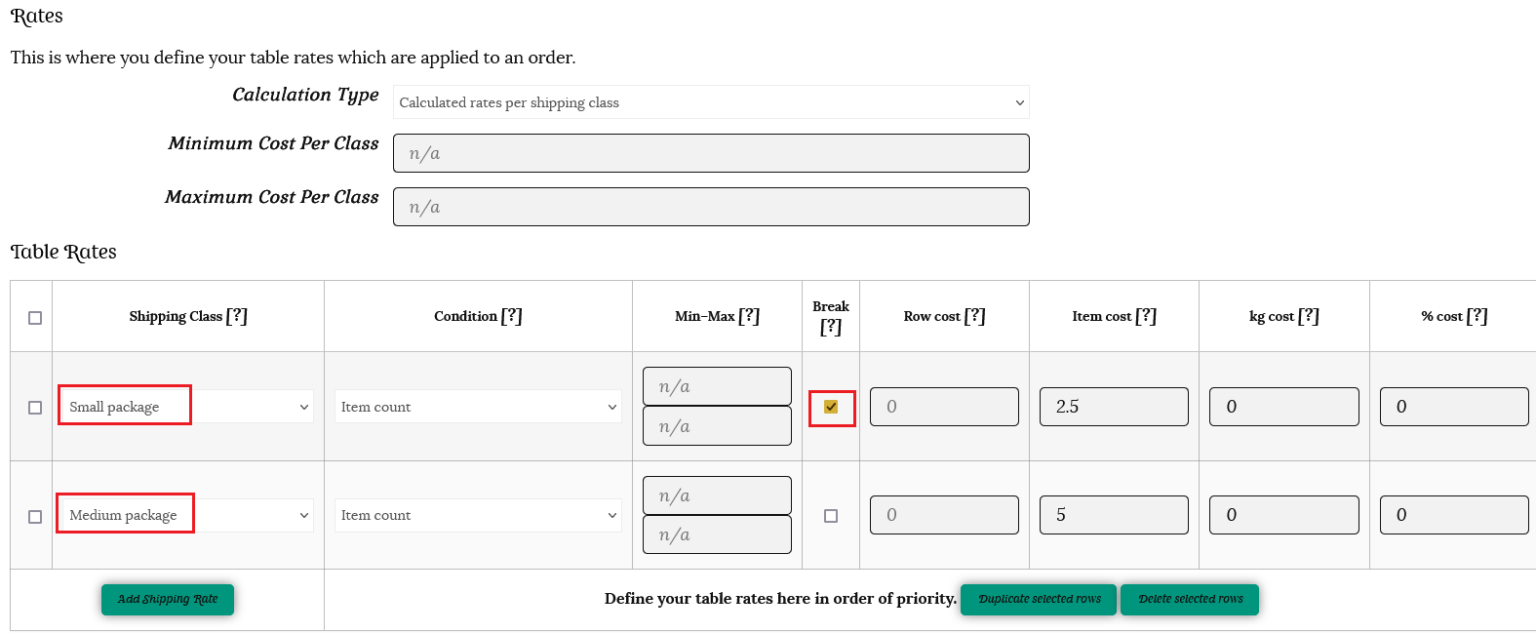
To properly merge items for shipping, you need to ensure that the table is set up with the highest rate at the top and the lowest rate at the bottom.
What you need to do is to tell the shipping calculator; “Go down this table of rates and stop when you get to the first condition that matches.”
To merge rates in a simple setup, you would;
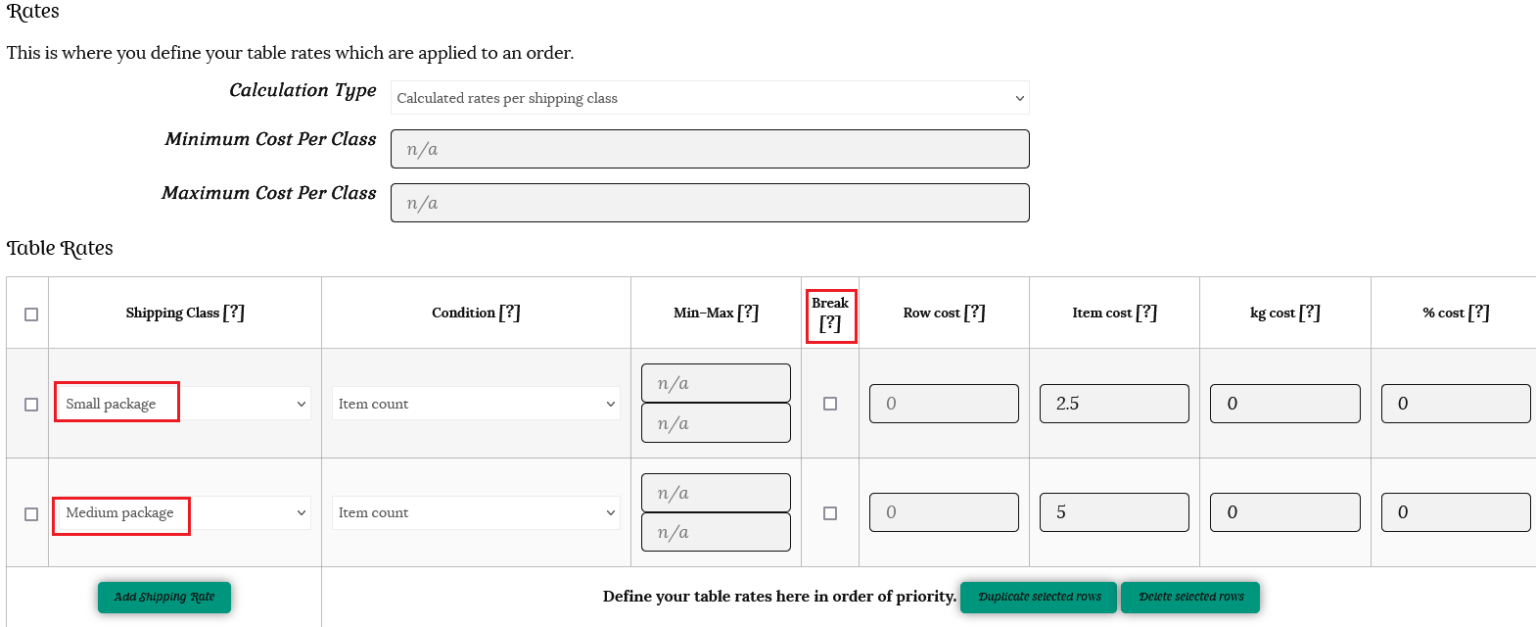
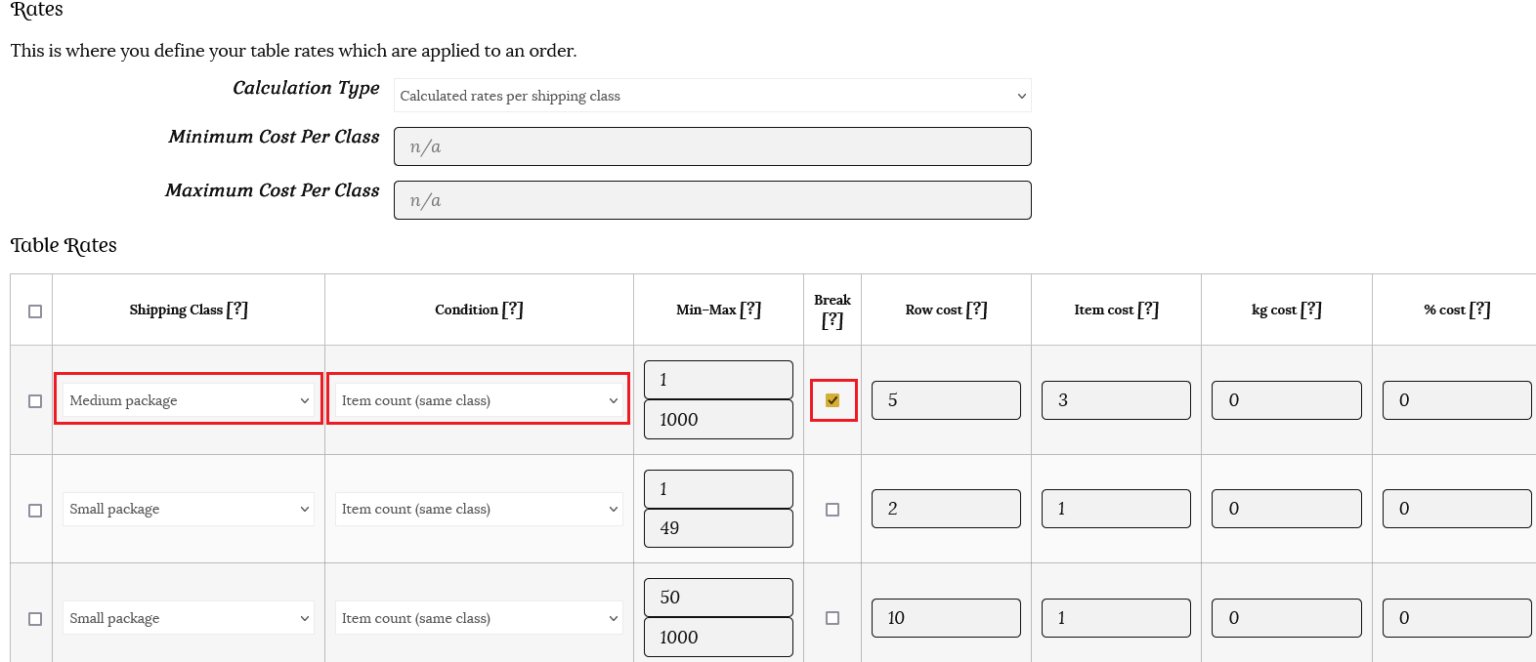
i) Choose Calculated rate (per shipping class) for your calculation type. ii) Create rates on the table, with the highest rate at the top. In our example of books and bookmarks, the medium shipping class is above the small shipping class. iii) Ensure that the Break option is checked.
Let’s take a look at the difference when the order and the break checkboxes are used.
In the first example, the table is set up correctly. Medium is above small on the table, and the break checkbox tells the plugin to stop its calculation when the first condition is met. The shipping price for the customer is $5 so the bookmark is correctly bundled with the book.
In the second example, medium is correctly above small, but the break checkbox hasn’t been checked. This means that the shipping calculator continues to calculate through the table for all of the items, calculating separately for each item and offering a final price of $7.50.
In this example, the break checkbox is checked, but small is above medium in the table. As the shipping calculator calculates down through the table stopping at the first row in which its condition is met, it stops at small. The customer is offered the price of $2.50, which is the shipping cost for the bookmark, not the book.
In the final example, small is above medium in the table and the break checkbox is not checked. This time, the shipping calculator checks every item in the basket against the table without stopping. It offers the price of $7.50 for shipping, totaling the cost for each line item, rather than combining.
Example 2;
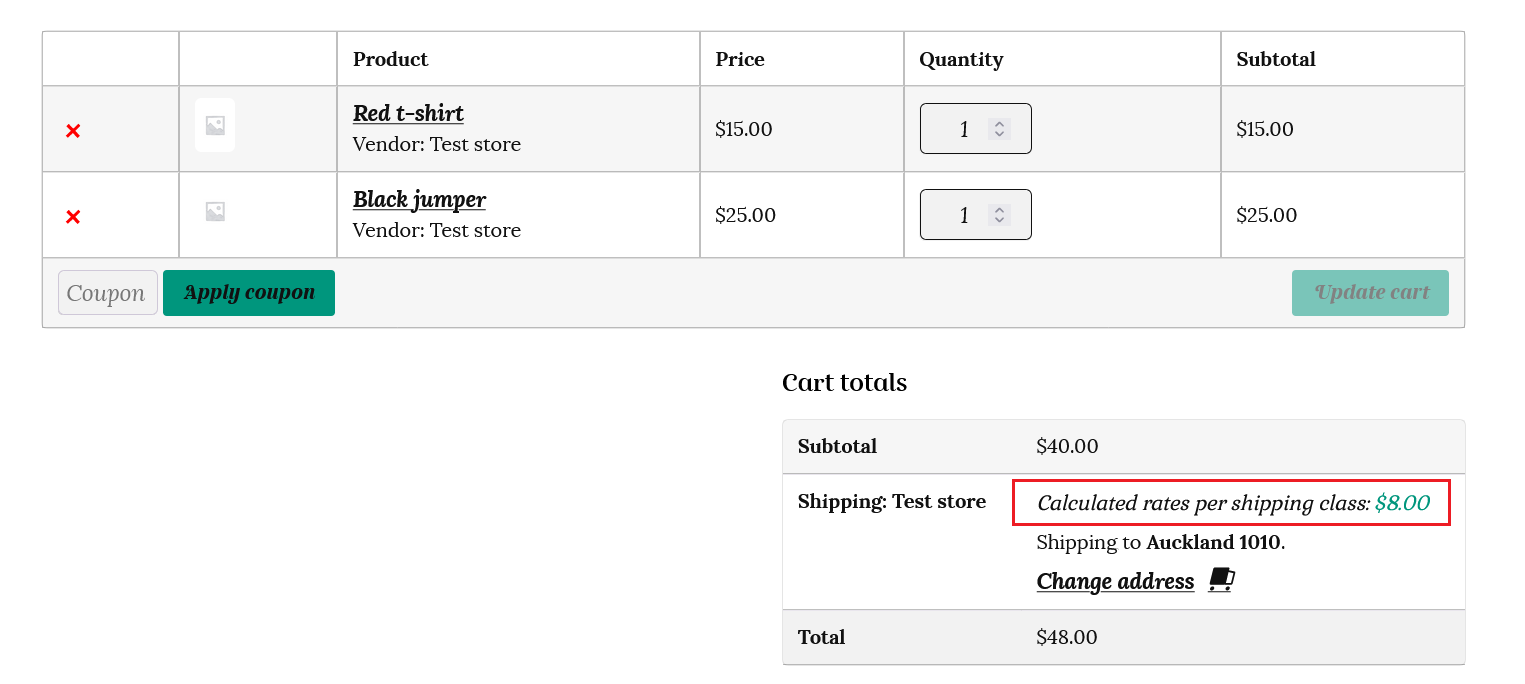
Sam’s been pretty successful with selling t-shirts in his store, so he decides to get into selling jumpers. When a customer buys a jumper and a t-shirt, he knows that he can package the t-shirt and jumper together, so he doesn’t want to charge shipping for each separately. His base rate for shipping a jumper is $5, and each jumper costs $3 to ship. To create rules for shipping jumpers, he does the following;
Creates a shipping class medium to apply to all of his jumpers
Opens his selected shipping zone
Creates the following rules;
Shipping Class – medium
Condition – item count (same class)
Min:1 Max:1000
Cost – 5
Item Cost – 3
His table is set up as follows;
As described in the section on Merging shipping, the most expensive shipping class needs to be at the top of the table. This will ensure that the customer is only charged the rate for shipping the jumper.
When a customer has both a t-shirt and jumper in their cart, the shipping reflects the combined shipping cost – in this case $8 ($5 base order cost plus $3 for the 1 item) as the shipping calculator stops/breaks after encountering a medium package (jumper).
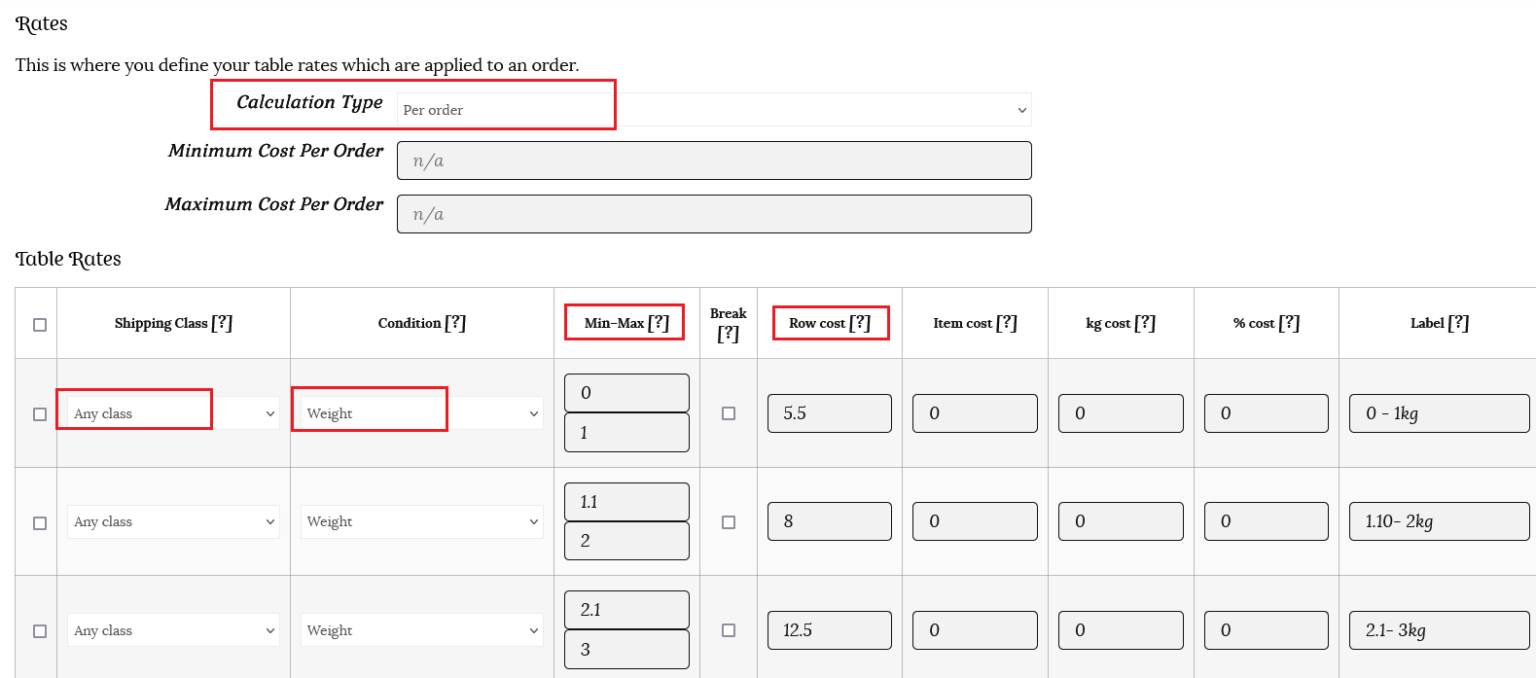
Sending by weight
Sam decided to move to a new courier company. It’s more cost-efficient for him to ship by weight, so he needs to rethink his shipping rates. The new rates provided by the courier are:
0 – 1 kg: $5.50
1.1 – 2 kg: $8
2.1 – 3 kg: $12.50
This time the calculation type is Per Order. This will calculate the total based on the weight of the entire order. He needs to create three rows, one for each rule he wishes to create. These will apply to any shipping class, with the weight condition, and a minimum and maximum weight applied.
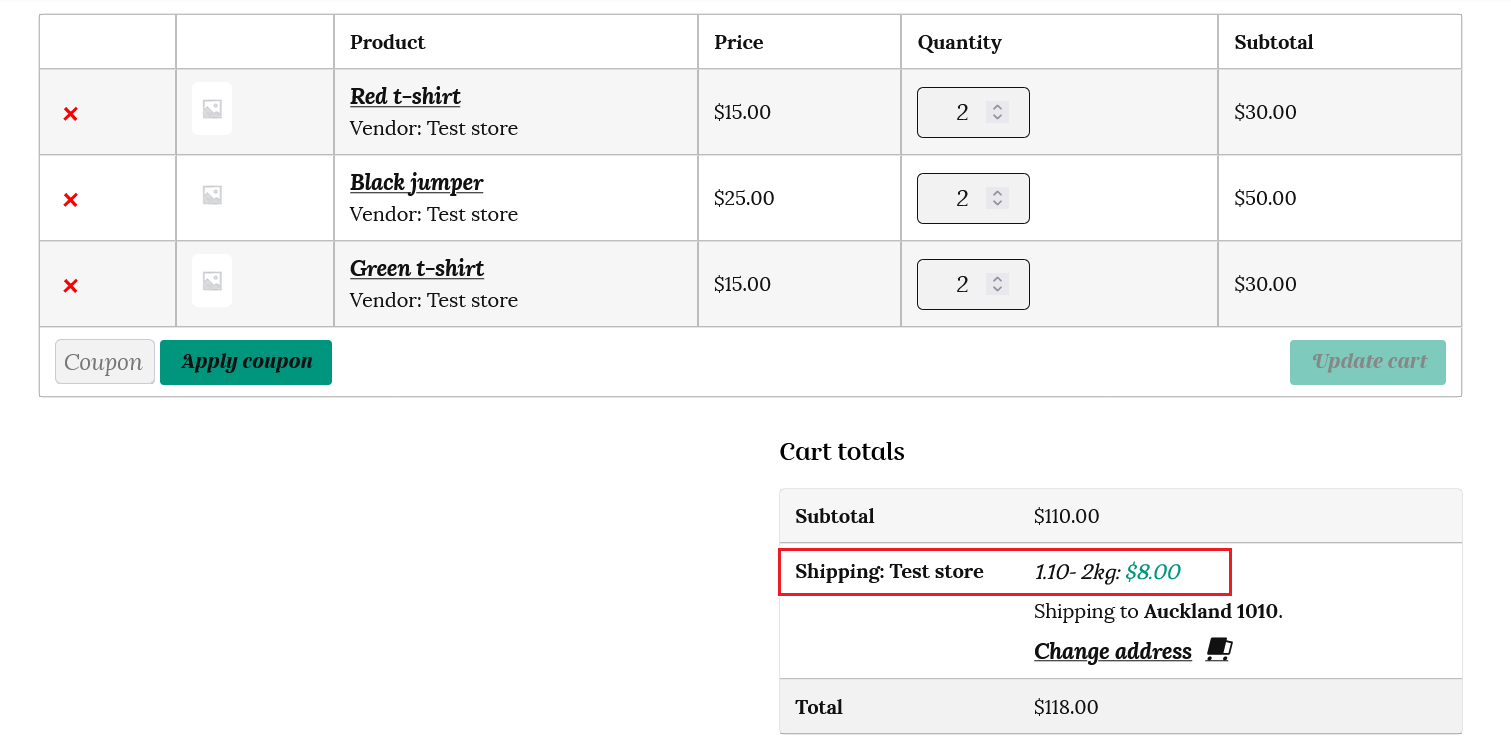
Sam sets his t-shirts as weighing 0.2 kg (200g) each, and his jumpers 0.5 kg (500g) each. If a customer has 4 t-shirts and 2 jumpers in their cart, the total weight will be;
4 x 0.2 kg for the t-shirts (0.8 kg) plus 2 x 0.5 kg for the jumpers (1 kg)
Total weight is 1.8 kg, so this will cost $8 to ship.
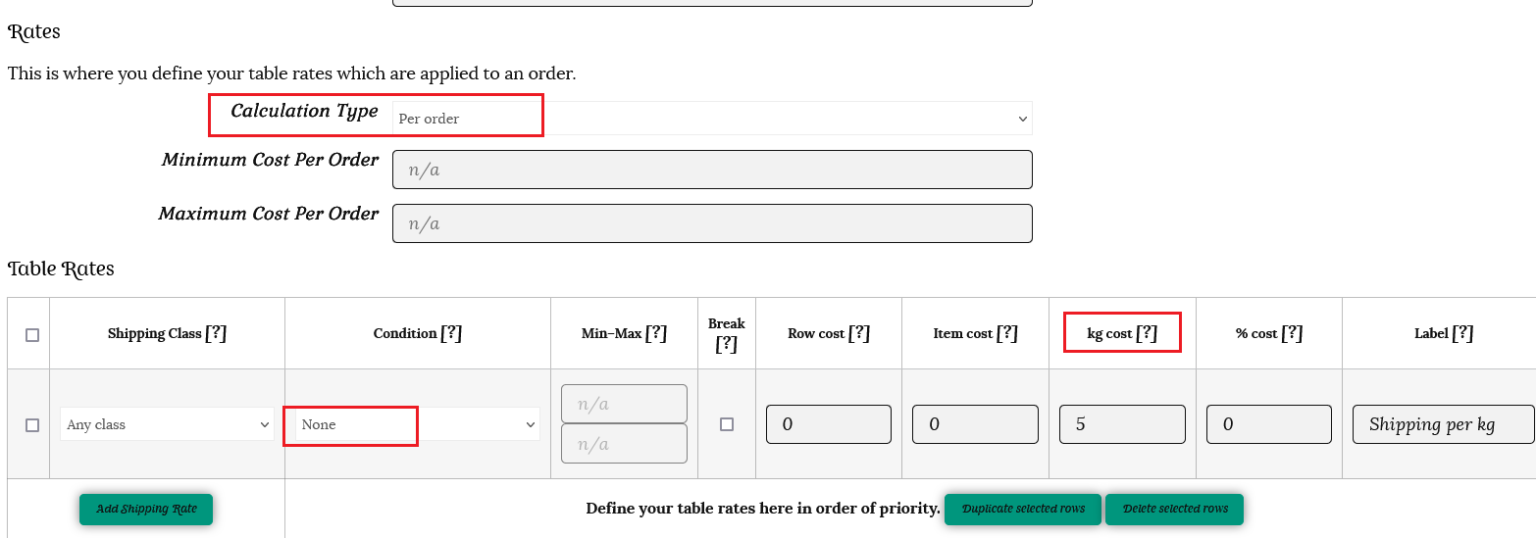
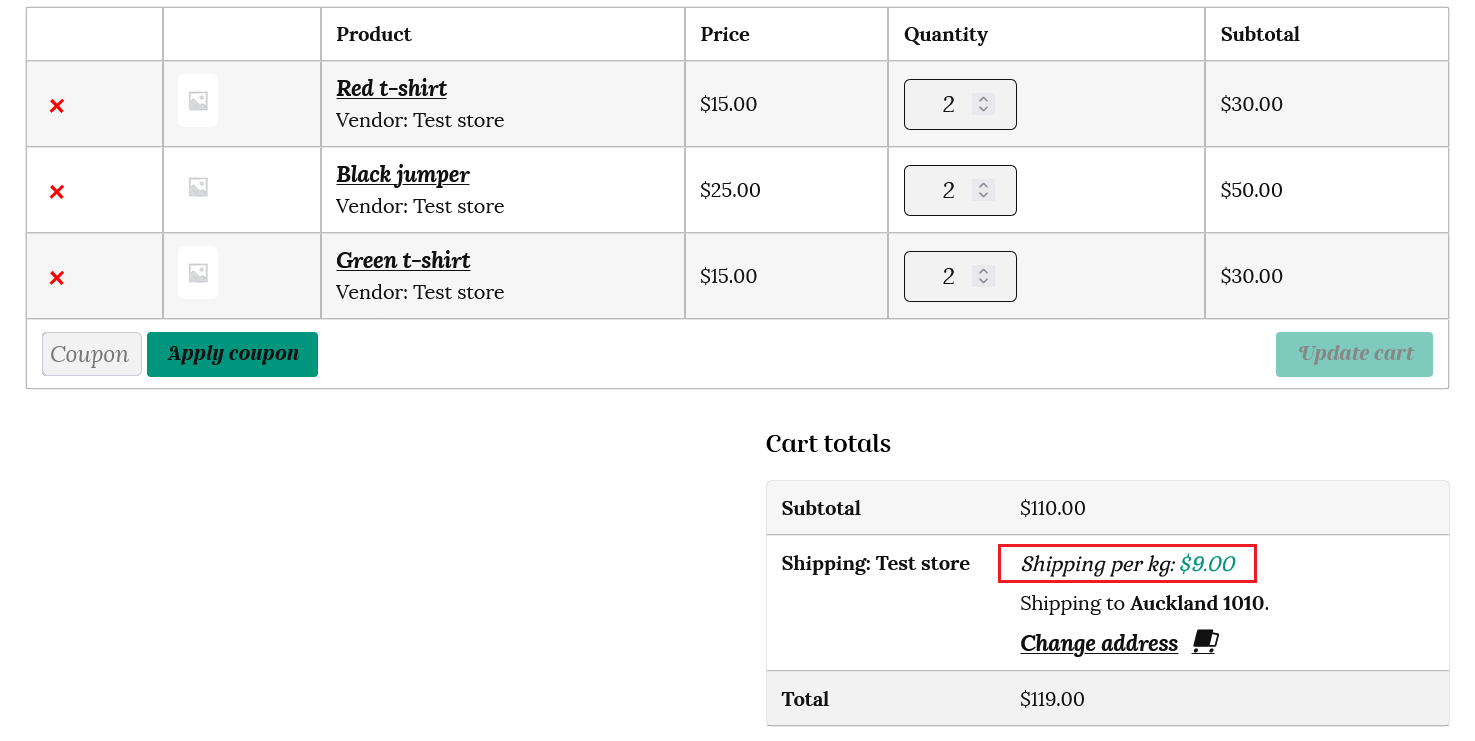
If your courier quotes you a cost per kilo, you could set your condition to None, and just use the cost per kg option.
For the same example as above, the shipping will be calculated at 1.8kg x $5 = $9 total shipping.
If you need further assistance in setting up your shipping, you are welcome to contact us here or use the “Contact Admin” tab in your vendor dashboard. We are happy to help.